啟用自我加密磁碟機時,無法連線至 Dell Security Management Server
Summary: 本文提供 Dell Data Protection 中開機前驗證環境的解決方案 |自我加密磁碟機無法連線至 Dell Security Management Server (先前稱為 Dell Data Protection |Enterprise Edition) 或 Dell Security Management Server Virtual (先前稱為 Dell Data Protection |虛擬版本)。 ...
This article applies to
This article does not apply to
This article is not tied to any specific product.
Not all product versions are identified in this article.
Symptoms
受影響的產品:
- Dell Data Protection | Enterprise Edition Shield
- Dell Security Management Server
- Dell Data Protection | Enterprise Edition
- Dell Security Management Server Virtual
- Dell Data Protection | Virtual Edition
- 戴爾數據保護 |自我加密磁碟機
受影響的版本:
- v8.5 及更早版本
當受管理的自我加密磁碟機顯示錯誤訊息 「無法連線至伺服器:檢查連接。
Cause
開機前驗證環境 Dell Data Protection |自我加密磁碟機管理員 v8.5 及更早版本不支援 TLS 加密通訊協定。在較新的伺服器版本中,預設情況下會停用這些通訊協定。嘗試在開機前認證環境中向伺服器進行驗證時,這會導致錯誤。
Resolution
- 按一下齒輪圖示,開啟畫面左下角的 選項功能表 ,然後按一下錯誤診斷。
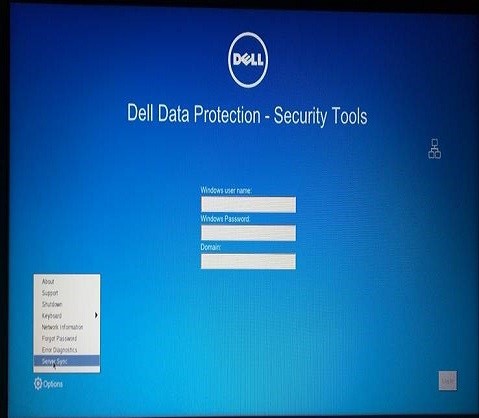
圖 1:(僅英文)按一下錯誤診斷
- 錯誤診斷畫面會顯示端點嘗試與之通訊的伺服器。
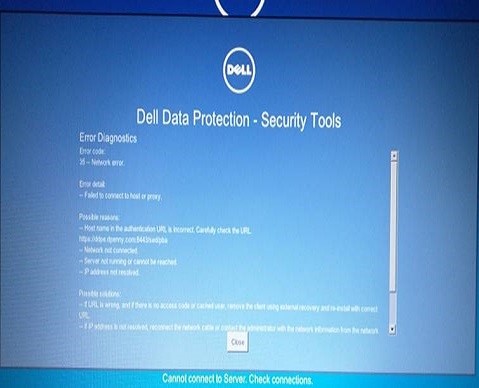
圖 2:(僅英文)錯誤診斷畫面
- 檢查伺服器版本。如果伺服器是更新版 Dell Security Management Server v8.5.1 或更新版本,或是升級版 Dell Security Management Server Virtual,v9.0 或更新版本,則需要修改 Security Server 服務的 spring-jetty.xml 檔案。根據伺服器類型而定,spring-jetty.xml配置檔預設位置為以下兩個位置之一。
- Dell Security Management Server -
C:\Program Files\Dell\Enterprise Edition\Security Server\conf - Dell Security Management Server Virtual -
/opt/dell/server/security-server/conf
- Dell Security Management Server -
注意:如需如何尋找伺服器版本的更多資訊,請參閱 如何識別 Dell Data Security/Dell Data Protection 伺服器版本。
- 打開相應的spring-jetty.xml配置。
- 前往資料夾 C:\Program Files\Dell\Enterprise Edition\Security Server\conf,然後開啟spring-jetty.xml檔案。
- 尋找
<property name="excludeProtocols" value="SSL, SSLv2, SSLv3" />行。

圖 3:(僅英文)Spring-jetty.xml
- 新增
<!--到開頭和-->到行尾。新行應顯示為下圖中突出顯示的行。

圖 4:(僅英文)新增 <!-- 和 --> 到行結尾
- 重新啟動 安全性伺服器服務。
- 從主功能表中,選取 啟動 Shell。

圖 5:(僅限英文版) 啟動 Shell
- 輸入
su <support user>命令,然後在出現提示時提供支援使用者帳戶的密碼。Dell Data Protection |Virtual Edition Server v9.2 及更早版本,<支援使用者>ddpsupport。若為 Dell Security Management Server Virtual v9.3 及更新版本,<支援使用者>dellsupport。

圖 6:(僅英文)切換使用者
- 將目錄變更為 spring-jetty.xml 組態檔案的位置,並使用
cd /opt/dell/server/security-server/conf/命令。

圖 7:(僅英文)變更目錄
- 使用 在 vi 編輯器中開啟spring-jetty.xml設定檔
sudo vi spring-jetty.xml命令。

圖 8:(僅英文)在 vi 編輯器中開啟spring-jetty.xml
- 尋找
<property name="excludeProtocols" value="SSL, SSLv2, SSLv3" />行,然後使用方向鍵將游標移動到該行的第一個字元 <下。按下鍵盤上的i鍵插入文字並新增<!--到行的開頭。

圖 10:(僅英文)新增 --> 到行結尾
- 儲存變更,然後輸入
:wq然後按下 Enter 鍵。

圖 11:(僅英文)儲存並退出 vi
- 類型
exit,然後按 Enter 鍵退出 <支援使用者> 上下文。類型exit,然後按 Enter 鍵返回主功能表。 - 從 「基本組態... 」功能表停止並啟動應用程式,以使變更生效。
- 在受影響的用戶端上按一下 伺服器同步 。如果用戶端可以與伺服器通信,則螢幕右上角會出現一個額外的符號。

圖 12:(僅英文)按一下伺服器同步
如要聯絡支援部門,請參閱 Dell Data Security 國際支援電話號碼。
請前往 TechDirect,以線上產生技術支援要求。
如需更多深入見解與資源,請加入 Dell 安全性社群論壇。
Affected Products
Dell EncryptionArticle Properties
Article Number: 000129515
Article Type: Solution
Last Modified: 21 Mar 2024
Version: 12
Find answers to your questions from other Dell users
Support Services
Check if your device is covered by Support Services.