How to Clear NVRAM, Network, Settings 1xxx Dell Laser Printers
Summary:If your 1000 series printer must be set back to factory default, you can follow the steps found in this article.
Please select a product to check article relevancy
This article applies to This article does not apply toThis article is not tied to any specific product.Not all product versions are identified in this article.
This article provides information about resetting the printer memory on 1000 series models of Dell Laser Printers.
1100 and 1110
No options available
1125
Reset NVRAM
Use the Right/Left arrows to navigate, use the checkmark to select your option.
Press the Right/Left arrow until you see "Setup" and press the checkmark.
Press the Right/Left arrow until you see "Clear Settings" and press the checkmark.
Press the checkmark on "All Settings."
1130 / 1130N
Reset NVRAM/Network
Open a web browser and enter your machine’s IP address.
When the EWS window opens, click "Network Settings."
Click "Reset."
Click "Clear" for the network.
Turn off and restart machine to apply settings.
1133 / 1135n
Reset NVRAM
First, enter Tech Mode:
1133
While in "Ready," press Menu, ID Copy, Left, Right, Menu, Back
1135
While in "Ready," press Menu, #, 1, 9, 3, 4, Menu
From there, press Left/Right to "Data Setup."
Press Left/Right to "Clear All Mem."
Press OK.
1230c
No options available
1235cn
Reset NVRAM/Network / Other Settings
Press Menu until "System Setup" appears on the bottom line of the display and press OK.
Press the Left/Right arrow until "Clear Settings" appears and press OK.
Press the Left/Right arrow until the item you want to clear appears.
"All Settings" - Clears all the data stored in memory and resets all your settings to the factory default.
"Fax Setup" - Restores all the fax options to the factory default.
"Copy Setup" - Restores all the copy options to the factory default.
"Scan Setup" - Restores all the scan options to the factory default.
"System Setup" - Restores all the system options to the factory default.
"Network Setup" - Restores all the network options to the factory default.
"Address Book" - Clears all the fax number and email address entries stored in memory.
"Sent Report" - Clears all records of sent faxes and emails.
"Fax RCV Report" - Clears all records of received faxes.
Press OK when "Yes" appears.
Press OK again to confirm clearing.
Repeat steps 3 through 5 to clear another item.
Press Stop/Clear down arrow to return to "Ready" mode.
1250c
Reset NVRAM
Warning: Never attempt to turn off the printer. The printer ceases to function. The printer restarts automatically to apply the settings and prints the printer settings and device settings pages.
Turn off the printer.
Open the rear cover.
While holding down the Start (w) and the Cancel (X) buttons simultaneously, turn on the printer.
After the Orange LED on the Ready/Data indicators goes out, release the Start (w) and Cancel (X) buttons.
Close the rear cover to initialize the nonvolatile memory (NVM).
Check if the factory settings are restored by referring to the "Printer Settings" and "Device Settings" pages.
1320c
Reset NVRAM
Turn off the printer
Open the toner door on the printer
While holding down both the Continue (w) and Cancel buttons turn the printer back on (lights cycle a few times).
Release the Continue button and Cancel buttons
Close the toner access cover.
1350cnw/1355cnw
Reset NVRAM/Network/Other Settings.
System Settings
Press the Menu button.
Press Down to "System" and press checkmark.
Press Down to "Admin Menu" and press checkmark.
Press Down to "Maintenance" and press checkmark.
Press Down to "Initialize NVM" and press checkmark.
Press Down until the wanted setting is highlighted, and press checkmark.
"Reset Defaults and Restart Printer" - initializes the system parameters.
"Reset Defaults of User (Fax) Section" - initializes the fax number entries in the Address Book.
"Reset Defaults of User (Scan) Section" - initializes the email and server address entries in the Address Book.
Press Down to "Yes" and press checkmark.
The printer restarts automatically to apply the settings.
Wired Network Settings
Press the Menu button.
Press Down to "System" and press checkmark.
Press Down to "Admin Menu" and press checkmark.
Press Down to "Network" and press checkmark.
Press Down to "Initialize NVM" and press checkmark.
Press Down to "Yes" and press checkmark.
The printer restarts automatically to apply the settings.
Wireless Network Settings
Press the Menu button.
Press Down to "System" and press checkmark.
Press Down to "System" and press checkmark.
Press Down to "Admin Menu" and press checkmark.
Press Down to "Network" and press checkmark.
Press Down to "Reset Wireless" and press checkmark.
Press Down to "Yes" and press checkmark.
The printer restarts automatically to apply the settings.
1600n
Reset NVRAM/Network/Other Settings.
System Settings
Press the Menu button until "Maintenance" appears.
Press Right to "Clear Settings" and press Select.
Press Right to "All Settings" and press Select.
Press the Return button.
Network Settings
Press the Menu button until "Network Setup" appears.
Press Right to "Reset NIC" or "Clear Settings" and press Select.
Press Right to "Yes" and press Select.
Press the Return button.
1700 / 1700n / 1710 / 1710n / 1720 / 1720dn
Reset NVRAM
Turn off the printer.
Open the access cover to the printer.
While holding down both the Continue (arrow) and Cancel buttons, turn the printer back on.
NOTE: The lights cycle a few times.
After the error light turns on solid and stays on, release the Continue (w) and Cancel (X) buttons.
Close the access cover.
1815dn
Reset NVRAM/Network
System Settings
Press Left/Right to "Menu" and press checkmark.
Press Left/Right to "Maintenance" and press checkmark.
Press Left/Right to "Clear Settings" and press checkmark.
Press Left/Right to the option that you want to clear and press checkmark.
Press Cancel (X) to go back to the main menu.
Network Settings
Press Left/Right to "Menu" and press checkmark.
Press Left/Right to "Network CFG" and press checkmark.
Press Left/Right to "Clear Settings" and press checkmark.
Press Cancel (X) to go back to the main menu.
B1160W
No options available
B1163
No options available
B1165nfw
Reset NVRAM/Network
System Settings
Press Menu
Press Left/Right to "System Setup" and press OK.
Press Left/Right to "Clear Setting" and press OK.
Press Left/Right to the desire option and press OK:
"All Settings" - Clears all the data stored in memory and resets all your settings to the factory default.
"System Setup" - Restores all the system options to the factory default.
"Network Setup" - Restores all the network options to the factory default. (Reboot required.)
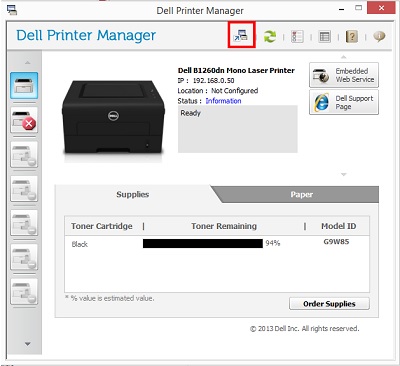
After installing, open the Dell Printer Manager and click the Advanced Options button at the top of the screen.
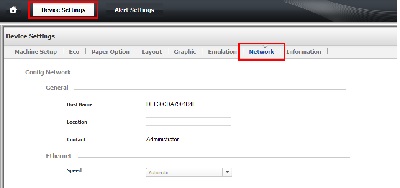
In the Advanced Mode, select the printer in the left column and then choose Device Settings. From here, you want to choose the Network tab:
At the bottom of this area, there is a Restore Default option for the network settings. This should also reset the EWS password:
After clearing these settings, you must manually reboot the printer for the reset to take effect.
B1265dnf
Reset NVRAM/Network
System Settings
Press Menu
Press Left/Right to "System Setup" and press OK.
Press Left/Right to "Clear Setting" and press OK.
Press Left/Right to the desire option and press OK:
Clear NVRAM from Tech Mode
To enter Tech Mode, from "Ready," press Menu, #, 1, 9, 3, 4, Menu in sequence.
Press Left/Right to "Data Setup" and press OK.
Press Left/Right to "Clear All Mem." And press OK.
OR
To enter Tech Mode, press Menu, #, 1, 9, 3, 4, Menu in sequence.
Press Left/Right to "EDC Mode" and press OK.
Press Left/Right to "NVM Initialize" and press OK.
C1660w/C1760nw
Reset NVRAM/Network
System Settings
Press the Menu button.
Press Down to "Admin Menu" and press the checkmark.
Press Down to "Maintenance" and press the checkmark.
Press Down to "Reset Defaults" and press the checkmark.
Press the checkmark when "Are you sure?" Appears.
The printer restarts automatically to apply the settings.
Wired Network Settings
Press the Menu button.
Press Down to "Admin Menu" and press the checkmark.
Press Down to "Network" and press the checkmark.
Press Down to "Reset LAN" and press the checkmark.
Press the checkmark when "Are you sure?" Appears.
The printer restarts automatically to apply the settings.
Clear NVRAM from Tech Mode
Turn off the printer.
Power on the printer while holding Right, Left, and Menu.
Release these keys when "CE Mode" and "Password" is displayed.
Press Up key twice and press Select the checkmark.
"CE Mode" and "ESS Diag" are displayed. (Now in the CE Diag mode.)
Press Down to "Installation," and press Select the checkmark.
Press Down to "NVM Init," and press Select the checkmark.
Press Select the checkmark twice to run the setting.
Power cycle the printer to return to "Ready" mode.
C1765nf/C1765nfw
Reset NVRAM/Network/Other Settings.
System Settings
Press the Menu button.
Press Down to "System" and press Select the checkmark.
Press Down to "Admin Menu" and press Select the checkmark.
Press Down to "Maintenance" and press Select the checkmark.
Press Down to "Initialize NVM" and press Select the checkmark.
Press Down until the wanted setting is highlighted, and press Select the checkmark.
"Reset Defaults and Restart Printer" - initializes the system parameters.
"Reset Defaults of User (Fax) Section" - initializes the fax number entries in the Address Book.
"Reset Defaults of User (Scan) Section" - initializes the email and server address entries in the Address Book.
Press Down to "Yes" and press Select the checkmark.
The printer restarts automatically to apply the settings.
Wired Network Settings
Press the Menu button.
Press Down to "System" and press Select the checkmark.
Press Down to "Admin Menu" and press Select the checkmark.
Press Down to "Network" and press Select the checkmark.
Press Down to "Initialize NVM" and press Select the checkmark.
Press Down to "Yes" and press Select the checkmark.
The printer restarts automatically to apply the settings.
Wireless Network Settings
Press the Menu button.
Press Down to "System" and press Select the checkmark.
Press Down to "Admin Menu" and press Select the checkmark.
Press Down to "Network" and press Select the checkmark.
Press Down to "Reset Wireless" and press Select the checkmark.
Press Down to "Yes" and press Select the checkmark.
The printer restarts automatically to apply the settings.
Clear NVRAM from Tech Mode
Turn off the printer.
Turn on the power while holding down Left, Right, and Menu.
Release these keys when "CE Mode" and "Password" is displayed.
Press Up twice and press Select the checkmark.
"CE Mode," "Printer" and "FAX/Scanner" are displayed. (Entered the CE Diag. Mode.)
Press Select the checkmark on "Printer."
Press Down to "IOT Diag" and press the checkmark.
Press Down to "Installation Set" and press the checkmark.
Press Down to "Clear All NVM."
Press Select the checkmark twice to run the test.
Power cycle the printer to return to the regular operating mode.
P1500
Reset NVRAM
System Settings
NOTE: Menus are represented by Ready/Data, Toner Low, Load Paper, and Paper Jam light sequences. Menu items and their settings are indicated by Error and Press Continue light sequences.
Turn the printer off.
Open the upper front door.
Press and hold Continue (right arrow) and Cancel (X) as you turn the printer on. All the lights cycle.
More information can be found in the User Guide for your model printer, or go to our Printer Support site for additional information, troubleshooting articles and videos.
Note: It is recommended that only Dell-Branded toner, drums, transfer rollers, or other consumables are used in our laser printers. Dell cannot guarantee the compatibility or the print quality of any third-party consumables.