PowerEdge: 14 Generation running Windows Server encounter a blue screen when installing Chipset Drivers with X2APIC enabled in the system BIOS
Summary: DELL guidance for resolving an issue with Dell 14th Generation PowerEdge servers with PCIe adapters may encounter a blue screen when installing a standalone chipset driver or when performing Lifecycle Controller based OS deployment with X2APIC enabled in the system BIOS. This step-by-step guide provides instructions to successfully update the chipset driver to resolve this issue. ...
This article applies to
This article does not apply to
This article is not tied to any specific product.
Not all product versions are identified in this article.
Symptoms
Affected products:
Dell 14th Generation PowerEdge servers with PCIe adapters (such as NVIDIA GPU) and Windows server 2012R2, 2016 and 2019 operations systems with X2APIC enabled in the system BIOS
Summary:
Dell 14th Generation PowerEdge servers with PCIe add-in cards (such as NVIDIA GPU) may encounter a blue screen when installing a standalone chipset driver or when performing Lifecycle Controller based OS deployment with X2APIC enabled in the system BIOS.
Details:
Dell 14th Generation PowerEdge servers with PCIe add-in cards (such as NVIDIA GPU) may encounter a blue screen when installing a standalone chipset driver or when performing Lifecycle Controller based OS deployment with X2APIC enabled in the system BIOS. The following blue screen types are encountered:
- Windows Server 2012 R2 - IRQL
- Windows Server 2016 - WHEA
- Windows Server 2019 - IRQL
NOTE: Both Intel and AMD processor types are impacted.
Cause
No cause
Resolution
To recover and successfully update the Chipset Driver perform one of the following options:
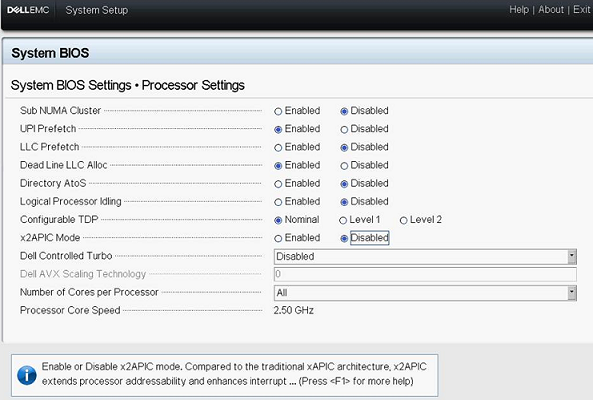
- Option 1: Temporarily disable X2APIC, install the chipset driver and then re-enable X2APIC
- Disable X2APIC in the System BIOS as shown below.
- Update the PCIe card drivers to the latest Dell/Vendor versions.
- Update the Chipset drivers from the Dell support site.
- Enable X2APIC.
- Disable X2APIC in the System BIOS as shown below.
- Option 2: Extract the chipset drivers and install through the Command Prompt
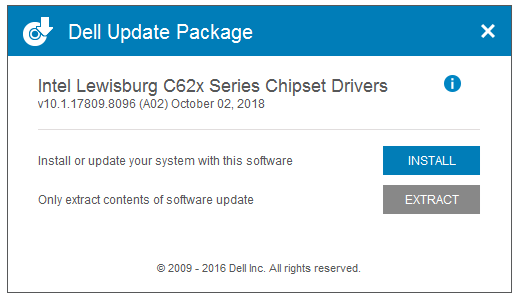
- Right-click the chipset driver installer and select Run As Administrator. Select Extract in the UI as shown below. Create a temp folder named chipset in the desktop to extract the drivers. For Example: "C:\Users\User_Name\Desktop\Driver\"
- Once extraction successfully completes, the Dell Update Package indicates that success and the extracted directory should contain the following contents:
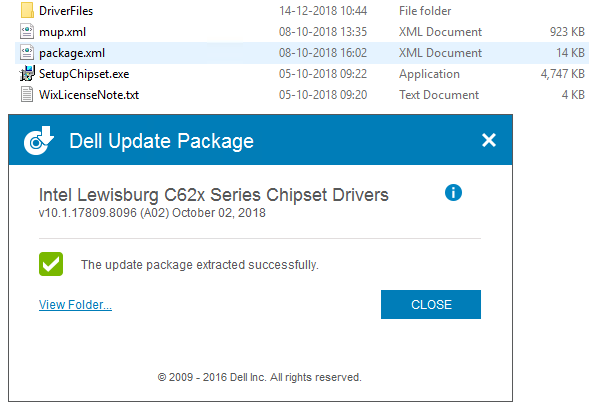
 Note: Windows Server 2019 Chipset drivers are located in "…\DriverFiles\production\Windows10-x64."
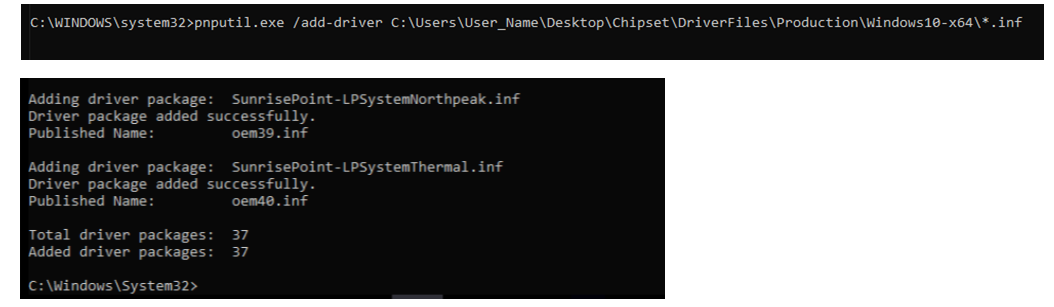
 - Open a Command Prompt window (Run as administrator) and run PnPUtil command
- For Servers running Windows Server 2019: pnputil.exe /Add-Driver C:\Users\User_Name\Desktop\Chipset\DriverFiles\production\Windows10-x64
- For Windows Server 2016 Chipset drivers will be located in "
…\DriverFiles\production\W2K16-x64" and the command is:
- For WS2012R2 Chipset drivers will be located in "
…\DriverFiles\production\W2K12R2-x64" and the command is:
NOTE: It takes a few minutes to load the chipset drivers and receive a success message.- Once the chipset drivers are loaded successfully, restart the host machine and boot into the Operating System. Windows Plug and Play Manager will install all the chipset drivers and clear any yellow bangs from Device Manager after login.
- For Servers running Windows Server 2019: pnputil.exe /Add-Driver C:\Users\User_Name\Desktop\Chipset\DriverFiles\production\Windows10-x64
- Right-click the chipset driver installer and select Run As Administrator. Select Extract in the UI as shown below. Create a temp folder named chipset in the desktop to extract the drivers. For Example: "C:\Users\User_Name\Desktop\Driver\"
Affected Products
Microsoft Windows Server 2019, PowerEdge XR2, Poweredge C4140, PowerEdge C6420, PowerEdge FC640, PowerEdge M640, PowerEdge M640 (for PE VRTX), PowerEdge MX740C, PowerEdge MX840C, PowerEdge R240, PowerEdge R340, PowerEdge R440, PowerEdge R540
, PowerEdge R640, PowerEdge R6415, PowerEdge R6515, PowerEdge R6525, PowerEdge R740, PowerEdge R740XD, PowerEdge R740XD2, PowerEdge R7415, PowerEdge R7425, PowerEdge R7515, PowerEdge R840, PowerEdge R940, PowerEdge R940xa, PowerEdge T140, PowerEdge T340, PowerEdge T440, PowerEdge T640
...
Article Properties
Article Number: 000146200
Article Type: Solution
Last Modified: 16 Apr 2025
Version: 7
Find answers to your questions from other Dell users
Support Services
Check if your device is covered by Support Services.