How to Create Phoenix ISO Image with Hypervisor for Dell Nutanix
Summary: Learn to create a Phoenix ISO image for reinstalling Hypervisor and restoring Controller VM (CVM) on Dell Nutanix systems. Step-by-step instructions are included.
This article applies to
This article does not apply to
This article is not tied to any specific product.
Not all product versions are identified in this article.
Instructions
Article Summary
This article explains how to create a Phoenix ISO-required image when you reinstall Hypervisor and restore Controller VM (CVM).Table of Contents
Download Hypervisor Installer File
Get the Installer File for the same version of Hypervisor as the target node.Acropolis Hypervisor (AHV)
Download the AHV Installer ISO (Filename: AHV-DVD-xxx.iso) or AHV 1-Click Installer (Filename:host-bundle-xxx.tar.gz) of the target version from the Nutanix Support page
Note: A Nutanix Support Portal Account is required to access the page and download the file.
Note: If you could not find the file of the target version or log in to the site, contact Dell Technical Support.
ESXi
Download the Dell Customized ESXi Installer ISO by following article VMware vSphere: How to Download and Use Dell Customized VMware ESXi Images for PowerEdge Servers
Note: If you could not find the ISO of the target version, contact Dell Technical Support.
Create Phoenix ISO Image File
Create the Phoenix ISO image file by following the below steps.- SSH into a CVM in the cluster as a Nutanix user
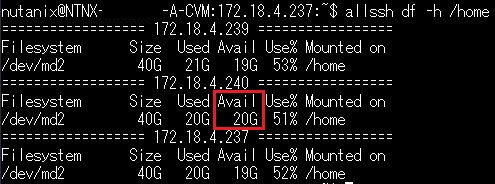
- Run the below command and verify which CVM has the most available space:
$ allssh df -h /home
Example:
- SSH into the CVM that is verified in step 2 as a Nutanix user.
- Run the below command to confirm the foundation version:
$ cat ~/foundation/foundation_version
- Run the below command to create a directory for the ISOs:
$ mkdir /home/nutanix/foundation/tmp
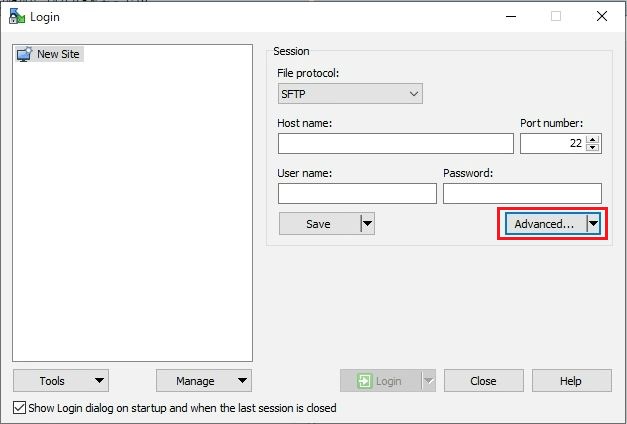
- Using WinSCP, copy the Hypervisor Installer that was downloaded in Download Hypervisor Installer File to the directory that was created in step 5.
Note: Before connecting with WinSCP, clear the Optimized Connection buffer size setting in the Connection section of the Advanced Settings.

It can take from a few minutes up to 10 minutes to complete. When it is completed, the output is as follows.

- Run the following command to change the current directory:
$ cd /home/nutanix/foundation/bin
- Run the following command to create the Phoenix ISO image file including Hypervisor:
AHV
$ ./generate_iso phoenix --kvm=/home/nutanix/foundation/tmp/<Hypervisor Installer Filename that was copied in Step 5>
Example:
$ ./generate_iso phoenix --kvm=/home/nutanix/foundation/tmp/AHV-DVD-x86_64-el7.nutanix.20201105.2286.iso
ESXi:
$ ./generate_iso phoenix --esx=/home/nutanix/foundation/tmp/<Hypervisor Installer Filename that was copied in Step 5>
Example:
$ ./generate_iso phoenix --esx=/home/nutanix/foundation/tmp/VMware-VMvisor-Installer-7.0.0.update01-17325551.x86_64-DellEMC_Customized-A01.iso
It can take from a few minutes up to 10 minutes to complete. When it is completed, the output is as follows.
- Confirm the ISO image file (Filename:phoenix-x.x.x-xxx-x86_64.iso) is created in the directory:
/home/nutanix/foundation/tmp.
- Run the command to confirm the md5 checksum of the Phoenix ISO image file.
$ md5sum /home/nutanix/foundation/tmp/<Phoenix ISO Filename that was confirmed in Step 9>
- Download the created ISO with WinSCP to any machine.
Note: As with step 6, clear the Optimized Connection Buffer size setting in the Connection section of the Advanced Settings before connecting with WinSCP.
- Confirm the md5 checksum of the ISO that was downloaded in step 11 and if it matches the value confirmed in step 10. If the value is not the same, the ISO may have been corrupted during the download. If so, download the ISO again.
- Delete the Hypervisor Installer and Phoenix ISO files in
/home/nutanix/foundation/tmpof the CVM.
Affected Products
Dell XC720XD Hyper-converged Appliance, Dell XC430 Hyper-converged Appliance, Dell XC430 Xpress Hyper-converged Appliance, Dell XC630 Hyper-converged Appliance, Dell XC6320 Hyper-converged Appliance, Dell EMC XC Series XC640 Appliance
, Dell EMC XC Series XC6420 Appliance, Dell XC730 Hyper-converged Appliance, Dell XC730XD Hyper-converged Appliance, Dell EMC XC Series XC740xd Appliance, Dell EMC XC Series XC940 Appliance
...
Article Properties
Article Number: 000179791
Article Type: How To
Last Modified: 29 Jul 2025
Version: 9
Find answers to your questions from other Dell users
Support Services
Check if your device is covered by Support Services.