Netskopeのアンインストール パスワードを設定する方法
Summary: アンインストール パスワードは、Windowsオペレーティング システムでNetskopeクライアントが不正に削除されるのを防ぐのに役立ちます。
This article applies to
This article does not apply to
This article is not tied to any specific product.
Not all product versions are identified in this article.
Instructions
対象製品:
- Netskopeクライアント
影響を受けるプラットフォーム:
- Windows 10.0(32ビットおよび64ビット)
- Windows 8
- Windows 8.1
- Windows Server 2019
- Windows Server 2016
- Windows Server 2012 R2(Windows NT 6.3)
- Windows Server 2008 R2(Windows NT 6.1)
- Webブラウザーで、Netskope Webコンソールに移動します。
- 米国データセンター:https://[TENANT].goskope.com/
- 欧州連合データセンター:https://[TENANT].eu.goskope.com/
- フランクフルト データセンター:https://[TENANT].de.goskope.com/
注:[TENANT] = お使いの環境内のテナント名
- Netskope Webコンソールにログインします。
- 「Settings(設定)」をクリックします。
![[設定]をクリックします。](https://supportkb.dell.com/img/ka06P0000009GvjQAE/ka06P0000009GvjQAE_ja_2.jpeg)
- [Security Cloud Platform]をクリックします。
![[Security Cloud Platform]をクリックします](https://supportkb.dell.com/img/ka06P0000009GvjQAE/ka06P0000009GvjQAE_ja_3.jpeg)
- [デバイス]をクリックします。
![[Devices]をクリックします](https://supportkb.dell.com/img/ka06P0000009GvjQAE/ka06P0000009GvjQAE_ja_4.jpeg)
- デバイスで[Client Configurations]をクリックします。
![[Configurations]をクリックします](https://supportkb.dell.com/img/ka06P0000009GvjQAE/ka06P0000009GvjQAE_ja_5.jpeg)
- [Client Configuration]で、[Default Tenant config]をクリックします。
![[Default Tenant config]をクリックします。](https://supportkb.dell.com/img/ka06P0000009GvjQAE/ka06P0000009GvjQAE_ja_6.jpeg) 注:追加のクライアント設定を作成した場合は、アンインストール パスワードを設定する正しい設定を選択するようにします。
注:追加のクライアント設定を作成した場合は、アンインストール パスワードを設定する正しい設定を選択するようにします。 - [Client Configuration]ウィンドウで、[Tamperproof]セクションが表示されるまで、下にスクロールします。
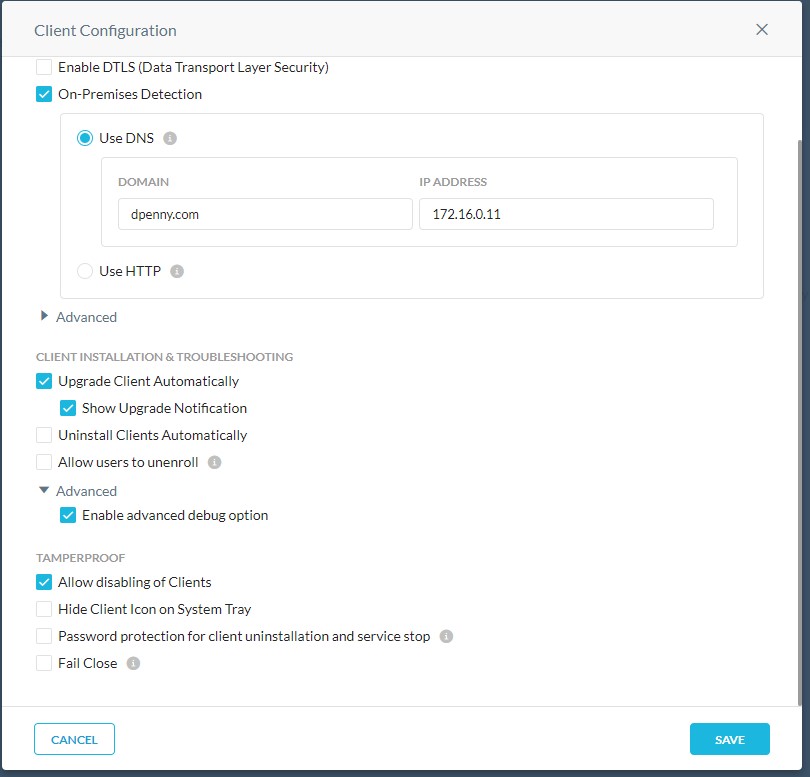
- [Tamperproof]セクションで、[Password protection for client uninstallation and service stop]のチェック ボックスをクリックします。

- [Admin Password]ボックスにパスワードを入力します。

- 「Save(保存)」をクリックします。
をクリックします。](https://supportkb.dell.com/img/ka06P0000009GvjQAE/ka06P0000009GvjQAE_ja_10.jpeg)
- これで、アンインストール パスワードが正常に設定されました。導入済みのすべてのエンドポイントは、次回のサーバーへの接続時にこのポリシーの変更を取得します。
サポートに問い合わせるには、「Dell Data Securityのインターナショナル サポート電話番号」を参照してください。
TechDirectにアクセスして、テクニカル サポート リクエストをオンラインで生成します。
さらに詳しい情報やリソースについては、「デル セキュリティ コミュニティー フォーラム」に参加してください。
Affected Products
NetskopeArticle Properties
Article Number: 000180646
Article Type: How To
Last Modified: 09 Dec 2024
Version: 8
Find answers to your questions from other Dell users
Support Services
Check if your device is covered by Support Services.