PowerFlex 3.x: How to Grow a Partition on a VM Running Logical Volume Manager
Summary: This article explains how to grow a partition on a VM running Logical Volume Manager (LVM).
This article applies to
This article does not apply to
This article is not tied to any specific product.
Not all product versions are identified in this article.
Instructions
Note: This article is limited to 3.x, Don't apply these steps on PowerFlex 4.x
Facts:
- The particular partition is over used.
- The over utilization of the partition may lead to unexpected behavior on the system.
Procedure:
Before you begin:
- Check if the operating system is using LVM:
- Run the following command to check if the operating system is using LVM:
df -h
Sample output:

Figure 1: Command to Check if Operating System is Using LVM.
Figure 1: Command to Check if Operating System is Using LVM.
- Alternately, run the following command:
cat /etc/fstab
In the output, VG is Volume Group and LV is Logical Volumes.
PowerFlex Manager uses LVM. In this article as an example, we are expanding /var/log on the PowerFlex Manager appliance.
- Check to see how many (if any) Free Physical Extents are available to extend the file system or if you must add more space first. Run the following command in the operating system CLI to check:
vgdisplay
Sample output showing 37.26 GB of space available to expand.
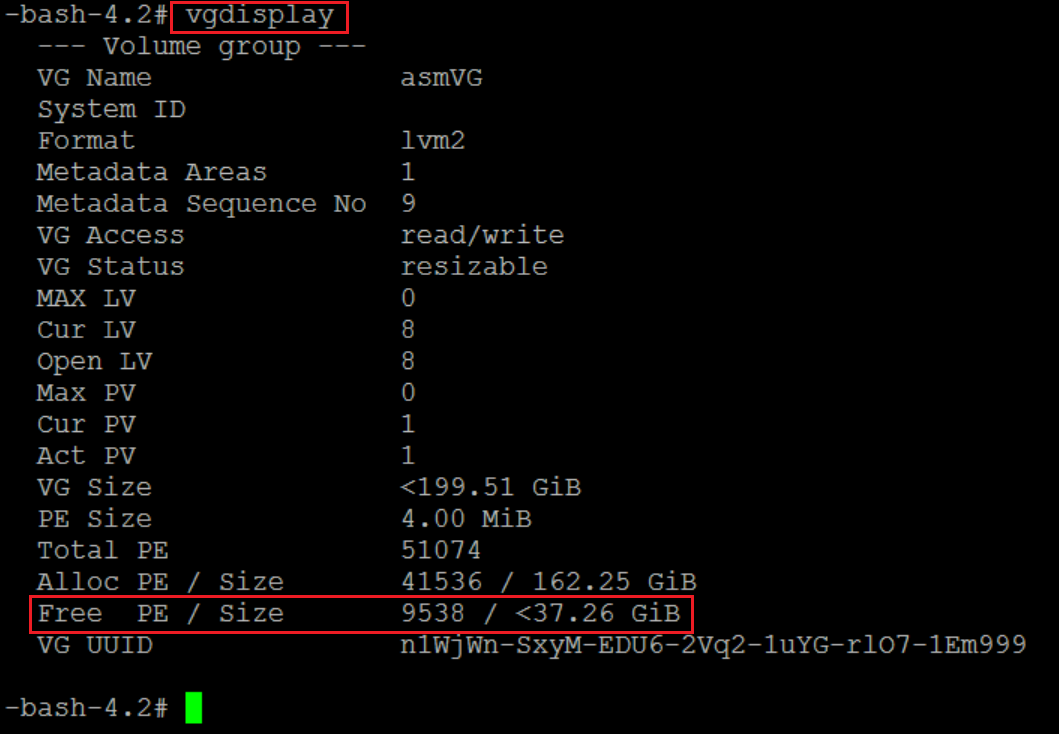
Figure 2: Command to Show Space Available to Expand Physical Extents
If there is not enough Free Physical Extents (Free PE) to expand the file system, follow Option 2 before following Option 1.
Option 1:
- Log in to the console and gather the details:
- Run the following command to find the mount point information:
df -h
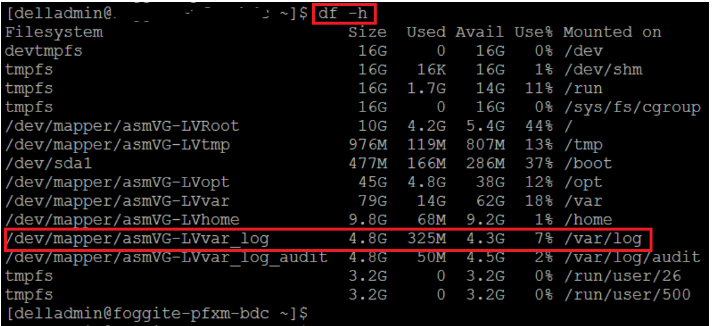
Figure 3: Df -h Command Output
- Alternatively, get the mount point information by running the following command:
cat /etc/fstab
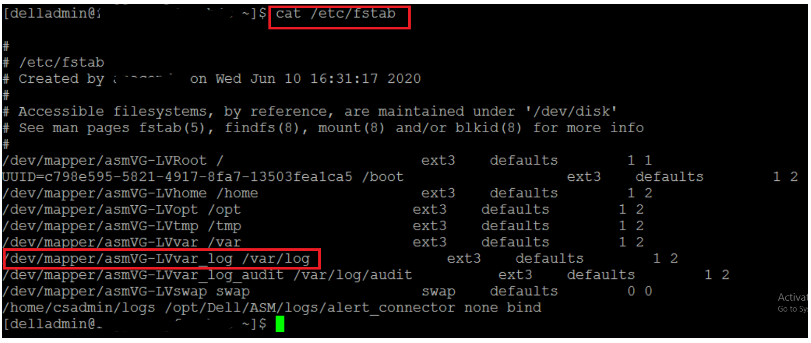
Figure 4: Cat /etc/fstab Command Output
- Run the following command to show the main volume group details including Free Physical Extents and their Size.
vgdisplay

Figure 5: Vgdisplay Command Output
- Run the following command to display all the logical volumes. Concentrate on the logical volume that you are interested in. In this example, we are interested in logical volume /dev/asmVG/LVvar_log.
lvdisplay
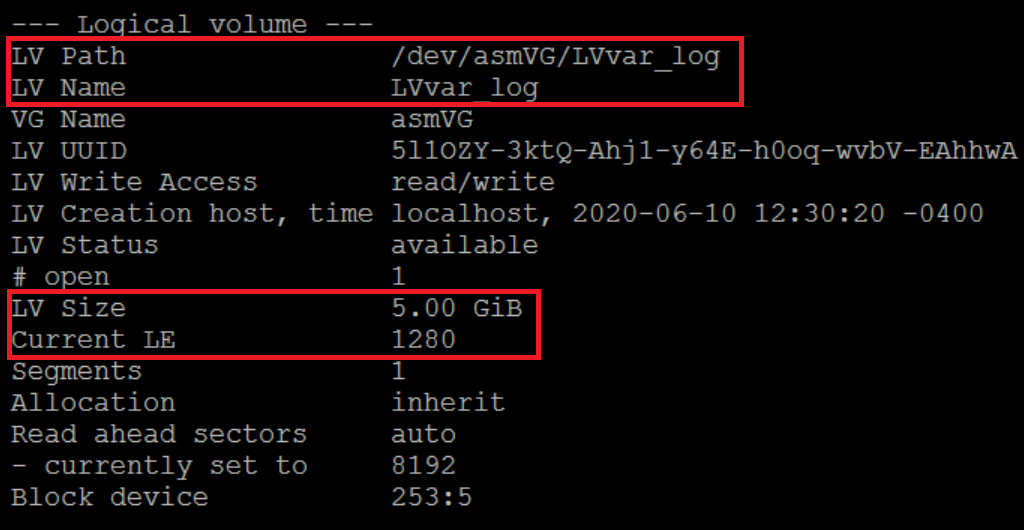
Figure 6: Lvdisplay Command Output
The selected area in the above screenshot shows the LV Path, LV Name, LV Size, and the Current Logical Extents. Also notice that 5 GB equals 1280 logical extents.
- Resize the partition /dev/asmVG/LVvar_log from 5 GB to 10 GB by running the following command:
lvm lvresize -l 2560 /dev/asmVG/LVvar_log
In the above command, the switch -l stands for Logical Extents. From the previous output above, you know that 5 GB equals 1280 logical extents. Since you are increasing the size to 10 GB, double the Current Logical Extents.
Another important consideration while selecting the Logical Extents is that it is less than the Free PE Size from the output selected in Step 1.

Figure 7: Lvm lvresize -l 2560 /dev/asmVG/LVvar_log Command Output
- The system does not see the change in the file system. Confirm this by running the following command.
df -h
- Run the following command to reflect the change in file system:
resize2fs /dev/asmVG/LVvar_log

Figure 8: resize2fs /dev/asmVG/LVvar_log Command Output
- Confirm that the system now recognizes the change in the file system by running the following command:
df-h
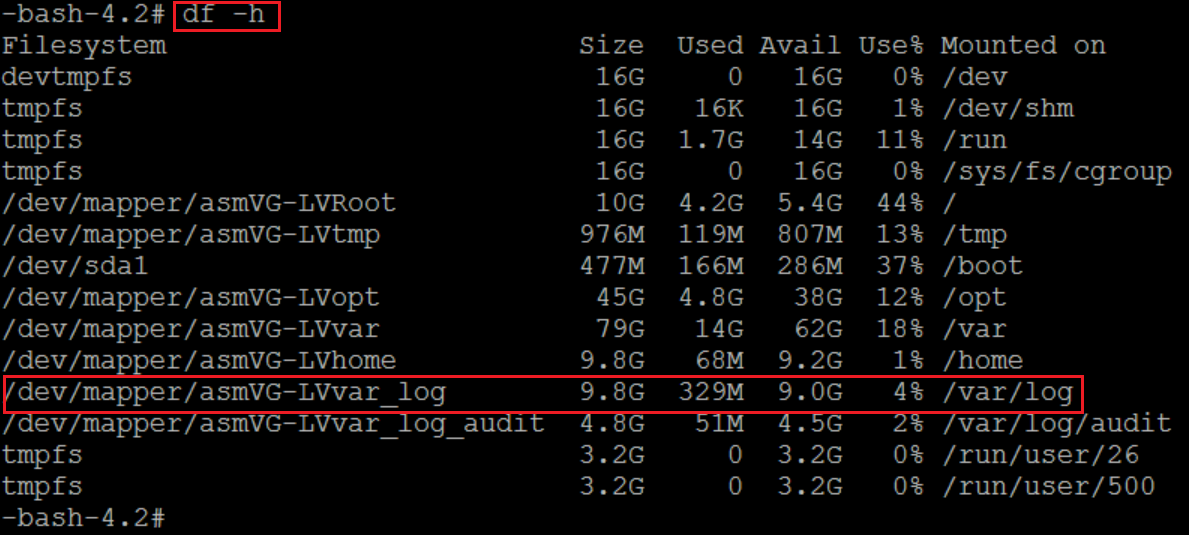
Figure 9: Rerun of df-h Command Output
- Confirm that the Free Physical Extent Size is now reduced by running the following command:
vgdisplay
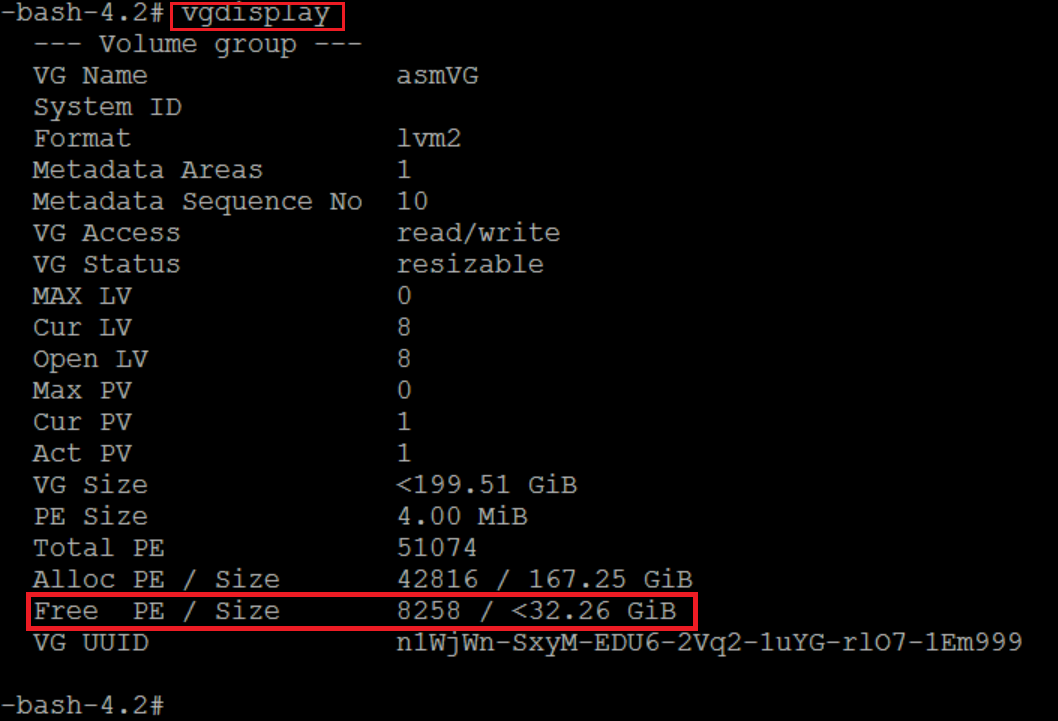
Figure 10: Rerun of vgdisplay Command Output
- Confirm that the Current Logical Extent of a particular partition is increased by running the following command:
lvdisplay
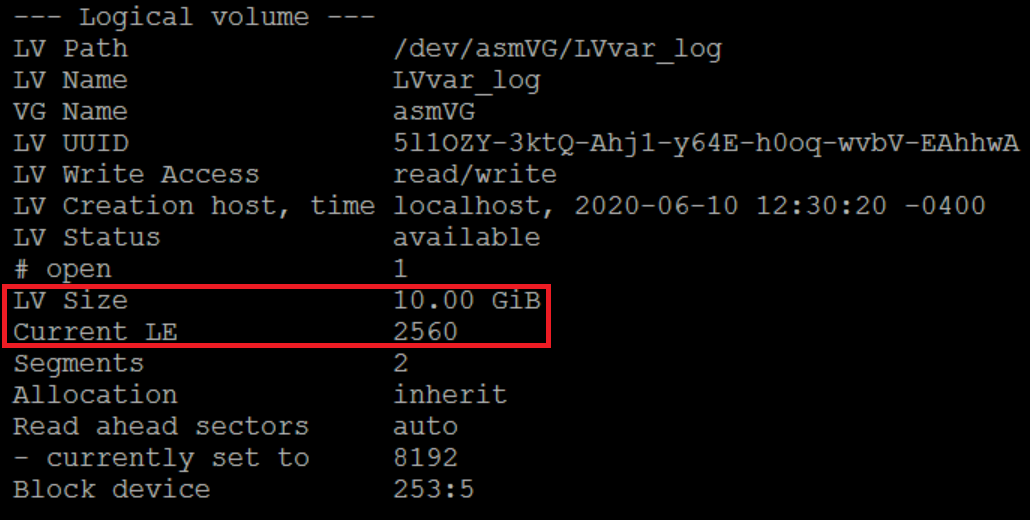
Figure 11: Rerun lvdisplay Command Output
Option 2:
This procedure is applicable only if you must extend the Logical Volume by a value that is higher than what is listed in Free PE Size.
The below steps explain how to increase the available Free PE by expanding the current virtual disk size.
- Check the size of current virtual disk by running the following command:
lsblk
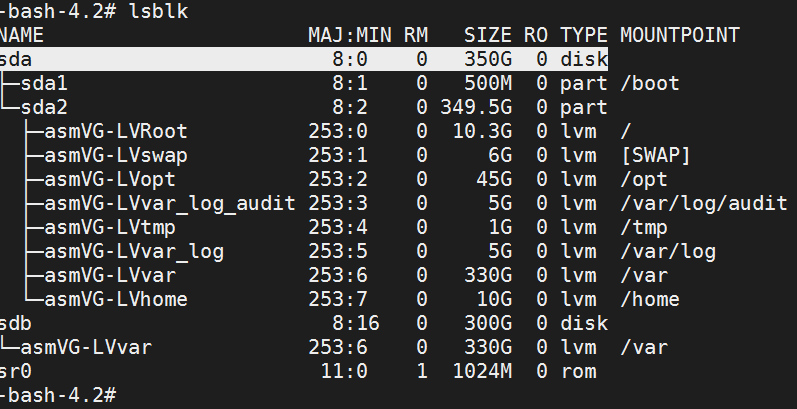
Figure 12: Lsblk Command Output
In this example, sda = 350G.
- Increase the virtual disk size by editing the virtual machine. In this example, you are increasing the virtual disk size by 50G.
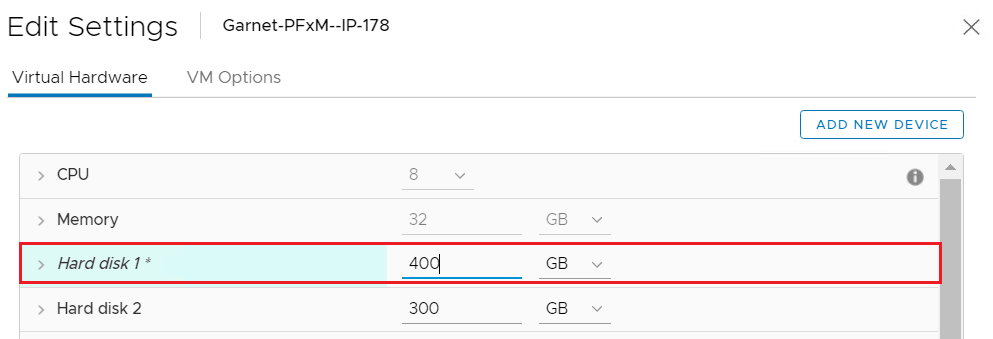
Figure 13: Editing Virtual Machine
- Perform a scan to detect the modifications made to the virtual disk by running the following command:
echo 1>/sys/class/block/sda/device/rescan
- Confirm that the changes are detected by running the following command:
lsblk
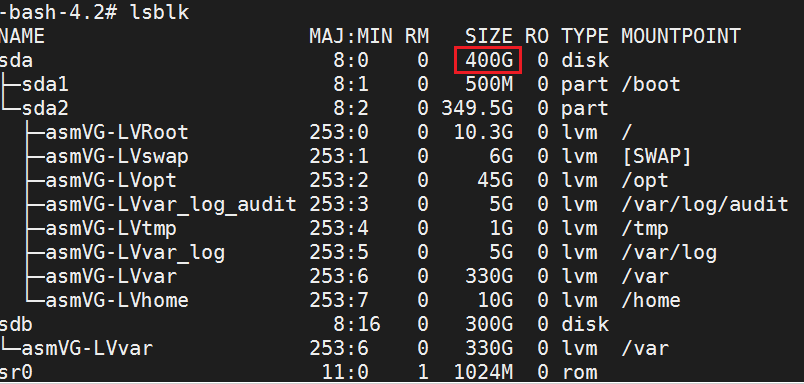
Figure 14: Confirm lsblk Command Output.
- Grow the partition that belongs to the expanded virtual disk and in which your logical volume exists by running the following command:
growpart <partition name>
Example:
growpart /dev/sda 2

Figure 15: Growpart /dev/sda 2 Command Output
- Check for Physical Volume current size by running the following command:
pvdisplay
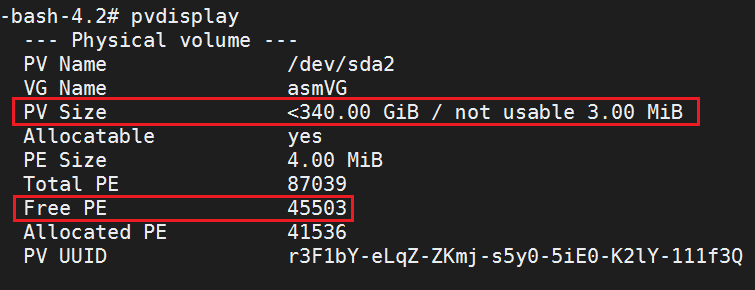
Figure 16: Pvdisplay Command Output
- Resize the Physical Volume by running the following command:
pvresize <pvname>
Example:
pvresize /dev/sda2

Figure 17: Pvresize /dev/sda2 Command Output
- Verify that the Physical Volume size is increased with the following command:
pvdisplay
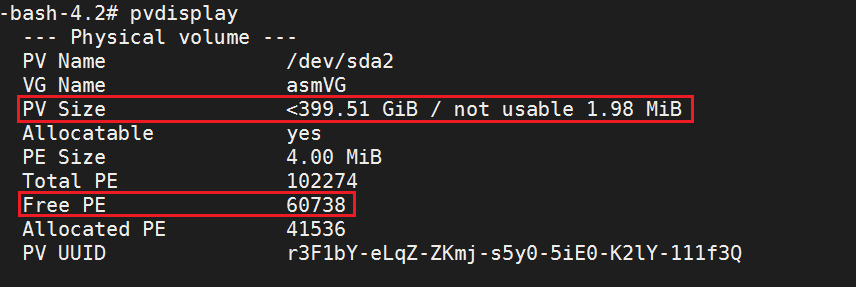
Figure 18: Rerun of pvdisplay Command Output
- Confirm that there is now enough Free PE space that is required to extend the Logical Volume by running the following command:
vgdisplay

Figure 19: Second Rerun of vgdisplay Command Output
- Follow Option 1 procedure.
Option 3:
This procedure is applicable only if you have run out of Free PE that is required to extend the Logical Volume (LV).
The below steps explain how we can increase the available Free PE by adding a new virtual disk. This procedure does the same thing that Option 2 does, but this method adds a drive to the VM rather than growing the existing drive. If PFxM is grown (which lives on the VSAN datastore), there is no real difference to doing it one way or the other.
- Add a new virtual disk in the virtual machine.
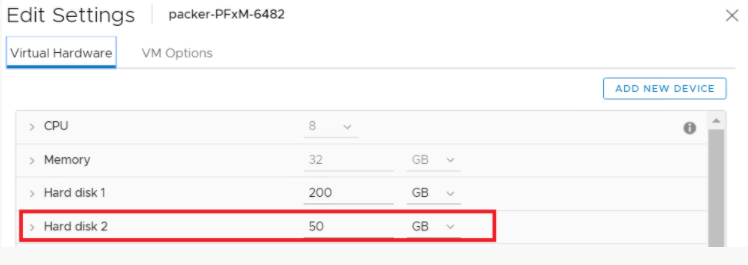
Figure 20: Add a New Virtual Disk to the VM.
- Scan for the new disk after adding it in VMware without requiring a reboot with the following command:
ls /sys/class/scsi_host

Figure 21: Ls /sys/class/scsi_host Command Output
- Run the following command:
echo "- - -" > /sys/class/scsi_host/<hostX>/scan
Replace the value of <hostX> with the values returned from step 2 command.
Example:

Figure 22: Echo "- - -" > /sys/class/scsi_host/<hostX>/scan Command Output.
- Confirm that the added disk is detected and has the appropriate size (in this example, 50G) with the following command:
lsblk
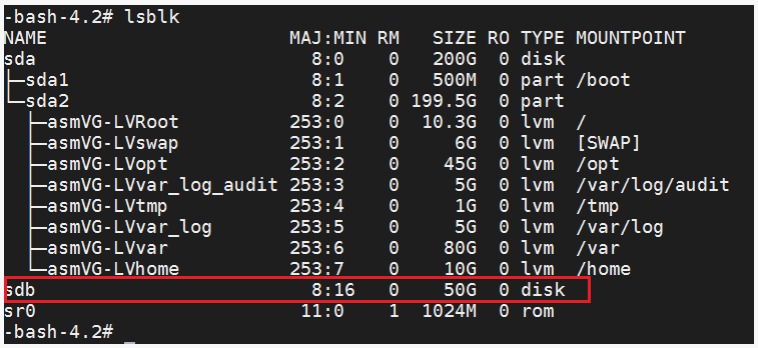
Figure 23: Confirm Disk Added with Correct Size.
- Add the added disk as a Physical Volume for LVM with the following command:
pvcreate /dev/sdb

Figure 24: Pvcreate /dev/sdb Command Output
- Run the following command to confirm that the disk is added:
pvscan

Figure 25: Pvscan Command Output
- Capture Volume Group details by running the following command:
vgdisplay
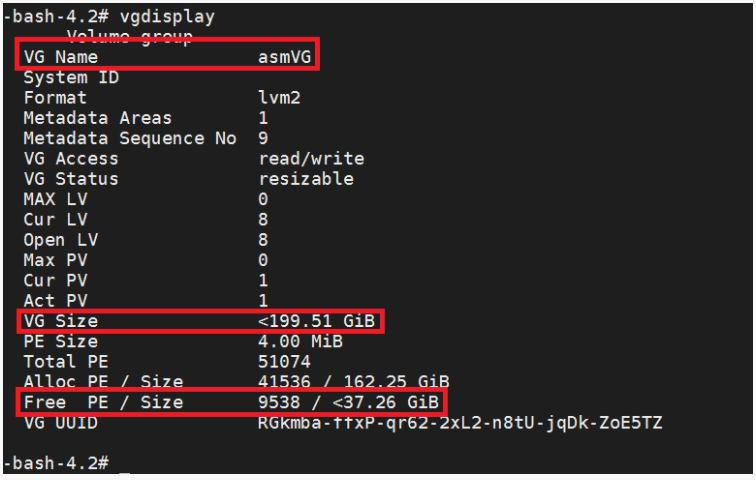
Figure 26: Vgdisplay Command Output of Volume Group Details
- Extend the size of the Volume Group by adding the new PV using the following command:
vgextend
Example:
vgextend asmVG /dev/sdb

Figure 27: Vgextend asmVG /dev/sdb Command Output
- Run the following command and look for the Logical Volume that you want to extend:
lvdisplay
Example:
In this example, you are looking for Logical Volume /dev/asmVG/LVvar.
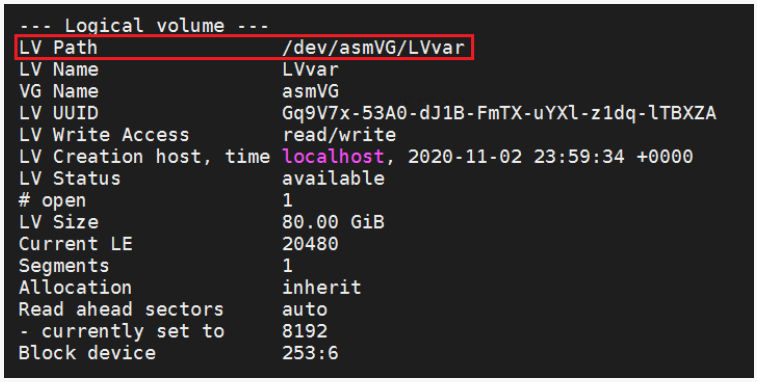
Figure 28: Look for Logical Volume to be Extended.
- Extend the Logical Volume size by running the following command:
lvextend -l +100%FREE /dev/mapper/asmVG-LVvar /dev/sdb

Figure 29: Extend Logical Volume /dev/asmVG/LVvar Size.
- Resize the file system on /var with the following command:
resize2fs /dev/mapper/asmVG-LVvar

Figure 30: resize2fs /dev/mapper/asmVG-LVvar Command Output
- Verify that the size of the Logical Volume is increased and it is reflecting under the file system by running the following command:
df -h
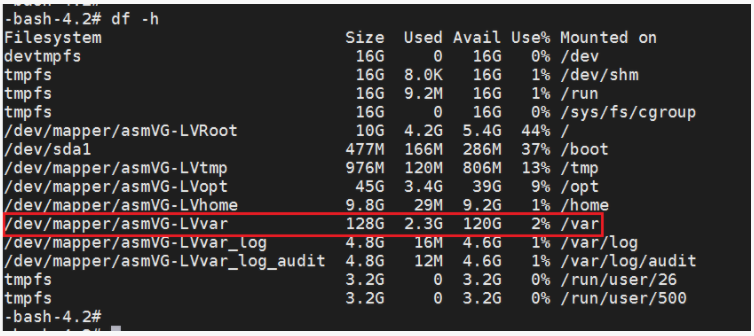
Figure 31: Verifying that the Logical Volume is Increased.
You have successfully grown a partition on a VM running an LVM.
Affected Products
PowerFlex rack, VxRack, PowerFlex ApplianceArticle Properties
Article Number: 000184907
Article Type: How To
Last Modified: 25 Jun 2025
Version: 5
Find answers to your questions from other Dell users
Support Services
Check if your device is covered by Support Services.