Avamar:如何创建、修改或验证 Isilon NDMP 用户设置
Summary: 有关如何创建、修改或验证 Isilon 网络数据管理协议 (NDMP) 用户设置的说明。
This article applies to
This article does not apply to
This article is not tied to any specific product.
Not all product versions are identified in this article.
Instructions
- 以 root 用户身份登录 OneFS Web UI
- 遵循路径OneFS>Data Protection>NDMP NDMP >Settings

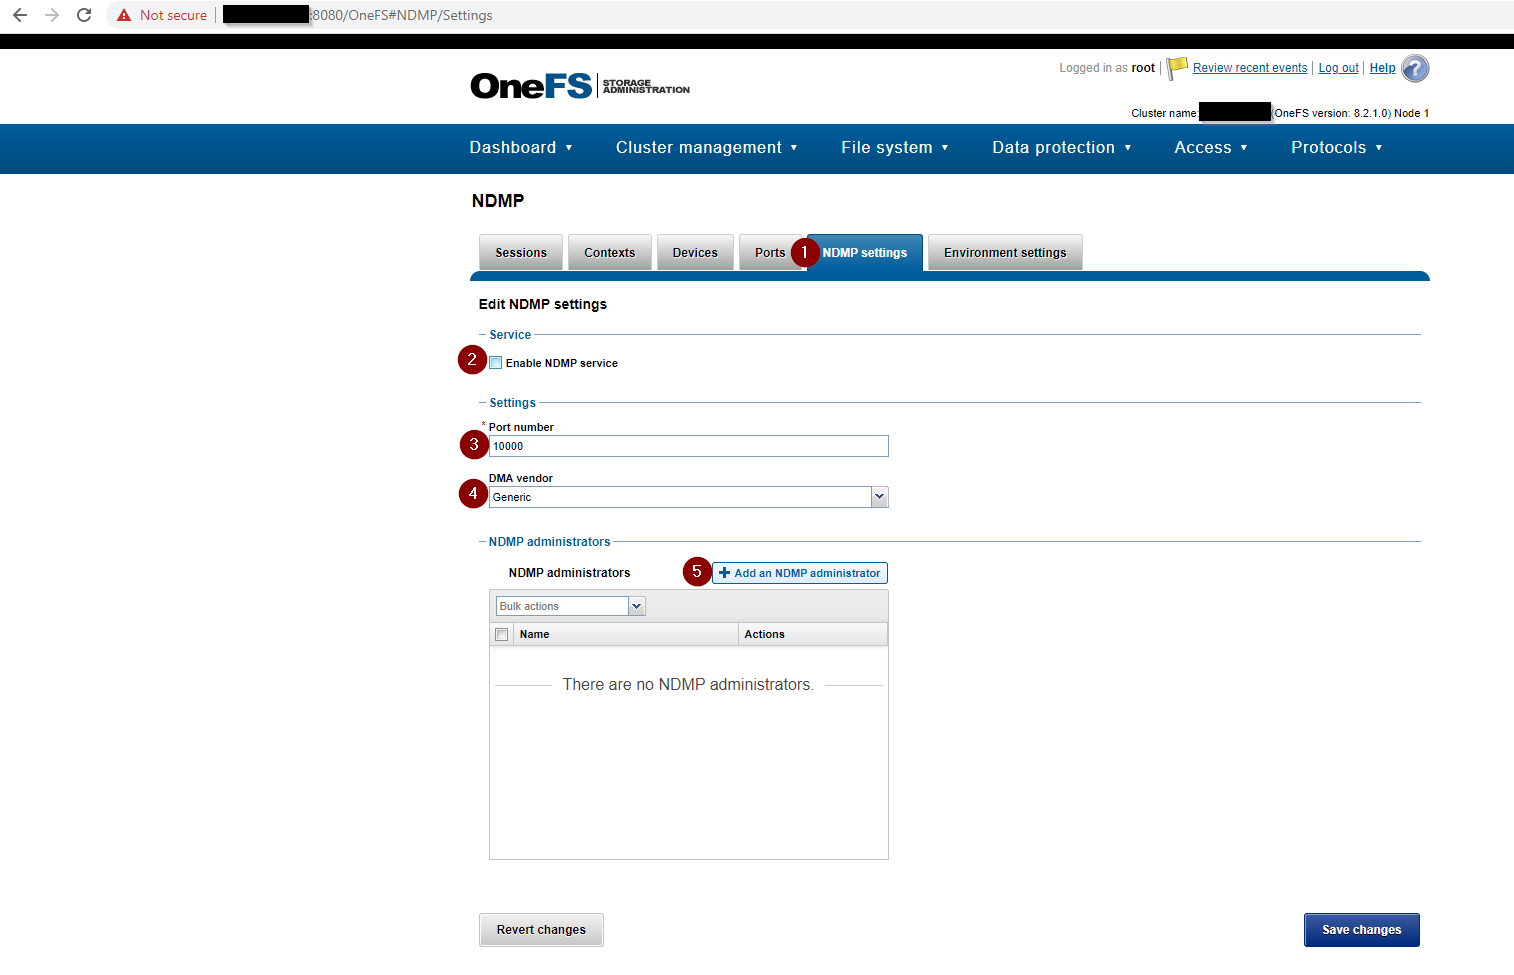
- 完成 NDMP 设置 ,包括以下内容:
- 启用 NDMP 服务复选框 已选中。
- 端口号设置为 10000
- DMA vendor 设置为 Generic
- NDMP administrator 设置为 NDMP 的管理员并添加密码
如果没有创建 NDMP 管理员用户,请创建一个。如果 Isilon 是新安装,NDMP Settings 页面将类似于下面的屏幕截图:

- 使用 OneFS Web UI 创建或更改 NDMP 用户密码:

- 或者,使用 Isilon CLI 创建 或更改 NDMP 用户密码 :
REDACTED_ISILON_CLUSTER# isi ndmp users create --name ndmp
password:
confirm:
REDACTED_ISILON_CLUSTER#

REDACTED_ISILON_CLUSTER# isi ndmp users modify --name ndmp
password:
confirm:
REDACTED_ISILON_CLUSTER#
- 验证 NDMP 设置:

使用 Isilon CLI 验证 NDMP 设置:
命令:
isi ndmp settings global view
输出示例:
REDACTED_ISILON_CLUSTER# isi ndmp settings global view
                       Service: True
                          Port: 10000
                           DMA: generic
          Bre Max Num Contexts: 64
MSB Context Retention Duration: 300
MSR Context Retention Duration: 600
        Stub File Open Timeout: 10
             Enable Redirector: False
              Enable Throttler: False
       Throttler CPU Threshold: 50

REDACTED_ISILON_CLUSTER# isi ndmp users list
Name
-----
ndmp
-----
Total: 1
Affected Products
AvamarArticle Properties
Article Number: 000189642
Article Type: How To
Last Modified: 02 Apr 2025
Version: 4
Find answers to your questions from other Dell users
Support Services
Check if your device is covered by Support Services.