How to Use and Troubleshoot the Dell Dual Charging Docking Station HD22Q
Summary: This article provides information about how to set up, use, and troubleshoot the Dell Dual Charging Docking Station HD22Q. Learn how to download and install drivers, set up multiple monitors, and find troubleshooting steps to resolve common issues. ...
This article applies to
This article does not apply to
This article is not tied to any specific product.
Not all product versions are identified in this article.
Instructions
Dell Dual Charging Docking Station HD22Q links all your electronic devices to your laptop using a single USB Type-C cable. Connecting a supported laptop to the Dell UD22 docking station, gain access to all your peripherals without having to plug each device into the laptop. (For example: Peripherals such as the mouse, keyboard, stereo speakers, external hard drive, and large-screen monitor.)
NOTE: Dell Dual Charging Docking Station HD22Q is compatible with Dell laptops with a USB-C port. The HD22Q docking station has a USB Type-C port that supports DisplayPort over USB Type-C alternate mode.
For help with specifications, setup, connecting an external monitor, troubleshooting common issues, and so on, see the appropriate expanding section below.
| Laptop Connectivity | USB Type-C |
|---|---|
| Video ports |
|
| Network ports |
|
| USB ports |
|
| Power or DC-in |
|
| Power Delivery | 90 W to computer with 130 W power supply using PowerDelivery 3.0 |
The Dell Dual Charging Docking Station HD22Q is designed for laptops with a USB-C port that supports the DisplayPort over USB Type-C protocol. Before using the docking station, ensure that your laptop has a USB-C port that supports DisplayPort over USB Type-C.
NOTE: The Dell Dual Charging Docking Station HD22Q will function on a device with a USB-C port that supports DisplayPort over USB Type-C. When connected to a DisplayPort over USB-C port, the HD22Q dock functions as the WD19 dock does. Verify that your laptop supports DisplayPort over USB Type-C.

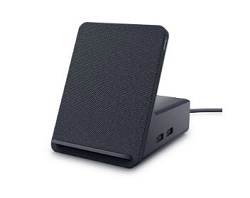
Figure 1: Dell Dual Charging Docking Station HD22Q Front View
| 1. | Wireless Charging Pad |
|---|
NOTE: The Dell Dual Charge Dock - HD22Q features a wireless charging pad for charging supported devices. The placement and orientation of the device can affect how it charges.
-
Align the device on the charging pad.
-
The LED on the dock power button turns solid white to indicate the device is charging.

Figure 2: Dell Dual Charging Docking Station HD22Q Rear View
| 1. | DisplayPort 1.4 Port |
|---|---|
| 2. | HDMI 2.1 Port |
| 3. | 2x USB 3.2 Gen1 Type-A Ports |
| 4. | Gigabit Ethernet RJ45 Port |
| 5. | Power Connector |
| 6. | USB 3.2 Gen2 Type-C Docking Cable |

Figure 3: Dell Dual Charging Docking Station HD22Q Right-Hand Side Ports
| 1. | Power Button with LED |
|---|---|
| 2. | 2x USB 3.2 Gen1 Type-A Ports |
NOTE: The power button on the docking station is designed to replicate your laptop's power button. The Dell Universal Dock UD22 power button works like your laptop's power button when connected to supported Dell laptops. You can use it to turn on, sleep or force a shutdown of the laptop. The power button is not functional if connected to unsupported Dell laptops or non-Dell laptops.
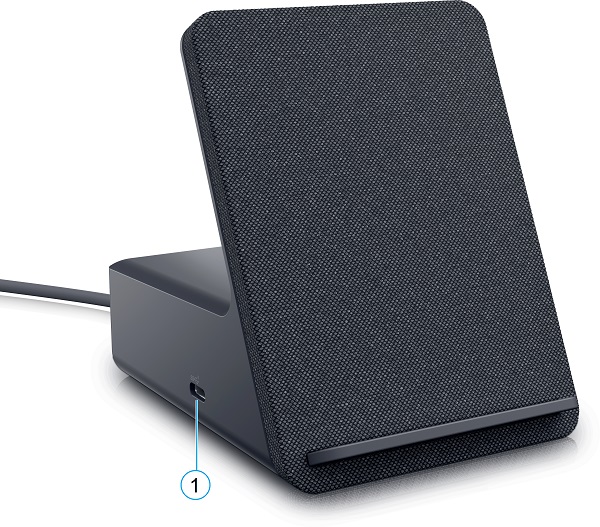
Figure 4: Dell Dual Charging Docking Station HD22Q Left-Hand Side View
| 1. | USB 3.2 Gen2 Type-C Power with PowerDelivery 3.0 |
|---|
NOTE: Update your laptop’s BIOS and the Dell Docking Station drivers before using the docking station. Update to the latest versions available at the Dell Drivers & Downloads website. Older BIOS versions and drivers can result in the laptop not recognizing the docking station or not functioning optimally.
Dell highly recommends the following applications to automate the installation of BIOS, firmware, driver, and critical updates specific to your laptop and docking station:
- Dell | Update - for Dell XPS laptops only
- Dell Command | Update - for Dell Latitude, Dell Precision, or XPS laptops
NOTE: Dell Update requires the Dell HD22Q dock connection to your laptop to start software updates on the host device.
Download and install drivers for Dell HD22Q docking station
- Browse to the Dell Drivers & Downloads page.
- Click Detect laptop to auto-detect your product, or enter your computer’s Service Tag in the Enter a Service Tag or Express Service Code field, or click Browse all products to browse to your computer model.
- Select the Operating System.
- Download and install the latest Basic Input Output System (BIOS) for the computer. This is available in the "BIOS" section.
NOTE: To learn more about updating the BIOS on a Dell computer, see the Dell knowledge base article BIOS Update Guide.
- Download and install the latest Intel or NVIDIA or AMD graphics driver for the computer. This is available in the "Video" section.
- Download and install the latest Realtek USB Gigabit Ethernet (GBE) Controller Driver for the docking station. This is available in the "Docks and Stands" section.
- Restart the computer.
- Once the driver update process completes, connect the AC adapter to the Dell HD22Q dock first. Then attach the USB Type-C cable to the computer before using the docking station.
NOTE: To learn more about installing device drivers, see the Dell knowledge base article Driver Update Guide.
Microsoft Windows operating system includes the VGA graphics drivers only. For optimum graphics performance, we recommend you install the Dell graphics drivers applicable for your laptop from the Dell Drivers & Downloads website. (Under the Video section.)
NOTE:
- For NVIDIA Discrete Graphics solutions on the Latitude and Mobile Dell Precision laptops:
- First, install the Intel Media Adapter Graphics Driver applicable to your laptop.
- Second, install the NVIDIA Discrete Graphics Driver applicable to your laptop.
- For AMD Discrete Graphics solutions on the Latitude and Mobile Dell Precision laptops:
- First, install the Intel Media Adapter Graphics driver applicable to your laptop.
- Second, install the AMD Discrete Graphics driver applicable to your laptop.
Before connecting the docking station to your laptop and connecting a monitor and other external devices, ensure to install all the required drivers.
Connect the monitor to the docking station using the DisplayPort or HDMI cable provided with the monitor. The docking station supports up to four monitors connected simultaneously. See the Display Resolution Table in the section below for more details about the supported resolution when connecting multiple monitors to the docking station.
To learn more about setting up and troubleshooting issues with multiple monitor setups, see these Dell knowledge-base articles: How to Set up Multiple Monitors or How to Troubleshoot Multiple Monitor Issues
Display resolution table
External monitors require a certain amount of bandwidth to work properly. Monitors with higher resolution require more bandwidth.
| DisplayPort Available Bandwidth |
Single Display (Max Resolution) |
Dual Display (Max Resolution) |
Triple Display (Max Resolution) |
Quad Display (Max Resolution) *** |
|---|---|---|---|---|
| HBR2 (HBR2 x2 lanes - 8.6 Gbps) |
DP 1.4/HDMI 2.1: 4K (3840 x 2160) @ 30 Hz |
DP 1.4 + HDMI 2.1: Full High-Definition (FHD) (1920 x 1080) @ 60 Hz |
HDMI 2.1: FHD (1920 x 1080) @ 60 Hz DP 1.4: 2x HD (1280 x 720) @ 60 Hz * |
Not Supported |
| HBR3 (HBR3 x2 lanes - 12.9 Gbps) |
DP 1.4/HDMI 2.1: 4K (3840 x 2160) @ 30 Hz |
DP 1.4 + HDMI 2.1: Quad High-Definition (QHD) (2560 x 1440) @ 60 Hz |
HDMI 2.1: FHD (1920 x 1080) @ 60 Hz DP 1.4: 2x HD (1280 x 720) @ 60 Hz * |
HDMI 2.1: FHD (1920 x 1080) @ 60 Hz DP 1.4: 3x HD (1280 x 720) @ 60 Hz * |
| HBR3 with Display Stream Compression (DSC) |
DP1.4: 8K (7680 x 8320) @ 30 Hz OR HDMI 2.1: 4K (3840 x 2160) @ 60 Hz, 4K (3840 x 2160) @ 120 Hz **, or 8K (7680 x 4320) @ 30 Hz ** |
DP 1.4/HDMI 2.1: 4K (3840 x 2160) @ 60 Hz |
HDMI 2.1: QHD (2560 x 1440) @ 60 Hz DP 1.4: 2x QHD (2560 x 1440) @ 60 Hz * |
HDMI 2.1: QHD (2560 x 1440) @ 60 Hz DP 1.4: 3x QHD (2560 x 1440) @ 60 Hz * |
- * The third and fourth displays must be daisy-chained through the DisplayPort (DP) 1.4 port using Multi-Stream Transport (MST) monitors connected to the DP 1.4 port. All DP-connected monitors should have DSC support. If non-DSC monitors are used, then the maximum resolution (HD: 1280 x 720) is the same as HBR3 non-DSC (12.9Gbps) offerings per lane). With DP overhead and HD22Q MST display bandwidth, the effective data rate is 4.25 Gbps per lane.
- ** This resolution is supported when using an HDMI 2.1 monitor with Fixed Rate Link support for a higher video resolution and refresh rate. An HDMI 2.1 cable is also required for this display resolution.
- *** Quad display setup functions only when the laptop LCD is off.
NOTE: If higher resolution monitors are used, the graphics driver makes a judgment based on the monitor specifications and display configurations. Some resolutions are not supported and are removed from the Windows Display Control Panel.
NOTE: The Linux operating system is unable to physically turn off the integrated display. The external display numbers are one less than the display numbers listed in the above table.
If the Display Port Data Rate is HBR2 then the maximum resolution that Linux supports is 8192 x 8192 (counted with integrated display plus external display.)
If the Display Port Data Rate is HBR2 then the maximum resolution that Linux supports is 8192 x 8192 (counted with integrated display plus external display.)
NOTE: Resolution support is also dependent on the monitor’s Extended Display Identification Data (EDID) resolution.
| Symptom | Possible Solution |
|---|---|
| No video on the monitors that are attached to the High Definition Multimedia Interface (HDMI), or DisplayPort (DP) port on the docking station. |
|
| The video on the attached monitor is distorted or flickering. |
|
| The video on the attached monitor is not displaying as an Extended Monitor. |
|
| The USB ports are not functioning on the docking station. |
|
| The High-Bandwidth Digital Content Protection (HDCP) content is not displayed on the attached monitor. |
NOTE: The monitor or display connected to the docking station must support HDCP 2.2.
|
| The LAN port is not functioning. |
|
| USB port has no function in a pre-OPERATING SYSTEM environment. | If your BIOS has a USB Configuration page, ensure that the following options are checked:
|
| Preboot Execution Environment (PXE) boot on dock does not function. | If your BIOS has an integrated Ethernet page, select Enabled with PXE. If your BIOS Setup on your laptop has a USB Configuration page, ensure that the following options are checked:
|
| USB Boot does not function. | If your BIOS has a USB Configuration page, ensure that the following options are checked:
|
| AC Adapter is displayed as "Not Installed" in the Battery Information page of the Dell BIOS Setup when the Type-C (USB-C) cable is connected. |
|
| Peripherals connected to the docking station do not work in a pre-OPERATING SYSTEM environment. | If the BIOS Setup on your laptop has a USB Configuration page, check the following option to enable docking station function in a pre-OPERATING SYSTEM environment:
|
| The alert message "You have attached an undersized power adapter to your system" is displayed when the docking station is connected to your laptop. |
|
| Undersized power adapter warning message that is displayed and cable LED are off. |
|
| No external display: USB or data and cable LED is off. |
|
| When the laptop or dock is moved, the cable LED turns off. |
|
| Wireless charging does not work. |
|
| Qi charging LED flashes amber. | This LED blinks amber when the dock detects an abnormal charging status such as Foreign Object Detection (FOD) or Over Temperature Protection (OTP). Foreign Object Detection (FOD):
Over Temperature Protection (OTP):
|
| A device placed on a wireless charging pad is charging slower than usual. | If the battery on the charging device gets too warm, the device might limit the wireless charging speed. However, it should start charging once the temperature drops:
|
| A device placed on the wireless charging pad charges intermittently. | The dock has a 3-coil design to support different size devices. Also, the dock only supports wireless charging on one device at a time:
|
Additional Information
Frequently asked questions
If the battery gets too warm, the device might limit charging and resumes charging once the temperature drops. Try to move the device and Qi charger to a cooler location.
Find a position that works best for the device to charge. Check by placing the device in the portrait position or upside-down, or landscape position. The wireless charge LED illuminates Solid White, while transmitting power to the wireless charging device.
Only one device can be charged at a time. Multiple coils do not increase the charging power. The use of coil arrays is primarily in the interests of convenience and efficiency improvement rather than overall power delivery.
Try repositioning the device.
Try removing the case.
During wireless charging, the back of the phone cannot have any attached iron, metal, coins, Integrated Circuit (IC) Cards, bank cards, or magnetic or metal objects.
- When a new device is plugged in, the USB hub driver notifies the Plug and Play (plug and play) manager that a new device was detected. The plug and play manager queries the hub driver for all the device's hardware IDs and then notifies the Windows operating system that a new device must be installed. In this scenario, the user sees a hardware installation window.
- Step 1: The New Device is Identified
- Identifiers for USB Devices
- Our Dell dock is designed to operate on AC power only, and it does not support a laptop power source back to the dock. (Powered by laptop USB-C port.) A power loss event makes all devices on the dock fail to work. Even when you restore the AC power, the dock may still not function properly because the dock must negotiate a proper power contract with the laptop's USB-C port and establish a laptop EC-to-dock-EC connection.
- You can disconnect and reconnect the AC Adapter from the back of the docking station to fix this.
Affected Products
Dell Dual Charge Dock HD22QArticle Properties
Article Number: 000199739
Article Type: How To
Last Modified: 17 Nov 2025
Version: 7
Find answers to your questions from other Dell users
Support Services
Check if your device is covered by Support Services.