NetWorker: Linux 클러스터 공유 볼륨을 백업하는 방법
Summary: 이 문서에서는 두 Linux 노드 간에 공유되는 파일을 백업하는 방법에 대한 일반적인 개요를 제공합니다.
This article applies to
This article does not apply to
This article is not tied to any specific product.
Not all product versions are identified in this article.
Instructions
클러스터 스토리지 및 논리적 이름을 식별합니다.
이 문서에서 표시된 예제는 pcs(Pacemaker) 고가용성 클러스터 서비스를 사용하는 두 개의 Red Hat 노드에서 가져온 것입니다. 운영 체제 공급업체 및 클러스터링 서비스에 따라 클러스터 구성에 대한 세부 정보를 얻는 방법에 차이가 있습니다. 클러스터 구성 및 명령에 대한 공급업체별 설명서를 참조하십시오. NetWorker Client 구성의 기반이 되는 논리는 동일하게 유지됩니다.
클러스터 서비스 명령을 사용하여 구성 세부 정보를 검토합니다. 이 경우에는 다음과 같습니다.
root@NWrhelNodeC:~# pcs config
Cluster Name: rhel7clus
Corosync Nodes:
 NWrhelNodeC.emclab.local NWrhelNodeD.emclab.local
Pacemaker Nodes:
 NWrhelNodeC.emclab.local NWrhelNodeD.emclab.local

Resources:
 Group: NW_group
  Resource: fs (class=ocf provider=heartbeat type=Filesystem)
   Attributes: device=/dev/sdb1 directory=/nsr_share fstype=ext4
   Operations: monitor interval=20 timeout=300 (fs-monitor-interval-20)
               notify interval=0s timeout=60s (fs-notify-interval-0s)
               start interval=0s timeout=60s (fs-start-interval-0s)
               stop interval=0s timeout=60s (fs-stop-interval-0s)
  Resource: ip (class=ocf provider=heartbeat type=IPaddr)
   Attributes: cidr_netmask=24 ip=192.168.25.40 nic=ens192
   Operations: monitor interval=15 timeout=120 (ip-monitor-interval-15)
               start interval=0s timeout=20s (ip-start-interval-0s)
               stop interval=0s timeout=20s (ip-stop-interval-0s)
  Resource: nws (class=ocf provider=EMC_NetWorker type=Server)
   Meta Attrs: is-managed=true
   Operations: meta-data interval=0 timeout=10 (nws-meta-data-interval-0)
               migrate_from interval=0 timeout=120 (nws-migrate_from-interval-0)
               migrate_to interval=0 timeout=60 (nws-migrate_to-interval-0)
               monitor interval=100 timeout=1000 (nws-monitor-interval-100)
               start interval=0 timeout=300 (nws-start-interval-0)
               stop interval=0 timeout=300 (nws-stop-interval-0)
               validate-all interval=0 timeout=10 (nws-validate-all-interval-0)
출력에서 다음 사항을 기록합니다.
- 클러스터의 각 물리적 노드
- 공유 디스크인 디바이스와 마운트되는 파일 시스템
- 논리 리소스에서 사용하는 IP 주소
NetWorker 19.11 이상에서 lcmap 명령은 논리적 클러스터 이름과 공유 볼륨을 반환합니다.
root@NWrhelNodeC:~# lcmap
type: NSR_CLU_TYPE;
clu_type: NSR_LC_TYPE;
interface version: 1.0;

type: NSR_CLU_VIRTHOST;
hostname: NWrhelClusC.emclab.local;
local: TRUE;
owned paths: /nsr_share>
19.10 이전 버전의 경우 nslookup 클러스터 IP 리소스의 논리적 클러스터 이름을 확인하는 명령:
root@NWrhelNodeC:~# nslookup 192.168.25.40
40.25.168.192.in-addr.arpa      name = NWrhelClusC.emclab.local
액티브 노드에만 공유 스토리지가 매핑됩니다. 이 예의 클러스터 구성에서 /dev/sdb1 device는 공유 ISCSI 디스크이며 에 마운트됩니다. /nsr_share.
root@NWrhelNodeC:~# pcs resource
 Resource Group: NW_group
     fs (ocf::heartbeat:Filesystem):    Started NWrhelNodeC.emclab.local
     ip (ocf::heartbeat:IPaddr):        Started NWrhelNodeC.emclab.local
     nws        (ocf::EMC_NetWorker:Server):    Started NWrhelNodeC.emclab.local
root@NWrhelNodeC:~#
root@NWrhelNodeC:~# lsblk | grep sdb1
└─sdb1        8:17   0 46.5G  0 part /nsr_share

root@NWrhelNodeD:~# lsblk | grep sdb1
└─sdb1          8:17   0 46.5G  0 part
root@NWrhelNodeD:~#
페일오버가 발생하면 스토리지가 다른 클러스터 노드에 마운트됩니다. 공유 스토리지는 활성 노드에 관계없이 논리적 클러스터 이름을 사용하여 액세스할 수 있습니다.
|
노드 1 호스트 이름
|
NWrhelNodeC.emclab.local
|
|
노드 2 호스트 이름
|
NWrhelNodeD.emclab.local
|
|
논리적 클러스터 이름
|
NWrhelClusC.emclab.local
|
공유 스토리지의 파일을 백업하도록 NetWorker Client 구성:
- NetWorker Client 소프트웨어가 클러스터의 각 물리적 노드에 설치되어 있는지 확인합니다. 자세한 내용은 NetWorker 설치 가이드를 참조하십시오.
- NetWorker Client 리소스가 클러스터를 인식하도록 구성하는 단계는 NetWorker 클러스터 통합 가이드에 자세히 설명되어 있습니다.
참고: 모든 NetWorker 가이드는 다음을 통해 사용할 수 있습니다. NetWorker 지원 정보
- NMC(NetWorker Management Console)에 로그인합니다.
- ProtectionClients>로 이동합니다.
- ProtectionNew > Client Wizard를 클릭합니다.
- Logical Client Name을 지정하고 보호 그룹을 선택합니다.
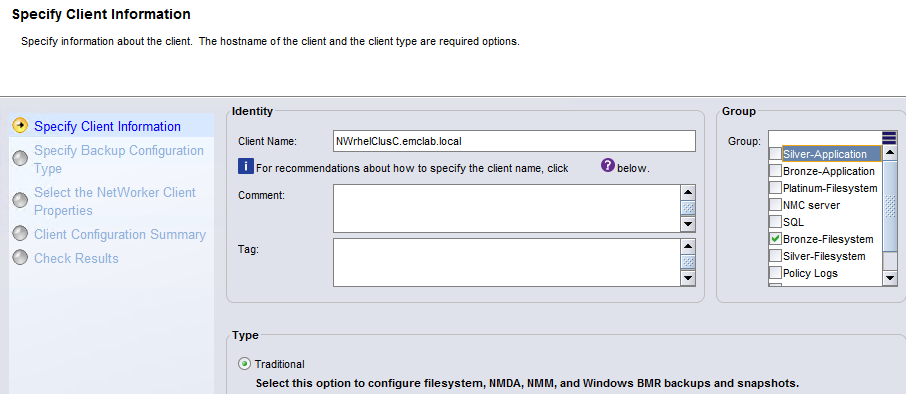
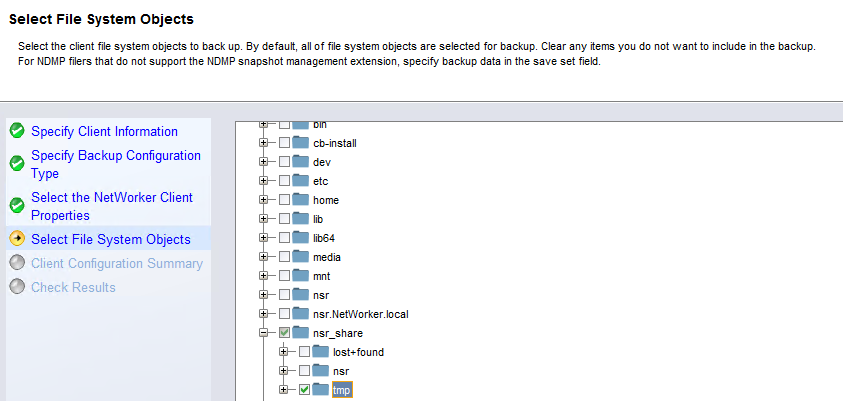
- 세이브 세트의 경우 세이브 세트 ALL을 지정하거나 마운트 지점 내의 공유 스토리지 마운트 지점 또는 하위 디렉토리를 선택합니다.
참고: 클러스터 공유 리소스에서 세이브 세트 ALL을 사용하는 경우 물리적 노드의 볼륨에 속하는 폴더/파일과 공유 볼륨 내의 백업 데이터만 무시합니다. "로컬" 파일 또는 디렉토리를 수동으로 선택하지 마십시오. 물리적 노드의 파일 및 디렉토리를 백업하려면 물리적 노드 이름을 사용하여 NetWorker Client를 생성하고 로컬 디렉토리/파일만 선택할 수 있습니다.
- 클라이언트 생성을 완료합니다.
- 논리적 클러스터 리소스의 클라이언트 속성을 엽니다.
- 앱 및 모듈로 이동합니다.
- 백업 명령 필드에서 다음을 지정합니다.
save -c Logical_Client_Name

세이브 세트는 활성 노드와 관계없이 현재 물리적 노드의 호스트 이름 대신 논리적 클러스터 클라이언트 이름 아래에 인덱싱됩니다.
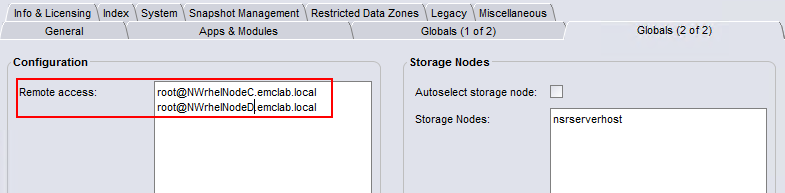
- 글로벌(2/2) 탭에서 다음을 포함하도록 Remote Access 필드를 업데이트합니다.
root@NodeClientName클러스터의 각 물리적 노드에 대해 다음을 수행합니다.
- 클러스터 클라이언트의 백업을 수행합니다.
- 세이브 세트는 NetWorker Server의 미디어 데이터베이스에 표시됩니다.
mminfo -avot -q client=Logical_Client_Name
[root@networker-mc]:~# mminfo -avot -q client=NWrhelClusC.emclab.local -r client,savetime,ssid,nsavetime
 client      date   ssid         save time
NWrhelClusC.emclab.local 12/22/2022 933550847 1671748351
NWrhelClusC.emclab.local 12/22/2022 883219305 1671748457
[root@networker-mc]:~#
[root@networker-mc]:~# nsrinfo -t 1671748457 NWrhelClusC.emclab.local
scanning client `NWrhelClusC.emclab.local' for savetime 1671748457(Thu 22 Dec 2022 05:34:17 PM EST) from the backup namespace
/nsr_share/tmp/somefile
/nsr_share/tmp/
/nsr_share/
/nsr_share//
/
5 objects found
Additional Information
Affected Products
NetWorkerProducts
NetWorker Family, NetWorker SeriesArticle Properties
Article Number: 000206944
Article Type: How To
Last Modified: 16 May 2026
Version: 8
Find answers to your questions from other Dell users
Support Services
Check if your device is covered by Support Services.