NetWorker:データ バックアップ中にクライアント ファイル インデックス バックアップを有効にする方法
Summary: この記事では、NetWorker 19.8で追加された新しい機能について説明し、同じポリシー データ バックアップでクライアント ファイル インデックス(CFI)バックアップを実行できるようにします。
This article applies to
This article does not apply to
This article is not tied to any specific product.
Not all product versions are identified in this article.
Instructions
NetWorker 19.8では、バックアップ管理者がクライアントがデータ バックアップを完了した直後に実行するクライアント ファイル インデックス(CFI)バックアップを構成できる機能が追加されました。これは、クライアントが保護されているバックアップ アクション内で実行できます。以前は、これはNetWorkerの「サーバー保護ポリシー」を使用してのみ可能でした。
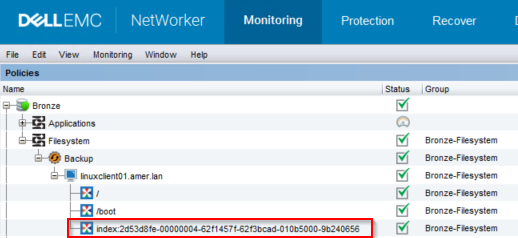
図1: NetWorkerバックアップ モニタリング
2.CFIバックアップを有効にするには、バックアップ アクションに対して次のnsrpolicyコマンドを実行します。
要件:
- NetWorkerサーバーはNetWorker 19.8.0.0以降である必要があります。https://www.dell.com/support/home/product-support/product/networker/overview
- この機能は、「従来型」(クライアント ベース)バックアップを対象としています。
図1: NetWorkerバックアップ モニタリング
root@linux1:~# mminfo -avot -t today
 volume        type   client           date     time         size ssid      fl   lvl name
ClientBackupPool.001 Data Domain linux1.amer.lan 02/27/2023 12:38:30 PM 74 MB 4277998791 cr 9 index:linuxclient01.amer.lan
ClientBackupPool.001 Data Domain linuxclient01.amer.lan 02/27/2023 12:39:32 PM 13 MB 16585916 cb incr /
ClientBackupPool.001 Data Domain linuxclient01.amer.lan 02/27/2023 12:39:37 PM 4  B 4294776000 cb incr /boot
メモ: この機能を有効にしても、データ保護ポリシーでインデックス バックアップを実行するクライアントがサーバー保護ポリシーから除外されることはありません。サーバー保護ポリシーを実行すると、インデックス バックアップが再度実行されます。
この機能を有効にするには、2つの方法があります。
Nsradmin CLI:
- NetWorkerサーバーのrootまたはadminコマンド プロンプトから、次のコマンドを実行します。
nsradmin
- nsradmin プロンプトから、次のコマンド構文を使用してバックアップ アクションの詳細を出力します。
nsradmin> show Enable Cfi
nsradmin> print type: nsr protection policy action; name: ACTION_NAME; policy name: POLICY_NAME; workflow name: WORKFLOW_NAME
Example:
nsradmin> show Enable Cfi
nsradmin> print type: nsr protection policy action; name: backup; policy name: Bronze; workflow name: Filesystem
Enable Cfi: No;
nsradmin>
- バックアップ アクションでCfiバックアップを有効にするには、 nsradmin プロンプトから次のコマンドを入力します。
nsradmin> update Enable Cfi: Yes
- print コマンドを再実行して、変更を表示します。
nsradmin> print type: nsr protection policy action; name: backup; policy name: Bronze; workflow name: Filesystem
                  Enable Cfi: Yes;
Nsrpolicy CLI:
- NetWorkerサーバーのrootまたはadminコマンド プロンプトから、次のnsrpolicyコマンドを実行して、バックアップ アクションの属性を表示します。
nsrpolicy action display -p POLICY_NAME -w WORKFLOW_NAME -A ACTION_NAME
または、
nsrpolicy action display --policy_name POLICY_NAME --workflow_name WORKFLOW_NAME --action_name ACTION_NAME
Example:
root@linux1:~# nsrpolicy action display -p Bronze -w Filesystem -A backup
{
    "actionName": "Backup",
    "actionSpecific": {
        "actions": {
            "actionType": "backup",
            "actionBackupSubtypeSpecific": {
                "backupSubtypes": {
                    "abBackupSubtype": "traditional",
                    "abtDestinationPool": "ClientBackupPool",
                    "abForceBackupLevel": "",
                    "abtBrowsePeriod": "1 Months",
                    "abtDDRetentionLockTime": "",
                    "abtEnableCfiBackup": false,
                    "abtEnableDDRetentionLock": false,
                    "abtEstimate": false,
                    "abtFileInactivityAlertThreshold": 0,
                    "abtFileInactivityThreshold": 0,
                    "abtRevertToFullWhenSyntheticFullFails": true,
                    "abtTimestampFormat": "none",
                    "abtVerifySyntheticFull": true
                }
...
...
nsrpolicy action update backup traditional -p POLICY_NAME -w WORKFLOW_NAME -A ACTION_NAME --enable_cfi yes
または、
nsrpolicy action update backup traditional --policy_name POLICY_NAME --workflow_name WORKFLOW_NAME --action_name ACTION_NAME --enable_cfi yes
Example:
root@linux1:~# nsrpolicy action update backup traditional -p Bronze -w Filesystem -A backup --enable_cfi yes
128947:nsrpolicy: Action 'backup' was successfully updated
- 変更を確認するには、 nsrpolicy display コマンドを再実行します。
root@linux1:~# nsrpolicy action display -p Bronze -w Filesystem -A backup
{
    "actionName": "Backup",
    "actionSpecific": {
        "actions": {
            "actionType": "backup",
            "actionBackupSubtypeSpecific": {
                "backupSubtypes": {
                    "abBackupSubtype": "traditional",
                    "abtDestinationPool": "ClientBackupPool",
                    "abForceBackupLevel": "",
                    "abtBrowsePeriod": "1 Months",
                    "abtDDRetentionLockTime": "",
                    "abtEnableCfiBackup": true,
                    "abtEnableDDRetentionLock": false,
                    "abtEstimate": false,
                    "abtFileInactivityAlertThreshold": 0,
                    "abtFileInactivityThreshold": 0,
                    "abtRevertToFullWhenSyntheticFullFails": true,
                    "abtTimestampFormat": "none",
                    "abtVerifySyntheticFull": true
                }
...
...
Affected Products
NetWorkerProducts
NetWorker Family, NetWorker, NetWorker SeriesArticle Properties
Article Number: 000210224
Article Type: How To
Last Modified: 25 Mar 2025
Version: 6
Find answers to your questions from other Dell users
Support Services
Check if your device is covered by Support Services.