PowerEdge: How to Configure LDAPS for Active Directory Integration
Summary: This article contains instructions for testing LDAPS connectivity on a Windows domain controller and how to enable LDAPS for use with Dell products.
This article applies to
This article does not apply to
This article is not tied to any specific product.
Not all product versions are identified in this article.
Instructions
When configuring a Dell product such as OpenManage Enterprise or an iDRAC to integrate with Microsoft Active Directory, the connection to the domain controller over LDAPS may fail even though the directory settings appear correct, and port 636 is accessible. This can occur if the target domain controller does not have a valid certificate installed.
By default, Active Directory Domain Services bind to port 389 for insecure LDAP requests and 636 for LDAP over SSL (LDAPS). However, even though port 636 is open in the Windows firewall and accepts TCP connections, any directory requests made over port 636 are rejected if the DC does not have a trusted certificate to bind to the service during startup.
You can test LDAPS connectivity by using the LDP tool, which is installed on the domain controller by default as part of the Active Directory management features.
- Run the following command in an administrative command prompt on the domain controller.
ldp.exe
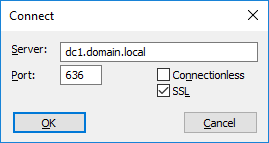
- Click Connection > Connect.
- Enter the FQDN of the domain controller and connect over port 636 using SSL.
- Check the output. If the connection fails with
"Error <0x51> Fail to connect", then the domain controller does not have an LDAPS certificate, and Dell products are unable to use Active Directory integration with this domain controller until a certificate is installed.
Resolving this issue requires installing a valid certificate on all domain controllers that the system uses for AD integration. Microsoft has an article documenting the requirements for LDAPS certificates and the process for requesting a certificate from a certificate authority server: https://learn.microsoft.com/en-us/troubleshoot/windows-server/identity/enable-ldap-over-ssl-3rd-certification-authority
Alternatively, since the certificate must only be trusted by the domain controller itself, customers without a certificate authority server can enable LDAPS by creating a self-signed certificate on the DC using the steps listed below.
- Open an administrative PowerShell window on the domain controller.
- Run the following command to create the certificate:
New-SelfSignedCertificate -DnsName dc1.domain.local, dc1 -CertStoreLocation cert:\LocalMachine\My

(replacing "dc1.domain.local" and "dc1" with the FQDN and name of your domain controller)
- Run the following command to open the certificate management snap-in for the local machine.
certlm.msc
- Browse to Personal > Certificates, locate the newly created certificate, and copy it into Trusted Root Certification Authorities > Certificates.
- Wait for LDAPS to bind to port 636 using the new certificate. This is done automatically and takes less than a minute.
- Use the following command to verify the connection to the DC using SSL over port 636.
ldp.exe
After a valid certificate is installed on the domain controller and the ldp.exe test connects successfully, the directory service integration test on the iDRAC/OME can communicate with the domain controller.
Additional Information
Having issues logging in a user from a nested group? Find some additional help in this article:
Affected Products
Dell OpenManage Enterprise, iDRAC7, iDRAC8, iDRAC9, Dell EMC OpenManage Enterprise, Microsoft Windows Server 2016, Microsoft Windows Server 2019, Microsoft Windows Server 2022Products
PowerEdge R240, PowerEdge R250, PowerEdge R340, PowerEdge R350, PowerEdge R440, PowerEdge R450, PowerEdge R540, PowerEdge R550, PowerEdge R640, PowerEdge R6415, PowerEdge R650, PowerEdge R650xs, PowerEdge R6515, PowerEdge R6525, PowerEdge R740
, PowerEdge R740XD, PowerEdge R740XD2, PowerEdge R7415, PowerEdge R7425, PowerEdge R750, PowerEdge R750XA, PowerEdge R750xs, PowerEdge R7515, PowerEdge R7525, PowerEdge R840, PowerEdge R940, PowerEdge R940xa, PowerEdge T140, PowerEdge T150, PowerEdge T340, PowerEdge T350, PowerEdge T440, PowerEdge T550, PowerEdge T640
...
Article Properties
Article Number: 000213104
Article Type: How To
Last Modified: 11 May 2026
Version: 5
Find answers to your questions from other Dell users
Support Services
Check if your device is covered by Support Services.