Alienware Pro Wireless Gaming Keyboard Usage and Troubleshooting Guide
Summary: The following article provides information about the Alienware Pro Wireless Gaming Keyboard. You can reference each section to learn more about the features of the Alienware Pro Wireless Gaming Keyboard and how to use it. ...
This article applies to
This article does not apply to
This article is not tied to any specific product.
Not all product versions are identified in this article.
Instructions
Table of Contents:
- What is in the Alienware Pro Wireless Gaming Keyboard box
- Alienware Pro Wireless Gaming Keyboard Features
- Setting up your Alienware Pro Wireless Gaming Keyboard
- Troubleshooting
- Additional Information
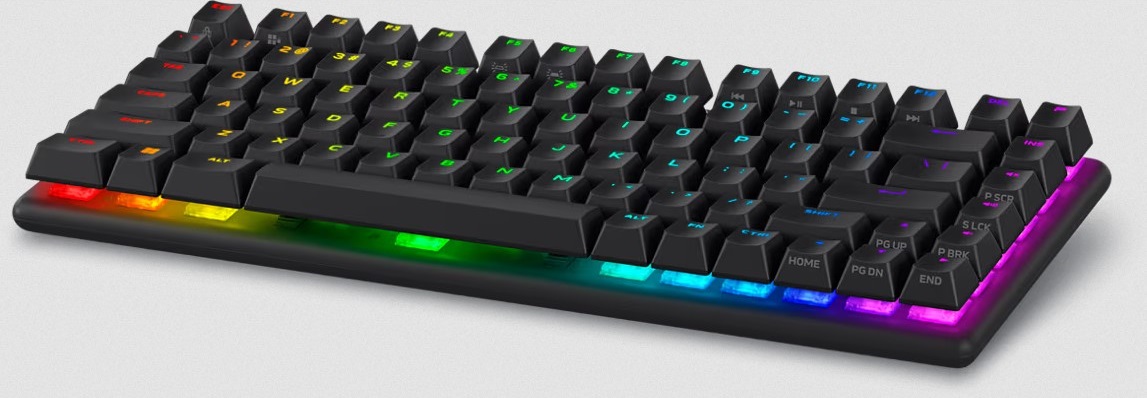
Figure 1: Alienware Pro Wireless Gaming Keyboard in the Dark Side of the Moon Color
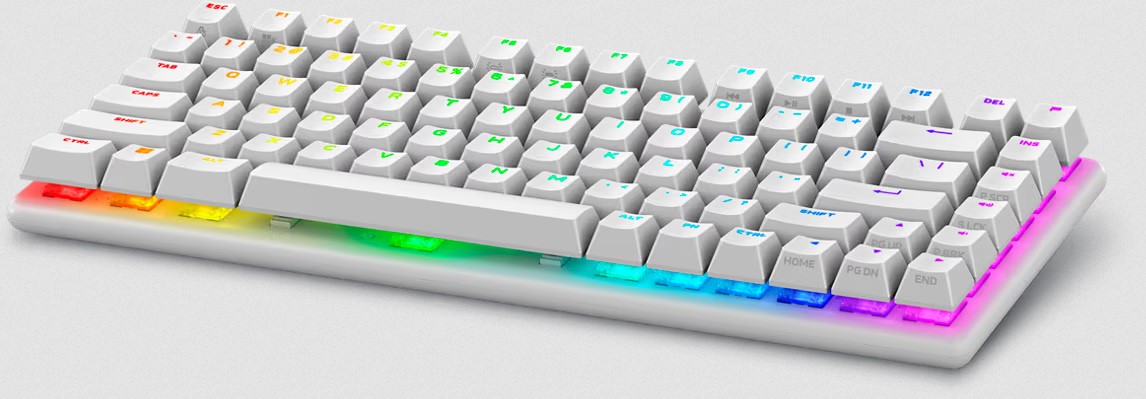
Figure 2: Alienware Pro Wireless Gaming Keyboard in the Lunar Light Color
What is in the Alienware Pro Wireless Gaming Keyboard box
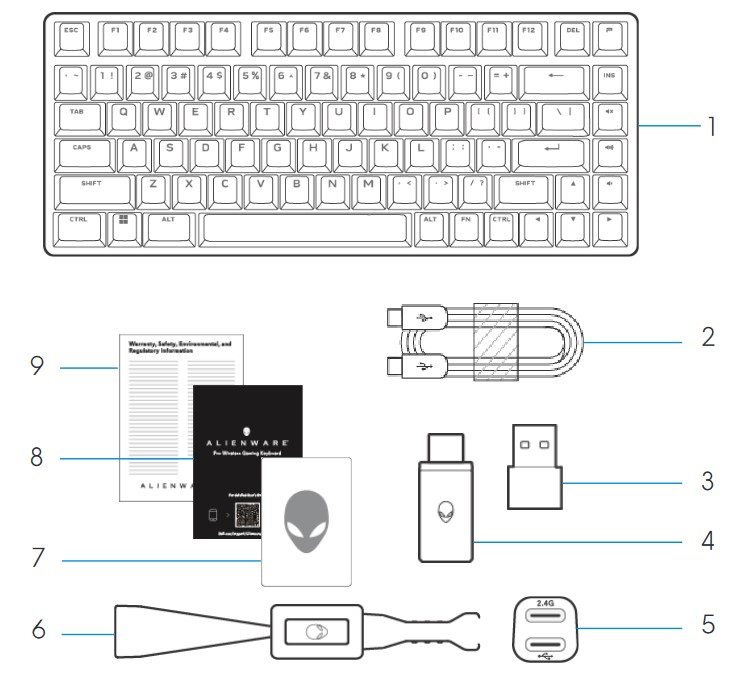
Figure 3: Alienware Pro Wireless Gaming Keyboard Box Contents
| 1 | Alienware Pro Wireless Gaming Keyboard | 2 | USB-C to USB-C cable |
| 3 | USB-A to USB-C adapter | 4 | Type-C dongle |
| 5 | Dongle extender | 6 | Keycap and switch puller |
| 7 | Alienware sticker | 8 | Quick Start Guide |
| 9 | Regulatory document |
Alienware Pro Wireless Gaming Keyboard Features
Top, Bottom, and Front Views
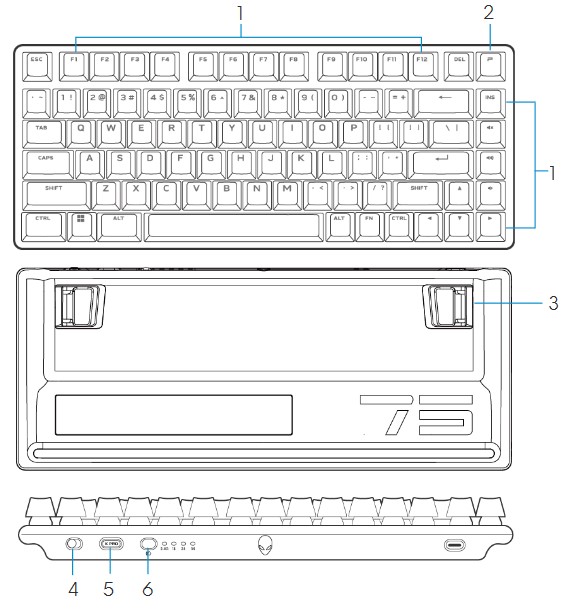
Figure 4: Alienware Pro Wireless Gaming Keyboard Top, Bottom, and Front Views
| 1 | Function keys | Enables a secondary function | 2 | Profile key | Toggles between five keyboard lighting effects |
| 3 | Dual-angle adjustable feet | Enables you to adjust the keyboard feet tilts in two different angles | 4 | Power slider | Turn on or turn off the keyboard |
| 5 | Type-C dongle storage dongle | Press to take out or place the Type-C dongle in the slot | 6 | Mode switch button | Click to switch keyboard connection mode |
Product Features
Alienware Pro Wireless Gaming Keyboard is the first Alienware professional-approved gaming keyboard that is designed and engineered for Esports.
Key features include:
- Tri-Mode connections: Wireless 2.4 GHz, Bluetooth 5.1, and Wired USB
- Alienware hot-swappable linear mechanical switches (greater than 100 million switch durability)
- Polybutylene Terephthalate (PBT) double-shot keycaps
- Compact 75% form factor
- Two layers sound dampening pad
- AlienFX per-key RGB backlighting
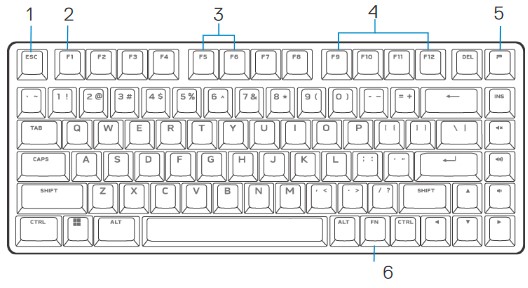
Figure 5: Alienware Pro Wireless Gaming Keyboard Product Features
| 1 | Function key (FN) lock | Press FN+ESC | Locks the F1 to F12 secondary functions | 2 | Win lock | Press FN+F1 | Disables the Windows key function |
| 3 | Brightness Control | Press FN+F5 Press FN+F6 |
Decreases brightness Increases brightness from current intensity or default intensity |
4 | Media playback | Press FN+F9 Press FN+F10 Press FN+F11 Press FN+F12 |
Fast backward Play or pause Stop Fast forward |
| 5 | Profile switch | Press FN+Profile key | Switches between lighting setup stored in keyboard | 6 | FN switch | Press FN+F1~F12 | Switches between different FN functions from F1 to F12 |
Note: Alienware Pro Wireless Gaming Keyboard has 10 brightness levels. The default keyboard-backlight brightness is at 5.
Setting up your Alienware Pro Wireless Gaming Keyboard
Compatibility
Operating Systems:
- Windows 10 - Redstone 3 or later
Turning on your Alienware Pro Wireless Gaming Keyboard
Slide the power slider on the keyboard to turn on the keyboard.
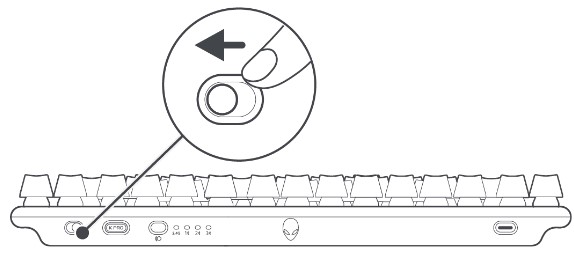
Figure 6: Sliding the power slider on the keyboard
Note: You can use your gaming keyboard without installing the Alienware Command Center (AWCC).
Connecting the Alienware Pro Wireless Gaming Keyboard
The Alienware Pro Wireless Gaming Keyboard uses a USB Type-C connector to connect to your desktop or laptop.
2.4G Wireless Connection Mode
- Press to remove the USB Type-C dongle from the keyboard dongle compartment.

Figure 7: USB Type-C keyboard dongle department
- Connect the Type-C dongle to your computer or to the USB-A to USB-C adapter.
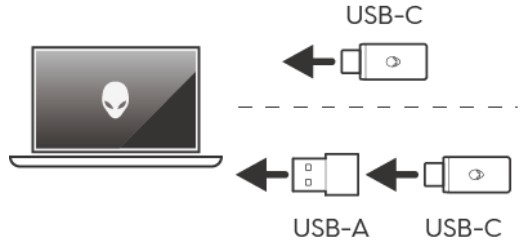
Figure 8: USB Type-C keyboard dongle connection
- Ensure that the keyboard is in or switched to 2.4G wireless connection mode.
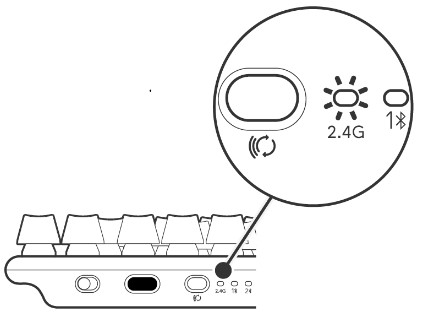
Figure 9: 2.4G wireless connection indicator and mode switch button
You can also connect the Type-C dongle and USB-C cable to the dongle extender.
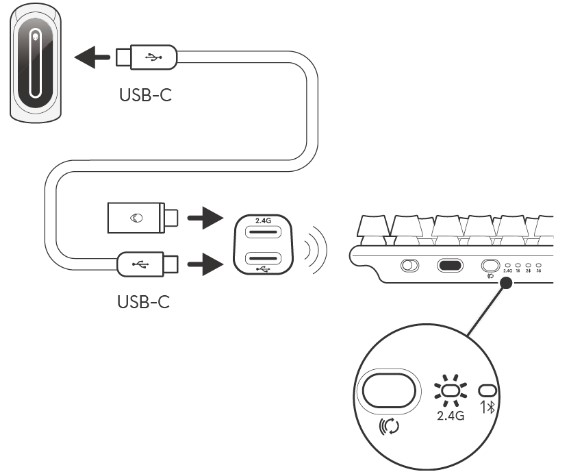
Figure 10: USB Type-C dongle and USB-C cable dongle extender connection
Note: Dell Technologies recommends using a dongle extender to enhance wireless connection stability.
Bluetooth Wireless Connection Mode
- Press the connection mode button to switch from 2.4G to Bluetooth 1. The keyboard RGB blinks to indicate the connection mode change.
- Press and hold the connection mode button for three seconds to activate Bluetooth pairing.
- Check your computer to view the new Bluetooth device. A notification appears with PIN. Enter the PIN to connect to the new Bluetooth device.
- To connect to a different computer, you can switch between Bluetooth 1, Bluetooth 2, or Bluetooth 3. Repeat these steps for a new connection.
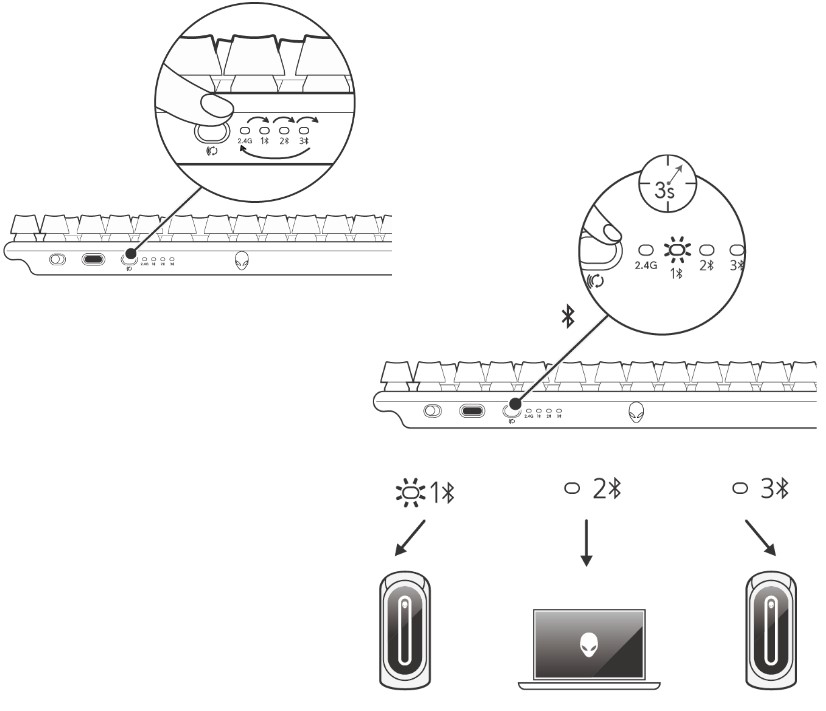
Figure 11: Using the mode switch button to connect to different computers
Wired connection Mode
Your computer may have a USB Type-C or Type-A port. If your computer has a Type-C port, connect your keyboard to the computer through the USB-C to USB-C cable. If your computer has a Type-A port, connect your keyboard to the computer using the USB-C to USB-C cable through the USB-A to USB-C adapter.
When the keyboard is connected to your computer through the wired cable, the connectivity switches from wireless or Bluetooth to wired connection (USB). Wired mode takes priority and disables the multidevice connectivity.
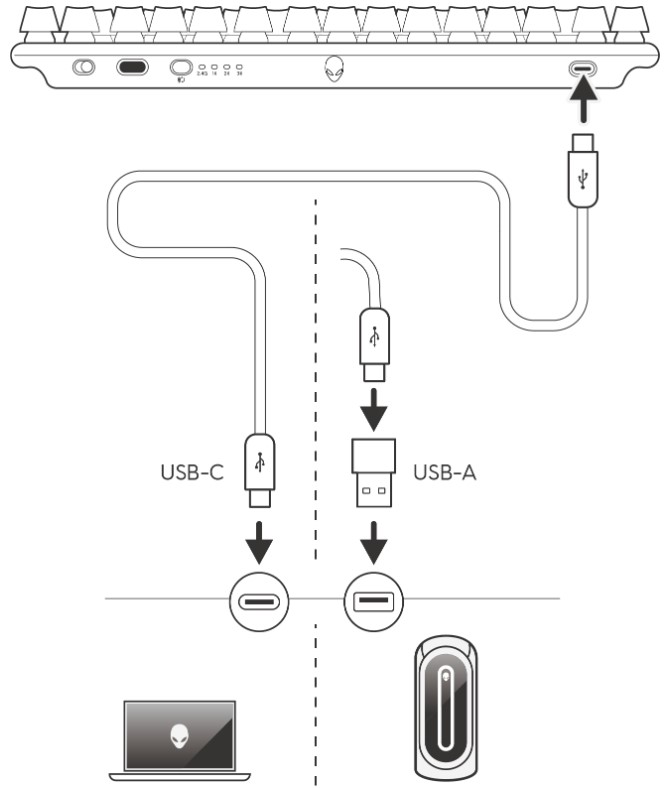
Figure 12: Wired connection mode using USB-C or USB-A
Installing the Alienware Command Center (AWCC)
Alienware Command Center is used to control the features and options of the Alienware Pro Wireless Gaming Keyboard. Alienware Command Center can be installed through either Windows Update or the Dell Support site.
Installing Alienware Command Center through Windows Update
Connect your Alienware device to your computer using the USB port. A prompt appears informing you that AWCC installation is initiated. The AWCC application is downloaded and installed automatically. AWCC installation takes up to ten minutes to complete.
Installing Alienware Command Center from the Dell Support site
- Download Alienware Command Center version 6.1 or later by following the steps below:
- Go to the Dell Support site.
- Type "Alienware Pro Wireless Gaming Mouse" in Identify your product or search support and then click Search.
- Select Drivers & Downloads.
- Select the Operating System.
- Download the Alienware Command Center full installer.
Note:
- If you have a non-Alienware or non-Dell computer, click the Download button of the Alienware Command Center application for a third-party computer.
- If your computer already has Alienware Command Center preinstalled and you want to reinstall the software, click the Download button of the Alienware Command Center application.
- Browse to the folder where you saved the setup files.
- Double-click the setup file and follow the on-screen instructions to install the application.
Alienware Command Center appears under All apps in the Start menu after the application is installed successfully. Launch Alienware Command Center to start the application.
Troubleshooting
| Problems | Possible solutions |
|---|---|
| The keyboard is not functioning. |
|
| The keyboard lighting is off. |
|
| I need more information about the Alienware Command Center features. |
|
| The selected configuration is not working in Alienware Command Center. |
|
Additional Information
Learn how to use and troubleshoot problems with the Alienware Pro Wireless Gaming Keyboard User's Guide you use with your computer. You can find information about Troubleshooting steps, How-To guides, and relevant Support Videos for assistance.
For the Alienware Pro Wireless Gaming Keyboard User's Guide, browse to the Alienware Pro Wireless Gaming Keyboard Online Manual Page. Touch or click View PDF to the right of the Alienware Pro Wireless Gaming Keyboard User Guide, located in the Manuals and Documents section.
Affected Products
Alienware Pro Wireless Gaming KeyboardArticle Properties
Article Number: 000221444
Article Type: How To
Last Modified: 24 Jan 2024
Version: 1
Find answers to your questions from other Dell users
Support Services
Check if your device is covered by Support Services.