Connectrix: Brocado: Cómo importar el certificado LDAP al switch a través de la CLI
Summary: En este artículo, se explican los pasos que implica generar una CSR, exportar el archivo CSR e importar el certificado LDAP a través de la CLI del switch.
This article applies to
This article does not apply to
This article is not tied to any specific product.
Not all product versions are identified in this article.
Instructions
1. Para enumerar los certificados disponibles en el switch, utilice el comando.
3. Para exportar el archivo CSR desde el switch, utilice el siguiente comando. Verifique que el cliente FTP esté listo para la transferencia.
4. Importe el certificado empaquetado de CA (raíz e intermedio).
5. A continuación, importe el certificado empaquetado bajo la función de servidor y utilice el mismo archivo que en el paso 4.
6. Importe el certificado de switch/cliente exportado en el paso anterior y firmado por el administrador de certificados.
>seccertmgmt show --all
Switch_1:FID128:admin> seccertmgmt show -all
ssh private key:
   Does not Exist
ssh public keys available for users:
   None
Certificate Files:
--------------------------------------------------------------------------------------------------------------------
Protocol   Client CA                 Server CA                 SW                        CSR     PVT Key Passphrase
--------------------------------------------------------------------------------------------------------------------
FCAP       Empty                     NA                        Empty                     Empty   Empty   Empty
RADIUS     Empty                     Empty                     Empty                     Empty   Empty   NA
LDAP       Empty                     Empty                     Empty                     Empty   Exist   NA
SYSLOG     Empty                     Empty                     Empty                     Exist   Exist   NA
HTTPS      NA                        Exist                     Exist                     Exist   Exist   NA
KAFKA      NA                        Empty                     NA                        NA      NA      NA
ASC        NA                        Empty                     NA                        NA      NA      NA
2. Para crear la solicitud de firma de certificado (.csr), utilice lo siguiente:
>seccertmgmt generate -csr ldapEl nombre del archivo creado debe terminar con una extensión .csr.
3. Para exportar el archivo CSR desde el switch, utilice el siguiente comando. Verifique que el cliente FTP esté listo para la transferencia.
>seccertmgmt export -csr ldap -protocol ftpHaga que el administrador de certificados firme el archivo CSR.
4. Importe el certificado empaquetado de CA (raíz e intermedio).
seccertmgmt import -ca -client ldap
Switch_1:admin> seccertmgmt import -ca -client ldap
Select protocol [ftp or scp]: ftp
Enter IP address: 10.xx.xx.xx
Enter remote directory: /CSR/LDAP
Enter certificate name (must have ".crt" or ".cer" or ".pem" suffix):chain.pem
Enter Login Name: _v800503
Enter Password:
Success: imported ldap client CA certificate [chain.pem].
5. A continuación, importe el certificado empaquetado bajo la función de servidor y utilice el mismo archivo que en el paso 4.
seccertmgmt import -ca -server ldap
Switch_1:FID128:admin> seccertmgmt import -ca -server ldap
Select protocol [ftp or scp]: ftp
Enter IP address: 10.xx.xx.xx
Enter remote directory: /CSR/LDAP
Enter certificate name (must have ".crt" or ".cer" or ".pem" suffix):chain.pem
Enter Login Name: _v800503
Enter Password:
Success: imported ldap server CA certificate [chain.pem].
6. Importe el certificado de switch/cliente exportado en el paso anterior y firmado por el administrador de certificados.
>seccertmgmt import -cert ldap
Switch_1:FID128:admin> seccertmgmtis  import -cert ldap
Select protocol [ftp or scp]: ftp
Enter IP address: 10.xx.xx.xx
Enter remote directory: /CSR/LDAP
Enter certificate name (must have ".crt" or ".cer" or ".pem" suffix):FCS50.pem
Enter Login Name: _v800503
Enter Password:
Success: imported ldap switch certificate [FCS50.pem].
Switch_1:FID128:admin> seccertmgmt show -all
ssh private key:
   Does not Exist

ssh public keys available for users:
   None

Certificate Files:
--------------------------------------------------------------------------------------------------------------------
Protocol   Client CA                 Server CA                 SW                        CSR     PVT Key Passphrase
--------------------------------------------------------------------------------------------------------------------
FCAP       Empty                     NA                        Empty                     Empty   Empty   Empty
RADIUS     Empty                     Empty                     Empty                     Empty   Empty   NA
LDAP       Exist                     Exist                     Exist                     Exist   Exist   NA
SYSLOG     Empty                     Empty                     Empty                     Exist   Exist   NA
HTTPS      NA                        Exist                     Exist                     Exist   Exist   NA
KAFKA      NA                        Empty                     NA                        NA      NA      NA
ASC        NA                        Empty                     NA                        NA      NA      NA
Additional Information
Siga los pasos que se indican a continuación para encadenar un certificado raíz, un subcertificado y un certificado intermedio en un paquete:
1. Descargue el certificado, que podría estar en formato .p7b. Extraiga el archivo y haga doble clic para abrirlo con el administrador de certificados de Windows.
Ejemplo:

2. Para sub/int/root, haga clic con el botón secundario en todas las tareas, expórtelas y guárdelas como codificadas en base 64 una por una y guarde los archivos en formato .pem.
Abra un bloc de notas y copie el contenido de sub/int/root y combine/encadene un archivo en uno, sub primero, luego int y root el último, guárdelo como PEM y cambie a EOL de UNIX.
Ejemplo: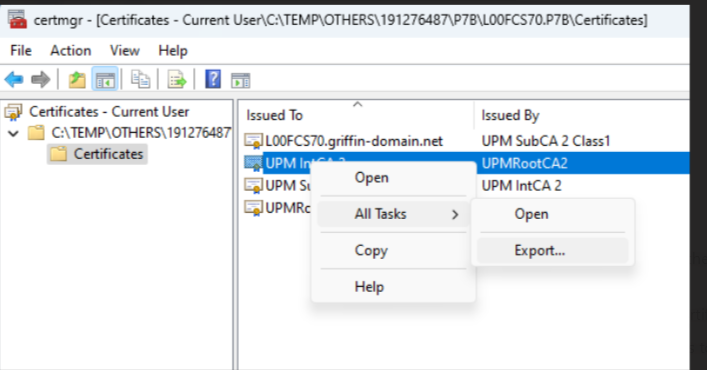
Affected Products
Connectrix B-SeriesProducts
Connectrix B-Series Fabric OS 9.X, Connectrix B-Series HardwareArticle Properties
Article Number: 000226132
Article Type: How To
Last Modified: 20 Jun 2024
Version: 1
Find answers to your questions from other Dell users
Support Services
Check if your device is covered by Support Services.