Connectrix: Brocade: Come importare il certificato LDAP nello switch tramite CLI
Summary: Questo articolo illustra i passaggi per generare la CSR, esportare il file CSR e importare il certificato LDAP tramite la CLI dello switch.
This article applies to
This article does not apply to
This article is not tied to any specific product.
Not all product versions are identified in this article.
Instructions
1. Per elencare i certificati disponibili sullo switch, utilizzare il comando.
3. Esportare il file CSR dallo switch utilizzando il seguente comando. Verificare che il client FTP sia pronto per il trasferimento.
4. Importare il certificato in bundle CA (root e intermedio).
5. Successivamente, importare il certificato in bundle sotto il ruolo server e utilizzare lo stesso file del passaggio 4.
6. Importare il certificato dello switch/client esportato nel passaggio precedente e firmato dall'amministratore del certificato.
>seccertmgmt show --all
Switch_1:FID128:admin> seccertmgmt show -all
ssh private key:
   Does not Exist
ssh public keys available for users:
   None
Certificate Files:
--------------------------------------------------------------------------------------------------------------------
Protocol   Client CA                 Server CA                 SW                        CSR     PVT Key Passphrase
--------------------------------------------------------------------------------------------------------------------
FCAP       Empty                     NA                        Empty                     Empty   Empty   Empty
RADIUS     Empty                     Empty                     Empty                     Empty   Empty   NA
LDAP       Empty                     Empty                     Empty                     Empty   Exist   NA
SYSLOG     Empty                     Empty                     Empty                     Exist   Exist   NA
HTTPS      NA                        Exist                     Exist                     Exist   Exist   NA
KAFKA      NA                        Empty                     NA                        NA      NA      NA
ASC        NA                        Empty                     NA                        NA      NA      NA
2. Creare la richiesta di firma del certificato (.csr) utilizzando:
>seccertmgmt generate -csr ldapIl nome del file creato deve terminare con un'estensione .csr.
3. Esportare il file CSR dallo switch utilizzando il seguente comando. Verificare che il client FTP sia pronto per il trasferimento.
>seccertmgmt export -csr ldap -protocol ftpFar firmare il file CSR dall'amministratore del certificato.
4. Importare il certificato in bundle CA (root e intermedio).
seccertmgmt import -ca -client ldap
Switch_1:admin> seccertmgmt import -ca -client ldap
Select protocol [ftp or scp]: ftp
Enter IP address: 10.xx.xx.xx
Enter remote directory: /CSR/LDAP
Enter certificate name (must have ".crt" or ".cer" or ".pem" suffix):chain.pem
Enter Login Name: _v800503
Enter Password:
Success: imported ldap client CA certificate [chain.pem].
5. Successivamente, importare il certificato in bundle sotto il ruolo server e utilizzare lo stesso file del passaggio 4.
seccertmgmt import -ca -server ldap
Switch_1:FID128:admin> seccertmgmt import -ca -server ldap
Select protocol [ftp or scp]: ftp
Enter IP address: 10.xx.xx.xx
Enter remote directory: /CSR/LDAP
Enter certificate name (must have ".crt" or ".cer" or ".pem" suffix):chain.pem
Enter Login Name: _v800503
Enter Password:
Success: imported ldap server CA certificate [chain.pem].
6. Importare il certificato dello switch/client esportato nel passaggio precedente e firmato dall'amministratore del certificato.
>seccertmgmt import -cert ldap
Switch_1:FID128:admin> seccertmgmtis  import -cert ldap
Select protocol [ftp or scp]: ftp
Enter IP address: 10.xx.xx.xx
Enter remote directory: /CSR/LDAP
Enter certificate name (must have ".crt" or ".cer" or ".pem" suffix):FCS50.pem
Enter Login Name: _v800503
Enter Password:
Success: imported ldap switch certificate [FCS50.pem].
Switch_1:FID128:admin> seccertmgmt show -all
ssh private key:
   Does not Exist

ssh public keys available for users:
   None

Certificate Files:
--------------------------------------------------------------------------------------------------------------------
Protocol   Client CA                 Server CA                 SW                        CSR     PVT Key Passphrase
--------------------------------------------------------------------------------------------------------------------
FCAP       Empty                     NA                        Empty                     Empty   Empty   Empty
RADIUS     Empty                     Empty                     Empty                     Empty   Empty   NA
LDAP       Exist                     Exist                     Exist                     Exist   Exist   NA
SYSLOG     Empty                     Empty                     Empty                     Exist   Exist   NA
HTTPS      NA                        Exist                     Exist                     Exist   Exist   NA
KAFKA      NA                        Empty                     NA                        NA      NA      NA
ASC        NA                        Empty                     NA                        NA      NA      NA
Additional Information
Seguire la procedura riportata di seguito per concatenare un certificato radice, secondario e intermedio in un pacchetto:
1. Scaricare il certificato, che potrebbe essere in formato .p7b. Estrarre il file e cliccare due volte sul file per aprirlo con il gestore certificati di Windows.
Esempio:

2. Per sub/int/root, fare clic con il pulsante destro del mouse, tutte le attività, esportare e salvare come codifica base-64 una per una e salvare i file in formato .pem.
Aprire un blocco note e copiare il contenuto da sub/int/root e combinare/concatenare un file in uno, sub first, quindi int e root l'ultimo, salvare come PEM e passare a UNIX EOL.
Esempio: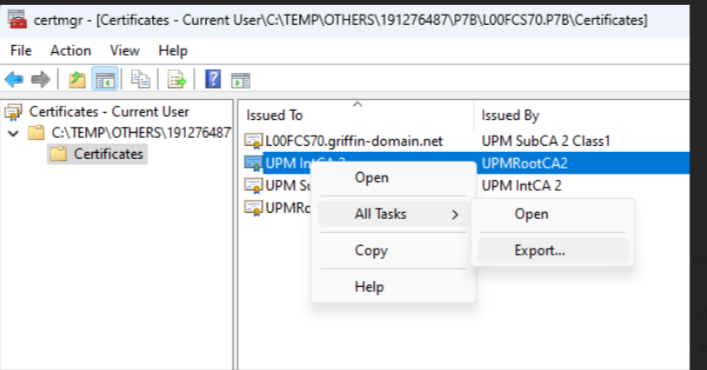
Affected Products
Connectrix B-SeriesProducts
Connectrix B-Series Fabric OS 9.X, Connectrix B-Series HardwareArticle Properties
Article Number: 000226132
Article Type: How To
Last Modified: 20 Jun 2024
Version: 1
Find answers to your questions from other Dell users
Support Services
Check if your device is covered by Support Services.