Connectrix: Brocade: LDAP sertifikasını CLI aracılığıyla anahtara aktarma
Summary: Bu makalede CSR oluşturma, CSR dosyasını dışa aktarma ve anahtar CLI aracılığıyla LDAP sertifikasını içe aktarma adımları açıklanmaktadır.
This article applies to
This article does not apply to
This article is not tied to any specific product.
Not all product versions are identified in this article.
Instructions
1. Anahtardaki kullanılabilir sertifikaları listelemek için komutunu kullanın.
3. Aşağıdaki komutu kullanarak CSR dosyasını anahtardan dışa aktarın. FTP istemcisinin aktarım için hazır olduğunu doğrulayın.
4. CA (kök ve ara) paketli sertifikayı içe aktarın.
5. Ardından, sunucu rolü altındaki paketlenmiş sertifikayı içe aktarın ve 4. adımdakiyle aynı dosyayı kullanın.
6. Önceki adımda dışa aktarılan ve sertifika yöneticisi tarafından imzalanan anahtarı/istemci sertifikasını içe aktarın.
>seccertmgmt show --all
Switch_1:FID128:admin> seccertmgmt show -all
ssh private key:
   Does not Exist
ssh public keys available for users:
   None
Certificate Files:
--------------------------------------------------------------------------------------------------------------------
Protocol   Client CA                 Server CA                 SW                        CSR     PVT Key Passphrase
--------------------------------------------------------------------------------------------------------------------
FCAP       Empty                     NA                        Empty                     Empty   Empty   Empty
RADIUS     Empty                     Empty                     Empty                     Empty   Empty   NA
LDAP       Empty                     Empty                     Empty                     Empty   Exist   NA
SYSLOG     Empty                     Empty                     Empty                     Exist   Exist   NA
HTTPS      NA                        Exist                     Exist                     Exist   Exist   NA
KAFKA      NA                        Empty                     NA                        NA      NA      NA
ASC        NA                        Empty                     NA                        NA      NA      NA
2. Sertifika İmzalama İsteği (.csr) oluşturma kullanımı:
>seccertmgmt generate -csr ldapOluşturulan dosya adı .csr uzantısıyla bitmelidir.
3. Aşağıdaki komutu kullanarak CSR dosyasını anahtardan dışa aktarın. FTP istemcisinin aktarım için hazır olduğunu doğrulayın.
>seccertmgmt export -csr ldap -protocol ftpCSR dosyasını sertifika yöneticinize imzalatın.
4. CA (kök ve ara) paketli sertifikayı içe aktarın.
seccertmgmt import -ca -client ldap
Switch_1:admin> seccertmgmt import -ca -client ldap
Select protocol [ftp or scp]: ftp
Enter IP address: 10.xx.xx.xx
Enter remote directory: /CSR/LDAP
Enter certificate name (must have ".crt" or ".cer" or ".pem" suffix):chain.pem
Enter Login Name: _v800503
Enter Password:
Success: imported ldap client CA certificate [chain.pem].
5. Ardından, sunucu rolü altındaki paketlenmiş sertifikayı içe aktarın ve 4. adımdakiyle aynı dosyayı kullanın.
seccertmgmt import -ca -server ldap
Switch_1:FID128:admin> seccertmgmt import -ca -server ldap
Select protocol [ftp or scp]: ftp
Enter IP address: 10.xx.xx.xx
Enter remote directory: /CSR/LDAP
Enter certificate name (must have ".crt" or ".cer" or ".pem" suffix):chain.pem
Enter Login Name: _v800503
Enter Password:
Success: imported ldap server CA certificate [chain.pem].
6. Önceki adımda dışa aktarılan ve sertifika yöneticisi tarafından imzalanan anahtarı/istemci sertifikasını içe aktarın.
>seccertmgmt import -cert ldap
Switch_1:FID128:admin> seccertmgmtis  import -cert ldap
Select protocol [ftp or scp]: ftp
Enter IP address: 10.xx.xx.xx
Enter remote directory: /CSR/LDAP
Enter certificate name (must have ".crt" or ".cer" or ".pem" suffix):FCS50.pem
Enter Login Name: _v800503
Enter Password:
Success: imported ldap switch certificate [FCS50.pem].
Switch_1:FID128:admin> seccertmgmt show -all
ssh private key:
   Does not Exist

ssh public keys available for users:
   None

Certificate Files:
--------------------------------------------------------------------------------------------------------------------
Protocol   Client CA                 Server CA                 SW                        CSR     PVT Key Passphrase
--------------------------------------------------------------------------------------------------------------------
FCAP       Empty                     NA                        Empty                     Empty   Empty   Empty
RADIUS     Empty                     Empty                     Empty                     Empty   Empty   NA
LDAP       Exist                     Exist                     Exist                     Exist   Exist   NA
SYSLOG     Empty                     Empty                     Empty                     Exist   Exist   NA
HTTPS      NA                        Exist                     Exist                     Exist   Exist   NA
KAFKA      NA                        Empty                     NA                        NA      NA      NA
ASC        NA                        Empty                     NA                        NA      NA      NA
Additional Information
Bir kök, alt ve ara sertifikayı bir pakete zincirlemek için aşağıdaki adımları izleyin:
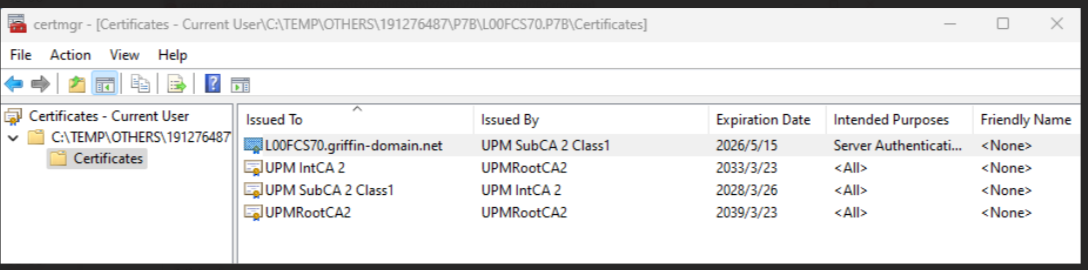
1. .p7b biçiminde olabilecek sertifikayı indirin. Dosyayı ayıklayın ve çift tıklayarak Windows sertifika yöneticisiyle açın.
Örnek:
2. Sub/int/root için sağ tıklayın, tüm görevleri dışa aktarın ve tek tek kodlanmış base-64 olarak kaydedin ve dosyaları .pem formatında kaydedin.
Bir not defteri açın ve içeriği sub/int/root'tan kopyalayın ve bir dosyayı önce sub, sonra int ve sonuncusu root olarak birleştirin/zincirleyin, PEM olarak kaydedin ve UNIX EOL olarak değiştirin.
Örnek: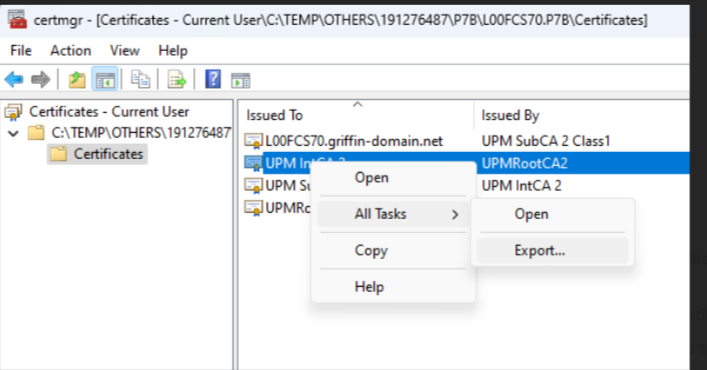
Affected Products
Connectrix B-SeriesProducts
Connectrix B-Series Fabric OS 9.X, Connectrix B-Series HardwareArticle Properties
Article Number: 000226132
Article Type: How To
Last Modified: 20 Jun 2024
Version: 1
Find answers to your questions from other Dell users
Support Services
Check if your device is covered by Support Services.