Connectrix:錦:如何透過命令行介面 (CLI) 將 LDAP 憑證匯入交換器
Summary: 本文說明產生 CSR、匯出 CSR 檔案,以及透過交換器 CLI 匯入 LDAP 憑證的步驟。
This article applies to
This article does not apply to
This article is not tied to any specific product.
Not all product versions are identified in this article.
Instructions
1.若要列出交換器上可用的憑證,請使用命令。
3.使用以下命令,從交換器匯出 CSR 檔案。驗證 FTP 用戶端是否已準備好進行傳輸。
4.匯入 CA (根和中繼) 套裝憑證。
5.接下來,在伺服器角色下導入捆綁的證書,並使用與步驟 4 相同的檔。
6.匯入在上一步驟中匯出並由憑證管理員簽署的交換器/用戶端憑證。
>seccertmgmt show --all
Switch_1:FID128:admin> seccertmgmt show -all
ssh private key:
   Does not Exist
ssh public keys available for users:
   None
Certificate Files:
--------------------------------------------------------------------------------------------------------------------
Protocol   Client CA                 Server CA                 SW                        CSR     PVT Key Passphrase
--------------------------------------------------------------------------------------------------------------------
FCAP       Empty                     NA                        Empty                     Empty   Empty   Empty
RADIUS     Empty                     Empty                     Empty                     Empty   Empty   NA
LDAP       Empty                     Empty                     Empty                     Empty   Exist   NA
SYSLOG     Empty                     Empty                     Empty                     Exist   Exist   NA
HTTPS      NA                        Exist                     Exist                     Exist   Exist   NA
KAFKA      NA                        Empty                     NA                        NA      NA      NA
ASC        NA                        Empty                     NA                        NA      NA      NA
2.建立憑證簽署要求 (.csr) 使用:
>seccertmgmt generate -csr ldap創建的檔案名應以.csr擴展名結尾。
3.使用以下命令,從交換器匯出 CSR 檔案。驗證 FTP 用戶端是否已準備好進行傳輸。
>seccertmgmt export -csr ldap -protocol ftp請由您的憑證管理員簽署 CSR 檔案。
4.匯入 CA (根和中繼) 套裝憑證。
seccertmgmt import -ca -client ldap
Switch_1:admin> seccertmgmt import -ca -client ldap
Select protocol [ftp or scp]: ftp
Enter IP address: 10.xx.xx.xx
Enter remote directory: /CSR/LDAP
Enter certificate name (must have ".crt" or ".cer" or ".pem" suffix):chain.pem
Enter Login Name: _v800503
Enter Password:
Success: imported ldap client CA certificate [chain.pem].
5.接下來,在伺服器角色下導入捆綁的證書,並使用與步驟 4 相同的檔。
seccertmgmt import -ca -server ldap
Switch_1:FID128:admin> seccertmgmt import -ca -server ldap
Select protocol [ftp or scp]: ftp
Enter IP address: 10.xx.xx.xx
Enter remote directory: /CSR/LDAP
Enter certificate name (must have ".crt" or ".cer" or ".pem" suffix):chain.pem
Enter Login Name: _v800503
Enter Password:
Success: imported ldap server CA certificate [chain.pem].
6.匯入在上一步驟中匯出並由憑證管理員簽署的交換器/用戶端憑證。
>seccertmgmt import -cert ldap
Switch_1:FID128:admin> seccertmgmtis  import -cert ldap
Select protocol [ftp or scp]: ftp
Enter IP address: 10.xx.xx.xx
Enter remote directory: /CSR/LDAP
Enter certificate name (must have ".crt" or ".cer" or ".pem" suffix):FCS50.pem
Enter Login Name: _v800503
Enter Password:
Success: imported ldap switch certificate [FCS50.pem].
Switch_1:FID128:admin> seccertmgmt show -all
ssh private key:
   Does not Exist

ssh public keys available for users:
   None

Certificate Files:
--------------------------------------------------------------------------------------------------------------------
Protocol   Client CA                 Server CA                 SW                        CSR     PVT Key Passphrase
--------------------------------------------------------------------------------------------------------------------
FCAP       Empty                     NA                        Empty                     Empty   Empty   Empty
RADIUS     Empty                     Empty                     Empty                     Empty   Empty   NA
LDAP       Exist                     Exist                     Exist                     Exist   Exist   NA
SYSLOG     Empty                     Empty                     Empty                     Exist   Exist   NA
HTTPS      NA                        Exist                     Exist                     Exist   Exist   NA
KAFKA      NA                        Empty                     NA                        NA      NA      NA
ASC        NA                        Empty                     NA                        NA      NA      NA
Additional Information
請遵循以下步驟,將 root、sub 和中繼憑證連結成套裝:
1.下載可能是 .p7b 格式的憑證。解壓縮檔案,然後按兩下以使用 Windows 憑證管理員開啟。
例: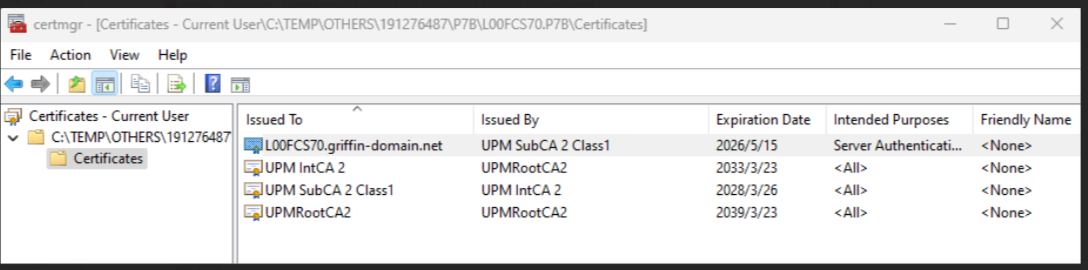
2.針對 sub/int/root,按右鍵,所有工作、匯出,並逐 一 儲存為 base-64 編碼,然後將檔案儲存為 .pem 格式。
開啟記事本並從 sub/int/root 複製內容,然後將檔案合併/連結成一個、先 sub,然後 int 和最後一個 root,另存為 PEM 並變更為 UNIX EOL。
例: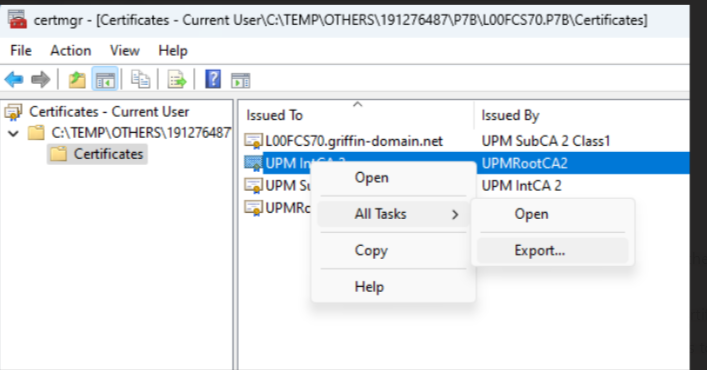
Affected Products
Connectrix B-SeriesProducts
Connectrix B-Series Fabric OS 9.X, Connectrix B-Series HardwareArticle Properties
Article Number: 000226132
Article Type: How To
Last Modified: 20 Jun 2024
Version: 1
Find answers to your questions from other Dell users
Support Services
Check if your device is covered by Support Services.