Connectrix: How to Add and Remove a License on the Switch Using WebTools
Summary: Add a License in the License Management window either by importing it from a file or by entering the license key.
This article applies to
This article does not apply to
This article is not tied to any specific product.
Not all product versions are identified in this article.
Instructions
To add a license, perform the following steps:
- From the navigation bar, click Settings and then select License from the Services tab. The License Management window is displayed.
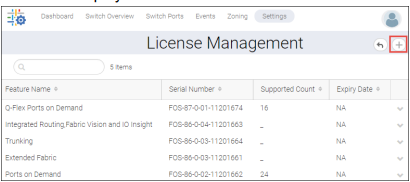
- Click the plus sign ( + ) icon on the upper right corner of the License Management window. The Add License window is displayed.
- Select the Options (Import from file or Enter License Key) to Add a license.
- To import a license certificate from a file:
- Select the Import from File option.
- Enter the host IP address, login credentials (SCP, SFTP, or FTP login credentials), and protocol type (SCP, SFTP, or FTP).
- Enter the file path.
In a Linux-based system, provide the full path of the SCP or SFTP root directory. For example,
/home/user1 is the root directory for SCP running on a Linux host logged in with user1; if the license is present in /home/user1/licenses/license1.xml, then enter the file path as /home/user1/licenses/license1.xml.
In a Windows-based system, enter the file path after the FTP root directory. For example, if a Windows FTP root folder is
c:/users/user1/ftproot/ and the license is present in c:/users/user1/ftproot/licenses/license1.xml, then enter the file path as /licenses/license1.xml.

- For SANnav inbuilt SCP or SFTP, enter the relative path. For example, if the default directory for SANnav inbuilt SCP and SFTP is
/sannav-home/Portal_version_build/data/filetransferand if the license is present in/sannav-home/Portal_version_build/data/filetransfer/license/license.xml, then enter the file path aslicense/license.xmlwith same credentials used for SANnav SCP or SFTP.

- To enter a license key:
- Select the Enter License Key option.
- Enter the License Key in the License Key field.
- Click OK. The license is added and displayed under the License Management window.
To remove a license, perform the following steps:
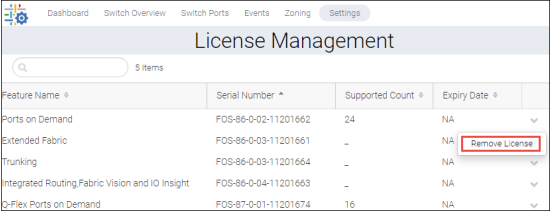
- From the navigation bar, click Settings and then select License Management from the Services tab. The License Management window is displayed.
- Click the ( ) icon next to the license that you want to remove, and then click Remove License. The Delete License window is displayed.
- Click OK. The license is removed from the License Management window.
Affected Products
Connectrix B-SeriesProducts
Connectrix B-Series SoftwareArticle Properties
Article Number: 000227520
Article Type: How To
Last Modified: 02 Aug 2024
Version: 1
Find answers to your questions from other Dell users
Support Services
Check if your device is covered by Support Services.