How to Validate Secured Component Verification (on Device) Certificates
Summary: Learn how to validate the integrity of a device using the platform certificate and a verifier platform for Secured Component Verification on Device.
This article applies to
This article does not apply to
This article is not tied to any specific product.
Not all product versions are identified in this article.
Instructions
Note: The following steps are intended only for performing your own validation instead of using Dell Technologies' service. To use Dell Technologies' service, refer to Guide to Secured Component Verification (On Cloud).
The integrity and authenticity of a Dell computer can be validated using the platform certificate and verifier platform. This can be accomplished when Secured Component Verification (On Device) is ordered with a device. The United States Department of Defense (DoD) developed the verifier platform. The verifier platform is known as the Host Integrity at Runtime and Start-up (HIRS) tool. The HIRS tool consists of two components, the Attestation Certificate Authority (ACA) portal and the HIRS provisioner. The following must be set up for the HIRS provisioner to verify results:
- HIRS tool
- Endpoint device running Windows 10 or Windows 11
- HIRS provisioner configured
- ACA portal
- Signing and platform certificates uploaded to the ACA
- Policy set within the ACA to specify which parts of the device and certificate shall be validated
Validating the device integrity requires that you Install the HIRS ACA Portal, Collect Certificates, Upload Certificates to the ACA Portal, Set the ACA Policy, Download and Install the HIRS Provisioner, Run Provisioner, then Verify Results.
Install the HIRS ACA Portal
Note: This requires a Docker Desktop license and a system under test with Internet or intranet connectivity. For more information about Docker Desktop, refer to Docker Desktop .
.
Installing the HIRS ACA portal on the system under test means that you are running the attestation locally. This method is likely the easiest deployment model but not the most secure. For a more secure method, install the HIRS ACA portal on a remote device or server.
- Download and install Docker Desktop on the system under test or server.
Note: Running the ACA verifier on the system under test is known as local verification and is a different threat model than running the ACA on a networked server.
- Search for Windows PowerShell, right-click it, select Run as administrator, type the following command and then press Enter.
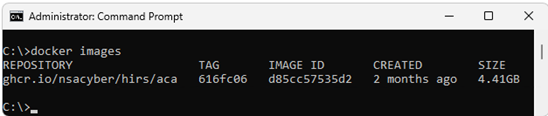
docker pull ghcr.io/nsacyber/hirs/aca:616fc06 - In Docker, to confirm that the HIRS ACA image has been created, type the following command and then press Enter.
docker images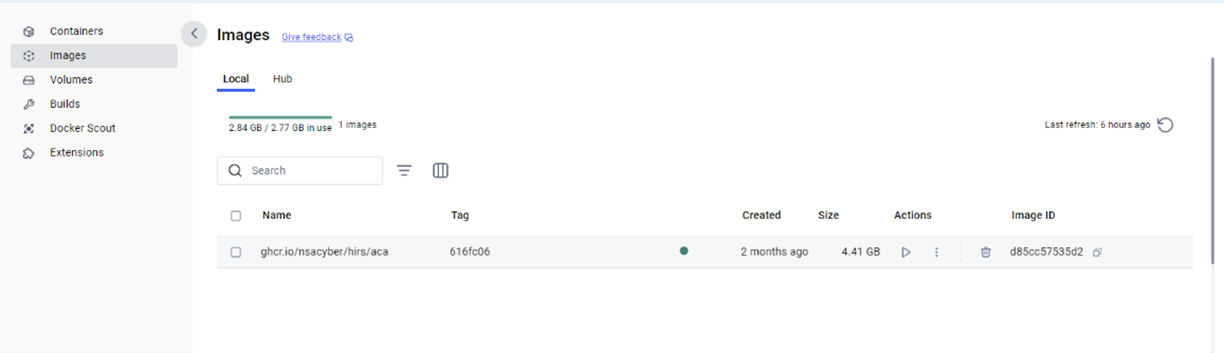
- In PowerShell, to verify the repository, check under REPOSITORY for
repository gchr.io/nsacyber/hirs/aca.
- In PowerShell, type the following command and then press Enter.
docker run --name=aca -p 8443:8443 ghcr.io/nsacyber/hirs/aca:616fc06 - In Docker, to confirm that the server image is running within the container, type the following command and then press Enter.
docker container ls -a - Verify that
acais shown under the NAMES category.

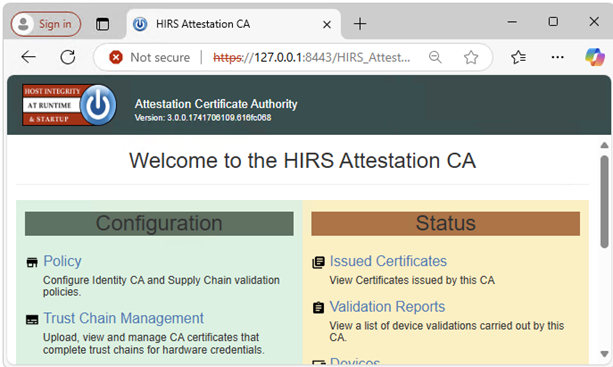
- Open a browser and go to the ACA Portal to verify that the Docker image is functioning. If running local verification, use the local host IP address 127.0.0.1.
 Note:
Note:- If running local verification, go to https://127.0.0.1:8443/HIRS_AttestationCAPortal/
- It can take a few minutes for the portal site to come online.
- Once the portal site is online, you may receive a "Your connection isn't private" message. This is expected behavior when running local verification.
- If running local verification, go to https://127.0.0.1:8443/HIRS_AttestationCAPortal/
Collect Certificates
- Collect the SCV platform attribute certificate. SCV (on Device) stores the certificate on the UEFI partition of the hard drive.
- Search for Command Prompt, right-click it, and then select Run as administrator.
- Type the following command and then press Enter.
mountvol o: /S - Type the following command and then press Enter.
copy o:\EFI\tcg\cert\platform\*.cer c:\dell\platcert}Note: If SCV (on Cloud) is purchased, the certificate is in Dell Trusted Device and is not available locally for verification with the HIRS ACA.
- Collect the Dell Intermediate CA signing certificate.
- From the factory, the Attribute Certificate and Signing Certificate are concatenated within the SCV Platform Certificate and must be separated before it can be uploaded to the HIRS ACA Portal. Run the following command from PowerShell and then press Enter.
PowerShell :> $i=0; Get-Content c:\dell\platcert\*.cer -ReadCount 3 | %{$i++; $_ | Out-File out_$i.crt} - Collect the filenames
out_1.crtandout _2.crt.
- From the factory, the Attribute Certificate and Signing Certificate are concatenated within the SCV Platform Certificate and must be separated before it can be uploaded to the HIRS ACA Portal. Run the following command from PowerShell and then press Enter.
- Collect the CA signing root certificate by going to Support for Trusted Device | Drivers & Downloads and downloading the Secure Component Validator.
- Collect the TPM root and intermediate signing certificates for the TPM models in your environment from the following sources:
- STMicro: https://www.st.com/resource/en/technical_note/tn1330-st-trusted-platform-module-tpm-endorsement-key-ek-certificates-stmicroelectronics.pdf
- Nuvoton: https://www.nuvoton.com/export/sites/nuvoton/files/security/Nuvoton_TPM_EK_Certificate_Chain.pdfNote: An administrator may not have records of the TPM models used in the environment. If this occurs, an administrator may download all TPM root and intermediate signing certificates in the provided documents for STMicro and Nuvoton.
- STMicro: https://www.st.com/resource/en/technical_note/tn1330-st-trusted-platform-module-tpm-endorsement-key-ek-certificates-stmicroelectronics.pdf
Upload Certificates to the ACA Portal
- Load the Dell SCV Platform Attribute certificate (
c:\dell\platcert\out_1.crt) into the ACA portal by clicking the + sign on the Platform Certificates tab.
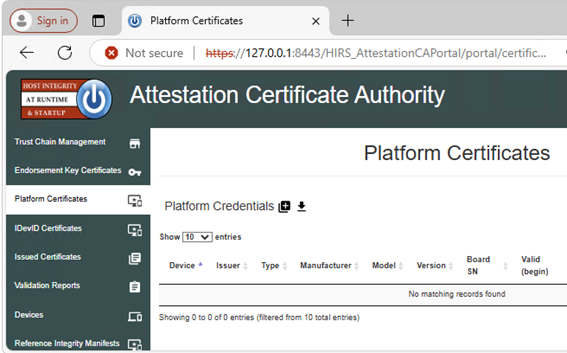 Note: If running local verification, go to https://127.0.0.1:8443/HIRS_AttestationCAPortal/portal/certificate-request/platform-credentials
 - Load the Dell Factory Intermediate CA signing certificate (
c:\dell\platcert\out_2.crt), CA signing root certificate (PROD-CSG-SCV-Root.cer), and TPM root signing certificates by clicking the + sign next to Trust Chain CA Certificates on the Trust Chain Management tab.
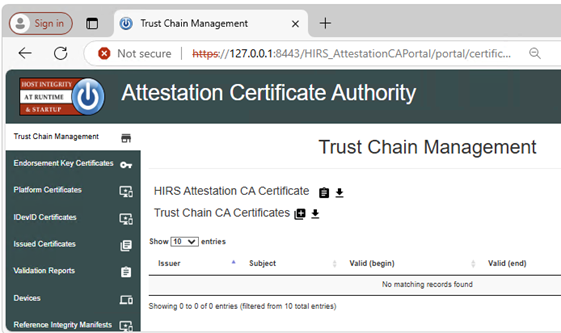 Note: If running local verification, go to https://127.0.0.1:8443/HIRS_AttestationCAPortal/portal/certificate-request/trust-chain
Set the ACA Policy
- Go to the Policy tab.
- Click the pencil icon and set the following to Enabled:
- Endorsement Credential Validation
- Platform Credential Validation
- Platform Attribute Credential Validation
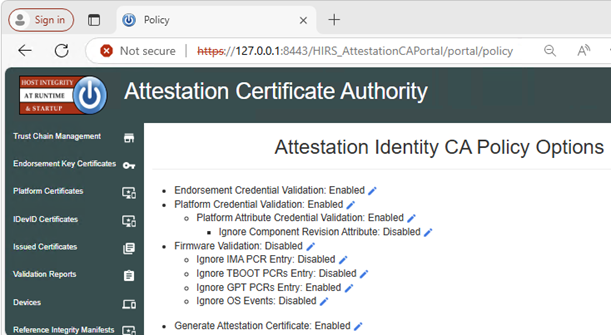 Note: If running local verification, go to https://127.0.0.1:8443/HIRS_AttestationCAPortal/portal/policy
Download and Install the HIRS Provisioner
This step must be performed on each system that contains a certificate.
- Download and install the latest version of Provisioner from HIRS Provisioner Releases
- From Windows Explorer, go to
c:\Program Files(x86)\HIRS_Provisioner.NET\plugins\scripts\windows. - Right-click
allcomponents.ps1and select Edit in Notepad, then comment out line 15 by adding the#symbol in front of the line.Note: For example,#$NVME_SCRIPT="$APP_HOME/nvme.ps1" # For NVMe. - Comment out line 30 by adding the
#symbol in front of the line.Note: For example,#. $NVME_SCRIPT. - Replace all of "
### Gather HDD details" (lines 669-744) with the below text:### Gather HDD details Write-Progress -Id 1 -Activity "Gathering component details" -PercentComplete 70 Write-Progress -Id 2 -ParentId 1 -Activity "Gathering HDD information" -CurrentOperation "Querying" -PercentComplete 0 function parseHddData() { $RS=(Get-CimInstance -ClassName CIM_DiskDrive | select serialnumber,mediatype,pnpdeviceid,manufacturer,model | where mediatype -eq "Fixed hard disk media") $component="" $replaceable=(jsonFieldReplaceable "true") $numRows=1 if ($RS.Count -gt 1) { $numRows=($RS.Count)} for($i=0;$i -lt $numRows;$i++) { Write-Progress -Id 2 -ParentId 1 -Activity "Gathering Hard Disk information" -CurrentOperation ("Cleaning output for HDD " + ($i+1)) -PercentComplete ((($i+1) / $numRows) * 100) $hddClass=(jsonComponentClass "$COMPCLASS_REGISTRY_TCG" "$COMPCLASS_HDD") $pnpDevID="" if(isIDE($RS[$i].PNPDeviceID)) { $pnpDevID=(ideDiskParse $RS[$i].PNPDeviceID) } elseif(isSCSI($RS[$i].PNPDeviceID)) { $pnpDevID=(scsiDiskParse $RS[$i].PNPDeviceID) } else {Continue } if(($pnpDevID -eq $null) -or (($pnpDevID -eq "(Standard disk drives)") -and ($pnpDevID.product -eq $null))) { $regex="^.{,16}$" $pnpDevID=[pscustomobject]@{ product=($RS[$i].model -replace '^(.{0,16}).*$','$1') # Strange behavior for this case, will return } } $tmpManufacturer=$pnpDevID.vendor # PCI Vendor ID $tmpModel=$pnpDevID.product # PCI Device Hardware ID $tmpSerial=$RS[$i].serialnumber $tmpRevision=$pnpDevID.revision if ([string]::IsNullOrEmpty($tmpManufacturer) -or ($tmpManufacturer.Trim().Length -eq 0)) { $tmpManufacturer="$NOT_SPECIFIED" } $tmpManufacturer=$(jsonManufacturer "$tmpManufacturer".Trim()) if ([string]::IsNullOrEmpty($tmpModel) -or ($tmpModel.Trim().Length -eq 0)) { $tmpModel="$NOT_SPECIFIED" } $tmpModel=$(jsonModel "$tmpModel".Trim()) if (![string]::IsNullOrEmpty($tmpSerial) -and ($tmpSerial.Trim().Length -ne 0)) { $tmpSerial=(jsonSerial "$tmpSerial".Trim()) } else { $tmpSerial="" } if (![string]::IsNullOrEmpty($tmpRevision) -and ($tmpRevision.Trim().Length -ne 0)) { $tmpRevision=(jsonRevision "$tmpRevision".Trim()) } else { $tmpRevision="" } $tmpComponent=(jsonComponent $hddClass $tmpManufacturer $tmpModel $replaceable $tmpSerial $tmpRevision) $component+="$tmpComponent," } Write-Progress -Id 2 -ParentId 1 -Activity "Gathering Hard Disk information" -CurrentOperation "Done" -PercentComplete 100 return "$component".Trim(",") }
Run Provisioner
Right-click Provisioner and select Run as administrator on the systems that contain a certificate.
Note: Provisioner is available from
c:\Program Files(x86)\HIRS_Provisioner.NET\tpm_aca_provision.exe.
Verify Results
Check the Validation Reports ACA portal page for a passing result.
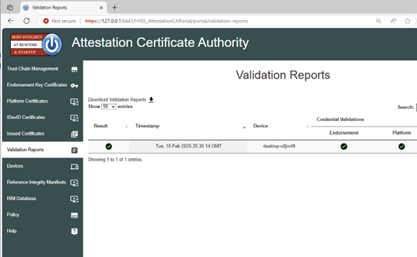
Note: If running local verification, go to https://127.0.0.1:8443/HIRS_AttestationCAPortal/portal/validation-reports.
Affected Products
Dell Trusted DeviceArticle Properties
Article Number: 000293241
Article Type: How To
Last Modified: 22 May 2026
Version: 6
Find answers to your questions from other Dell users
Support Services
Check if your device is covered by Support Services.