PowerFlex 4.X: How to Replace NVDIMM using PFMP Wizard
Summary: This article explains how to use the PowerFlex Manager Platform (PFMP) Wizard to replace a faulty Non-Volatile Dual inline memory module (NVDIMM) in PowerEdge servers.
This article applies to
This article does not apply to
This article is not tied to any specific product.
Not all product versions are identified in this article.
Instructions
Identify the faulty NVDIMM module.
Identify the faulty NVDIMM module in Integrated Dell Remote Access Controller (iDRAC) and correlate its Direct Access (DAX) device in PFMP.
- Identify the faulty
NVDIMMslot from PowerEdge iDRAC from the Maintenance tab; select System event log.
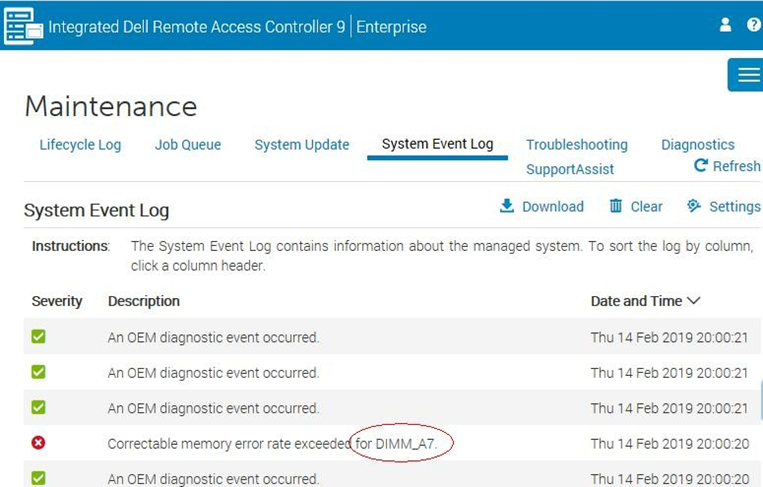
In this example, the faulty NVDIMM slot is A7.
- Identify the faulty
NVDIMMserial number usingSSHto the impactedSDSnode and run the following command.
dmidecode --type memory | grep "Non-" -B 3 -A 3 | grep -E 'Locator|Serial' | grep -v BankOutput similar to the following appears:
Locator: A7
Serial Number: 16492521
Locator: B7
Serial Number: 1649251B
In this example, the serial number for NVDIMM A7 is 16492521.
- Display the list of
NVDIMMsmounted on the server and find the devnmemfor the serial number16492521.
ndctl list -Dvvv | jq '.[].dimms'Output similar to the following should appear:
  [
{
"dev": "nmem1",
"id": "802c-0f-1711-1649251b",
"handle": 4097,
"phys_id": 4370, "state": "disabled", "health": {
"health_state": "ok", "temperature_celsius": 255,
"life_used_percentage": 32
}
},
{
"dev": "nmem0",
"id": "802c-0f-1711-16492521",
"handle": 1,
"phys_id": 4358, "state": "disabled", "health": {
"health_state": "ok", "temperature_celsius": 255,
"life_used_percentage": 32
}
}
]
In this example, nmem0 is the dev for serial number 16492521.
- Correlate
nmemmapping, region, namespace, and DAX configuration information using the following command:
ndctl list -Dvvv | jq '.[].regions[]'Output similar to the following appears:
   {
"dev": "region1", "size": 17179869184,
"available_size": 0,
"max_available_extent": 0, "type": "pmem", "numa_node": 1, "mappings": [
{
"dimm": "nmem1", "offset": 0,
"length": 17179869184,
"position": 0
}
],
"persistence_domain": "unknown", "namespaces": [
{
"dev": "namespace1.0",
"mode": "devdax",
"map": "dev", "size": 16909336576,
"uuid": "0a438fbc-91e4-427d-8068-1f26330d85cc", "daxregion": {
"id": 1,
"size": 16909336576,
"align": 4096,
"devices": [
{
"chardev": "dax1.0", "size": 16909336576
}
]
},
"numa_node": 1
}
]
}
{
"dev": "region0",
"size": 17179869184,
"available_size": 0,
"max_available_extent": 0, "type": "pmem", "numa_node": 0, "mappings": [
{
"dimm": "nmem0", "offset": 0,
"length": 17179869184,
"position": 0
}
],
"persistence_domain": "unknown", "namespaces": [
{
"dev": "namespace0.0",
"mode": "devdax",
"map": "dev", "size": 16909336576,
"uuid": "38cbd555-3f5b-4f4f-8d83-bf77db75553d", "daxregion": {
"id": 0,
"size": 16909336576,
"align": 4096,
"devices": [
{
"chardev": "dax0.0",
"size": 16909336576
}
]
},
"numa_node": 0
}
]
}
In this example nmem0 is in region 0, namespace0.0, and DAX device dax0.0.
The result of these steps is to correlate A7 from iDRAC with dax0.0 in PFMP.
Remove the NVDIMM memory module.
Remove the NVDIMM memory module from the system using the PowerFlex Manager NVDIMM Replacement Wizard.
- Log in to PowerFlex Manager.
- On the menu bar, click Lifecycle > Resource Groups.
- On the Resource Groups page, click the resource group that needs replacement and click View Details.
- On the Details page, scroll to the Physical Nodes section of the page.
- Under Component Replacement, click
NVDIMMReplacement.
PowerFlex Manager displays the Node List panel in theNVDIMMReplacement
- Select the node that needs the
NVDIMM
PowerFlex Manager displays the Selected Component panel. All availableNVDIMMNVDIMMNVDIMMNVDIMM
- Under
NVDIMMNVDIMM
A message displays prompting you to ensure that the node selection is correct, as theNVDIMM
- To replace an
NVDIMMREMOVE NVDIMM.
A message stating the removal or addition of theNVDIMM
A job for the replacement of the memory module gets created.
- Click the Jobs icon at the upper right hand-side of the menu bar to view the details of the job. Wait for the job to finish.
Dell Field Engineer (FE) to do the physical replacement for the faulty NVDIMM
NVDIMMPut the SDS NVDIMM
Completing the NVDIMM
NVDIMMAfter the memory module is replaced, the host and SVMNVDIMM
Prerequisites
Ensure that you have performed the steps in Remove the NVDIMMNVDIMM
- When the node is replaced physically, click Discover Replacement
NVDIMM.
The Discover ReplacementNVDIMMNVDIMMs.
- Upon discovery completion, the log displays the status as Complete. Under Actions, click the Complete
NVDIMM
- Click Complete to finish the replacement process.
After replacing theNVDIMM,NVDIMMSDSSVM.
- After adding the new
NVDIMMTheNVDIMMdevice replacement is complete
Bring the resource into compliance and return the node to operation.
After replacing the hardware component, update the system resources to bring the resources into compliance with the firmware and drivers in the compliance file. When the resource is compliant, return the node to operation.
Affected Products
PowerFlex rack, ScaleIOArticle Properties
Article Number: 000321223
Article Type: How To
Last Modified: 27 Jan 2026
Version: 3
Find answers to your questions from other Dell users
Support Services
Check if your device is covered by Support Services.