PowerFlex4.x Enabling and Configuring SupportAssist on PFMP Direct and using SCG
Summary: There are two options to configure events and alerts: ● Connect directly ● Connect using secure connect gateway ● If you connect directly, only the call home option is available ● If you connect through secure connect gateway, all options through secure connect gateway are enabled ...
This article applies to
This article does not apply to
This article is not tied to any specific product.
Not all product versions are identified in this article.
Instructions
Enabling SupportAssist
There are two options to configure events and alerts:
- Connect directly
- Connect using secure connect gateway
- If you connect directly, only the call home option is available
- If you connect through secure connect gateway, all options through secure connect gateway are enabled
Deploy or configure secure connect gateway
Secure connect gateway is an enterprise monitoring technology that monitors your devices and proactively detects hardware issues that may occur.
Prerequisites
Ensure your system complies to the minimum requirements, for more information, see the Secure Connect Gateway 5.x - Virtual Edition Deployment Guide.
Steps
To deploy and configure secure connect gateway, see Deploy Secure Connect Gateway using VMware vSphere Web Client in the Secure Connect Gateway 5.x - Virtual Edition Deployment Guide.
Configuring the initial setup and generating the access key and pin
Use the section to generate the access key and pin to register with secure connect gateway and Dell Technologies Support site.
Customers should work with Dell Technologies Support to get the site ID that is required while generating the access key and pin.
Register and log in to the secure connect gateway user interface
Use this procedure to log in to the secure connect gateway user interface.
Steps
To log in to the secure connect gateway, see Registering and signing in to Secure Connect Gateway in the Secure Connect Gateway 5.x — Virtual Edition User's Guide.
Ensure you complete the following procedures:
- Sign in to Secure Connect Gateway
- Register Secure Connect Gateway
- Sign in using administrator account or network credentials
Deploying and configuring policy manager for secure connect gateway
Policy manager for secure connect gateway is a device access management technology that is delivered as a virtual appliance. Policy manager for secure connect gateway can be deployed on a hypervisor.
You can configure policy manager for secure connect gateway to perform the following tasks:
- Control remote access to your devices.
- Maintain an audit log of remote connections and file transfers.
- Access administration actions performed on policy manager for secure connect gateway.
Minimum requirements to deploy and use Policy Manager for Secure Connect Gateway
The following sections provide information about:
- Minimum system and network requirements for the local system to deploy policy manager.
- Browsers that can be used to access the policy manager user interface.
- Hypervisors that can be used to deploy policy manager.
System requirements
The system requirements to deploy and use policy manager are:
- Number of processor cores—4
- Installed memory (RAM)—8 GB
- Hard drive space—120 GB—Thin Provisioning
Deploy policy manager for secure connect gateway
Use this procedure to deploy policy manager for secure connect gateway.
About this task
NOTE: Policy manager for secure connect gateway is optional.
PowerFlex Manager does not manage policies or policy manager for secure connect gateway.
This chapter does not cover procedures to create and manage policies. For information on creating and managing policies, see
Policy Manager for Secure Connect Gateway 5.00.00.xy User's Guide.
Prerequisites
Before deploying policy manager for secure connect gateway, ensure the following:
- Upgrade secure connect gateway
- Download the latest version of policy manager for secure connect gateway from Dell Technologies support site.
Steps
- Download and extract the OVF file to a location accessible by VMware vSphere Client.
- On the right pane of VMware vSphere Client, click Create/Register VM. The New virtual machine window is displayed.
- On the Select creation type page, select Deploy a virtual machine from an OVF or an OVA file and click Next.
- On the Select OVF and VMDK files page, enter a name for the virtual machine, select the OVF and VMDK files, and click
Next.
The Select storage page is displayed. If there is more than one datastore on the host, the datastores are displayed on the
Select storage page.
- Select the location to store the virtual machine files and click Next.
- Review the details and click Next.
- On the License agreements page, read the license agreement, click I agree, and click Next.
- On the Select Storage page, select the datastore for the VM, select a disk provisioning type, and click Next.
- On the Deployment options page, perform the following steps:
- From the Network mappings list, select the network that the deployment template must use.
- Click Next.
- On the Additional settings page, enter the following details and click Next:
- Domain name server
- Hostname
- Default gateway
- Network IPv4 and IPv6
- Time zone
- Secure socket layer
- Root password: Ensure that the root password consists of eight characters with at least one uppercase and one lowercase letter, one number, and one special character.
- Web administrator username: After deployment, the username is automatically updated to admin.
- On the Ready to complete page, verify the details that are displayed and click Finish.
A message is displayed after the deployment is complete and the virtual machine is powered on.
- Log in to policy manager for secure connect gateway and perform the following steps:
- Go to https://<hostname(FQDN) or IP address>:8443
- Enter admin as the user ID.
- If you are logging in for the first time, enter the default password.
- After logging in for the first time, enter the new administrator account password when prompted and click Save.
- Enter the new password and click Log In.
Configure policy manager settings on secure connect gateway
Use this procedure to ensure connectivity between secure connect gateway and policy manager.
About this task
NOTE: Policy manager is not managed by PowerFlex Manager.
Steps
- Sign in to secure connect gateway.
- Go to Settings > Environment configuration > Connectivity details > Policy Manager.
- Click Enable remote Policy manager.
- Enter the hostname or IP address, port number, username, and password of the policy manager server.
NOTE: If the port is SSL secured, the port number must be 8443. If the port is not SSL secured, the port number must be 8888.
- Click Enable SSL if policy manager for secure connect gateway is installed on a server that is secured by SSL.
- If the policy manager server connects to the Internet through a proxy server, perform the following steps in the Customer proxy server section:
- Click Enable proxy server for Policy manager only.
- Enter the hostname or IP address and port number.
- Click Proxy requires authentication and enter the username and password to access the proxy server.
- Test the connection and click Apply.Configuring SupportAssist on PowerFlex Manager
Depending on the customers requirement, use the following procedures to configure the connect directly or connect using the secure connect gateway. In order to allow remote support, use secure connect gateway. Remote support is not be enabled for direct connect.
===========================================================================================================
Configure SupportAssist using the connect directly mode
Use this procedure to enable SupportAssist using the connect directly mode.
Steps
- Log in to PowerFlex Manager.
- Click Settings > Events and alerts.
- Click Notification Policies.
- On the Destinations pane, click SupportAssist.
- Accept the license and telemetry agreement on the connect support assist page and click Next.
- Choose the connection type Connect Directly.
NOTE: This helps us directly connect to SupportAssist direct. Call to home feature works on connect direct. The proxy setting is not supported.
- Click Connect to cloudIQ.
It enables PowerFlex Manager to transport telemetry data, alerts and analytics to assist Dell Technologies in providing support.
- On the Authentication details page, provide the following details.
- Access key and PIN, see Generate Access Key and PIN for Secure Connect Gateway 5.x. You need the software ID for generating the access key and PIN.
- Choose the Device type to be registered like rack, appliance or software.
- In the Enterprise License Management Systems file, enter the software ID used in step 2 while generating the access key and pin.
- The Solution serial number must be provided by customer.
- In the Site ID field, provide the site ID location. If you do not have one, contact Dell Technologies Support to generate one.
- Click Next, provide the contact details for customer, and click Finish.
A window appears on the bottom of the screen configuring SupportAssist and another window appears once it is successfully configured.
- To activate the policy, click Configure Now and enable the policy by making it active.
Once the policy is active, the policy will move from grayed out mode to available and active mode.
Connect SupportAssist using the secure connect gateway
Use this procedure to enable SupportAssist using the secure connect gateway.
Prerequisites
Configure the secure connect gateway.
Steps
- Log in to PowerFlex Manager.
- Click Settings > Events and alerts.
- Click Notification Policies.
- On the Destinations pane, click SupportAssist.
- Accept the license and telemetry agreement on the Connect to SupportAssist page and click Next.
- Choose the connection type connect via gateway.
NOTE: Connect using the gateway helps register PowerFlex Manager on secure connect gateway and SupportAssist. From here we can enable the proxy setting.
- Provide the SCG IP address and Port number.
NOTE: Maintain the gateway port as 9443. Port 5700 port is only used for the secure connect gateway UI, API communication with secure connect gateway from the PowerFlex management platform uses port 9443.
- Click Connect to CloudIQ.
It enables PowerFlex Manager to transport telemetry data, alerts, and analytics to assist Dell Technologies in providing support.
- Enable the Remote Support button and click Next.
- On the Authentication Details page, provide the following details.
- Access key and PIN, see Generate Access Key and PIN for Secure Connect Gateway 5.x.
- Choose the Device type to register like rack, appliance, or software.
- In the Enterprise License Management Systems file, enter the software ID used in step 4 while generating the access key and PIN.
- The Solution serial number must be provided by the customer.
- In the Site ID field, provide the site ID location. If you do not have one, contact Dell Technologies Support to generate one.
- Click Next, provide the contact details for the customer, and click Finish.
A popup appears on the bottom of the screen configuring SupportAssist and another pop up appears once it is successfully configured.
- To activate the policy now, click Configure Now and enable the policy by making it active. Once the policy is active, it will remove from grayed out mode to available and active mode.
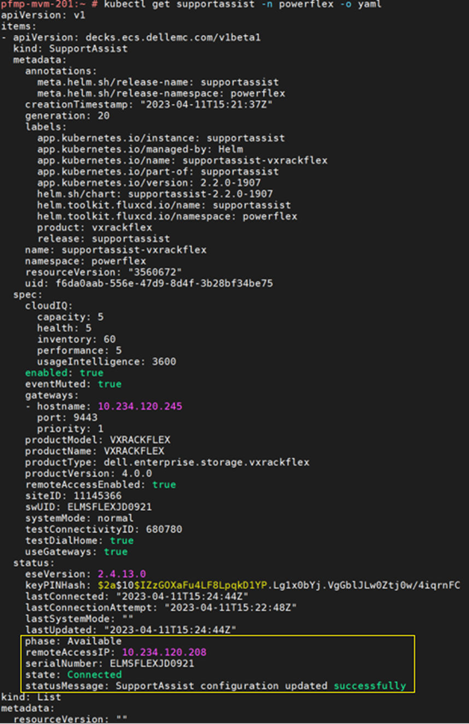
- To verify the registration, check the PowerFlex management platform log to monitor registration status, type: =
kubectl get supportassist -n powerflex -o yaml
Example of a successful registration:
Additional Information
For Full Guide See Dell PowerFlex Appliance with PowerFlex 4.x Administration Guide
Affected Products
ScaleIOArticle Properties
Article Number: 000324438
Article Type: How To
Last Modified: 08 Nov 2025
Version: 2
Find answers to your questions from other Dell users
Support Services
Check if your device is covered by Support Services.