PPDM - How To Get Started With PPDM NAS
Summary: This article shows and explains how to get around PPDM NAS and ensure that the PPDM host is ready for backups.
This article applies to
This article does not apply to
This article is not tied to any specific product.
Not all product versions are identified in this article.
Instructions
To get started with PowerProtect Data Manager (PPDM) Network Attached Storage (NAS), there are a few things to review.
- Was NAS Asset Sources enabled from the PPDM?
- Was a NAS proxy deployed?
- Were there NAS credentials added to PPDM?
- Was a NAS share of appliance added?
- Enable NAS Asset Sources
To enable the NAS Asset Sources, go to Infrastructure > Asset Sources and select the +. From there, scroll down to find the NAS, then click Enable Source.
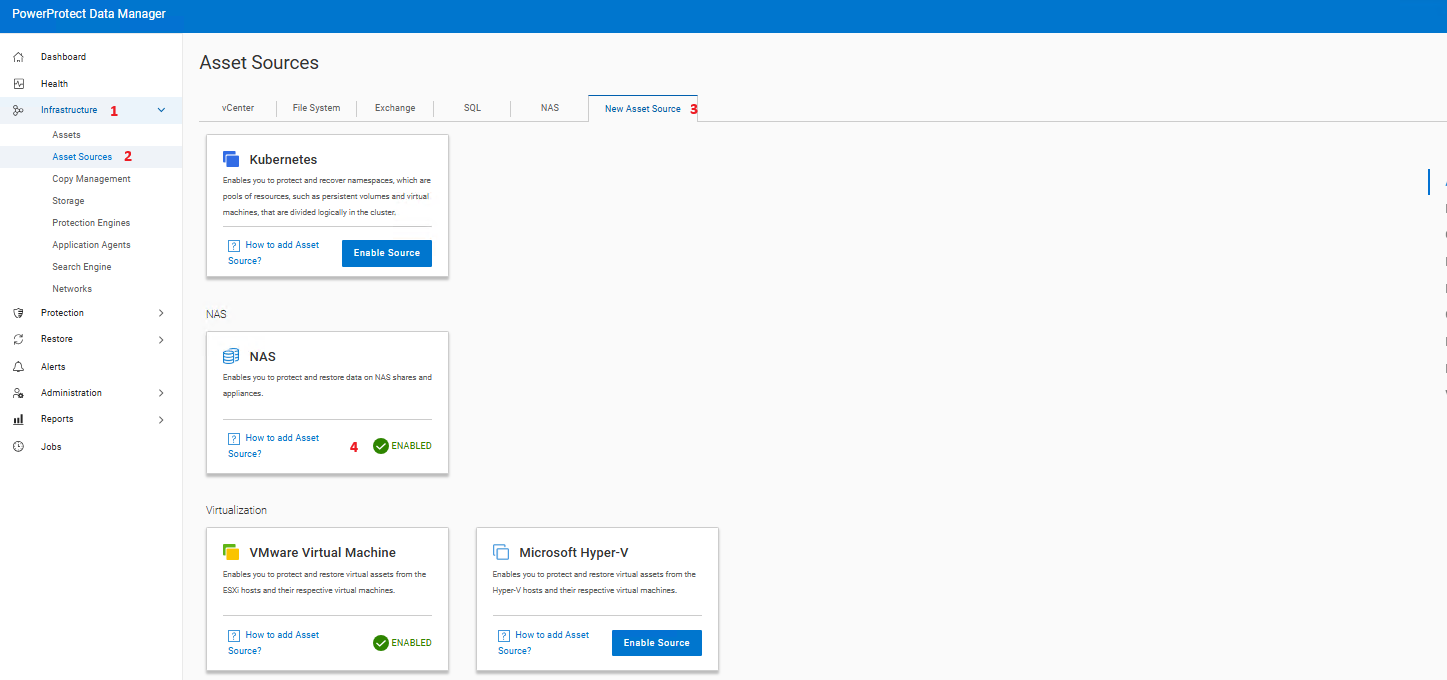
Once enabled, a new NAS Tab appears in the Asset Sources tab.
2. Adding a NAS Protection Engine
PPDM uses NAS Protection Engines (proxies) to run the backups of the different NAS shares, from appliances or direct shares. A NAS proxy is an extra Linux Virtual Machine deployed by PPDM directly in the VMware vCenter that handles all the backups and restore tasks. A containerized File System Agent is installed in it, and is started in every time new backups or restore is triggered. One NAS proxy can starts up to three containers simultaneously.
To add a NAS Proxy, go to Infrastructure > Protection Engines and click Add:

3. Adding NAS Credentials
The next step is to add the NAS credentials to PPDM that are used to connect to the NAS Appliance.
From the PPDM dashboard, click Administration > Credentials, and then click Add.
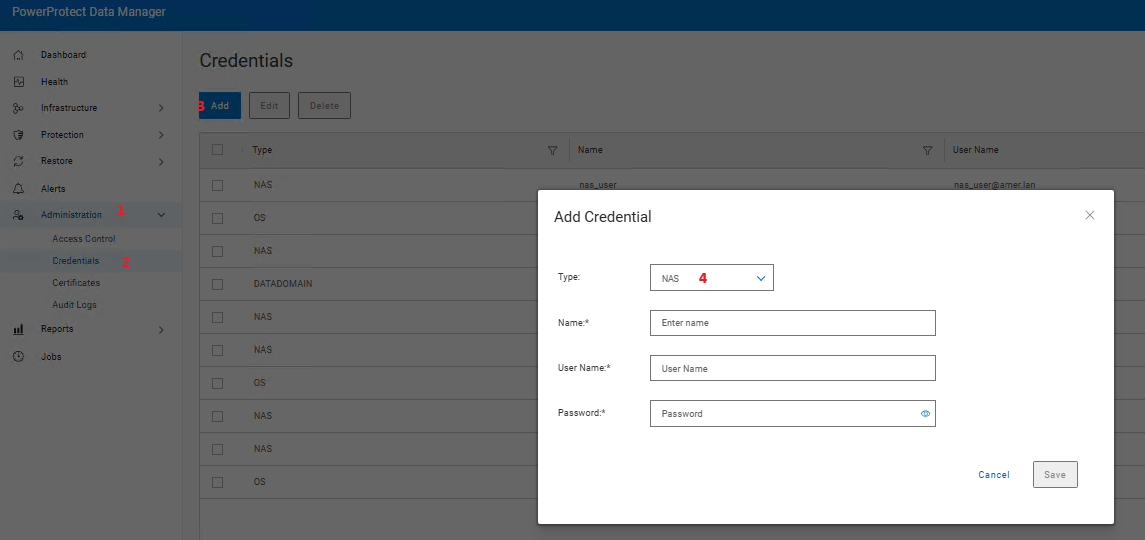
For the PowerStore credentials, since PPDM version 19.18, they must be in the form of user@domain with NO . before or after the @.
NAS_User@domain_name is correct format.
not
NAS_user@domain_name.net is incorrect format.
Once the credentials are added, go to the next step.
4. Adding NAS Asset Sources
Add NAS to get an Appliance or a NAS share added to the Asset Sources. Go to Infrastructure > Asset Sources > NAS and click Add.
Two options appear as Source Types:
- Appliance
- Share
PPDM supports different kind of appliances, such as PowerScale/Isilon, PowerStore, Unity and NetApp. For any other type of Appliances, using Share as Source Types is needed.
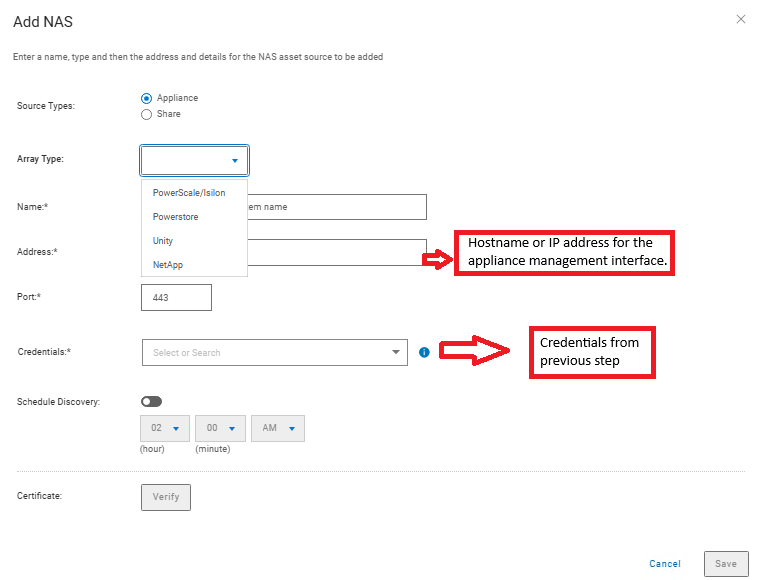
Table 1 NAS appliances details:
|
Field |
Description |
|
Name |
Enter a descriptive name for the appliance. |
|
Array Type |
Select a supported appliance type from the drop-down menu (PowerStore, Unity, PowerScale, NetApp) |
|
Address |
Enter the FQDN or IP address for the appliance management interface. |
|
Port |
Enter the port number for HTTPS REST API access to the appliance. |
|
Credentials |
Select an existing set of management credentials of the NAS array. Alternatively, the Add Credentials option can be selected to provide new credentials. Click Save. The credentials should be root or admin credentials for the NAS array. |
From PowerProtect Data Manager 19.18, NetApp appliance can be added as an asset source and NetApp shares/ exports (CIFS and NFS) can be auto discovered. Below are some of the key points to be considered:
- Minimum required ONTAP version for the NetApp appliance is ONTAP version 9.6
- Supports only a single HA pair in a cluster
- FlexVol volume type is supported. Other unsupported volumes which are discovered will be marked as unprotected.
- Allows discovery of all NetApp shares/exports which are part of the cluster and auto discovery of new shares The default schedule for discovery is at 2 AM every day.
- Support for snapshot-based backup as opposed to live share backup in previous versions.
- Existing assets added as generic share will be mapped as NetApp type assets automatically. As part of the seamless onboarding process, older generic asset source entries would be removed and NetApp shares would be automatically added to the protection policy. Backup will not promote to full for the onboarded assets.

Affected Products
PowerProtect Data ManagerProducts
PowerProtect Data Manager EssentialsArticle Properties
Article Number: 000337931
Article Type: How To
Last Modified: 19 Sep 2025
Version: 1
Find answers to your questions from other Dell users
Support Services
Check if your device is covered by Support Services.