EMC VMAX1, VMAX2 Draining Data Device (TDAT) from a Thin Pool
Resumen: This article outlines how to properly drain Data Device (TDAT) from a VMAX1 and VMAX 2 array thin Pool.
Este artículo se aplica a:
Este artículo no se aplica a:
Este artículo no está vinculado a ningún producto específico.
En este artículo no se identifican todas las versiones de los productos.
Instrucciones
Goals
Guideline on how to safely drain a Data Device (TDAT) from a VMAX1 or VMAX2 Thin Pool using either the Unisphere for VMAX or Symmetrix Command line interface (SYMCLI).Facts
- Draining of a Data Device (TDAT) from a VMAX Thin Pool is a non-disruptive activity.
- Remove TDAT's from a Thin Pool without the need to unbind any TDEV’s with allocated extent’s residing on the TDAT.
- TDAT's need to have similar size to be part of a Thin Pool
- VMAX1 and VMAX2
- Unisphere 1.6.x
- Unisphere 8.x.x
- Solution Enabler 7.x.x
- Solutions Enabler 8.x.x
- Enginuity 5875 and higher
References:
- Unisphere for VMAX Online Help
- Solution Enabler CLI Command Reference Guide
symcfg -sid ### show -pool <Pool-Name> -thin -all
- Re-allocate the TDAT’s to another pool helping to reuse space in order to improve efficiency.
- Replace a drive(s) with a newer model (higher capacity required), and you need to move off any production data that resides on the existing drives in preparation for the replacement.
The Draining and removal process is essentially a 3-phase operation:
- Disabling the TDAT effectively initiates draining on the device. Once the TDAT gets disabled within the pool, "used tracks" on the device get moved to the remaining enabled devices in the pool non-disruptively.
- On completion of the draining process, the TDAT device enters a disabled state.
- Once in a disabled state, the TDAT can be removed from the thin pool.
Select: Storage Tab -> Thin Pool -> <Pool_Name> -> Data Volume
This example demonstrates removing device ID 0904.
- Choose data volume 0904, and hit the Disable Button.
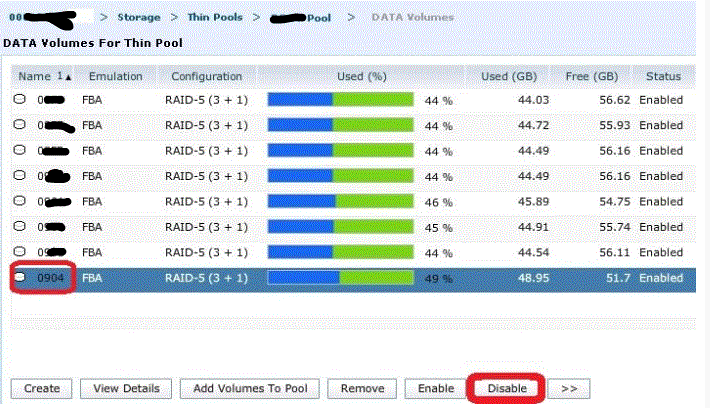
- The progress of the drain is visible from Unisphere as the volume %used, GBused and GBfree are updated during the transition to other TDAT’s.

- Once the data volume completes the drain process and displays an "inactive" state, then it is safe to hit "remove".

Performing the Drain Operation Via Symcli:
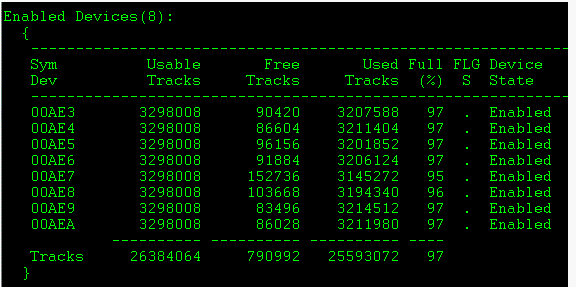
1. List TDAT's on a Thin Pool:
symcfg -sid ### show -pool <Pool-Name> -thin -all
2. To drain a TDAT on a Thin Pool:
symconfigure -sid ### -cmd “disable dev <Symdev_ID> in pool <Pool-Name>, type=thin;” preview
symconfigure -sid ### -cmd “disable dev <Symdev_ID> in pool <Pool-Name>, type=thin;” commit
3. Use the symconfigure command Disabling the data device <dev_ID>:
symconfigure -sid ### -cmd “disable dev <Symdev_ID> in pool <Pool-Name>, type=thin;” preview
symconfigure -sid ### -cmd “disable dev <Symdev_ID> in pool <Pool-Name>, type=thin;” commit
4. Viewing the Pool detail using the symcfg show -pool command, we can monitor the progress of the Drain operation:
symcfg -sid ### show -pool <Pool-Name> -thin -all
5. Removing the data device once the Drain operation is complete:
symconfigure -sid ### -cmd “remove dev <Symdev_ID> from pool <Pool-Name>, type=thin;” preview
symconfigure -sid ### -cmd “remove dev <Symdev_ID> from pool <Pool-Name>, type=thin;” commit
Productos afectados
VMAXPropiedades del artículo
Número de artículo: 000205820
Tipo de artículo: How To
Última modificación: 14 abr 2026
Versión: 2
Encuentra las respuestas que necesitas con la ayuda de otros usuarios de Dell
Servicios de asistencia
Comprueba si tu dispositivo está cubierto por los servicios de asistencia.