How to Reset Your Dell BIOS or CMOS & Clear NVRAM
概要: Reset BIOS, CMOS, or NVRAM on your Dell system with easy, step-by-step methods to fix boot issues and restore default settings
この記事は次に適用されます:
この記事は次には適用されません:
この記事は、特定の製品に関連付けられていません。
すべての製品パージョンがこの記事に記載されているわけではありません。
手順
If your Dell computer isn’t starting up right or acting strangely, resetting the BIOS, CMOS, or NVRAM can help. This guide walks you through simple, safe steps to restore default settings and get things working again.
Why You Might Need This
Your BIOS settings control how your computer starts and interacts with hardware. Over time, these settings can get corrupted, especially after a system crash, power surge, or hardware change. Resetting them brings everything back to factory defaults and often fixes boot problems.
Warning: The BIOS setup is a powerful tool designed for advanced settings. If you're not sure about a change, it's best to leave it as is or check your system’s manual first. Making the wrong adjustment could affect how your computer starts or runs.
How to Reset BIOS Settings from Within BIOS
This is the easiest method if you can access the BIOS screen.
- Turn on your computer.
- As soon as it starts, press F2 repeatedly until you see the BIOS setup screen.
- Look for an option to reset to defaults. Depending on your Dell model, this may be:
- Load Defaults
- Restore Settings
- Pressing F9 or Alt + F
- Select the option, then choose Save and Exit.
- Your system will restart with default BIOS settings.
Note: If none of these options appear, check your system’s user manual for model-specific instructions.
Load BIOS to defaults
Duration: 00:24
When available, closed caption (subtitles) language settings can be chosen using the Settings or CC icon on this video player.
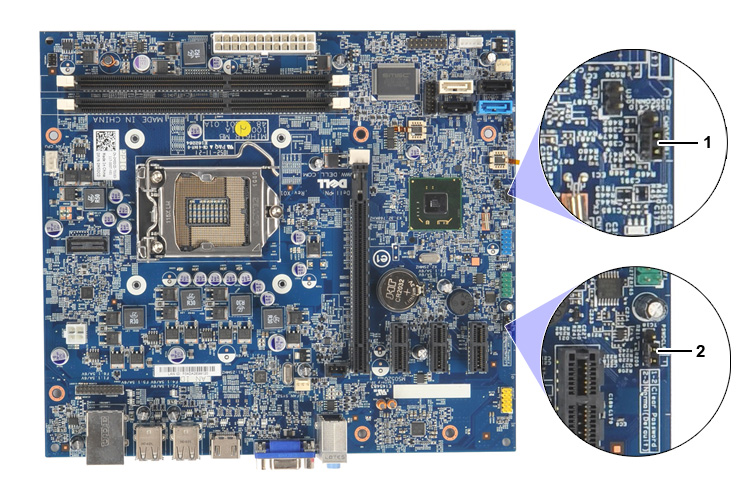
How to Clear CMOS / NVRAM Using a Jumper (Desktops Only)
This method is great for desktops that don’t respond to BIOS resets.
Note: This also removes any BIOS-level passwords.
- Turn off your desktop and unplug the power cable.
- Remove the side panel of your case (refer to your manual for instructions).
- Locate the PSWD jumper (usually a 2-pin connector) and remove it.
- Find the RTCRST jumper and move the jumper cap there.
- Plug in the power cable and wait for 10 seconds.
- Unplug the power again, move the jumper back to PSWD.
- Replace the case panel and power on your system.
Your BIOS settings will now be reset, and any passwords cleared.
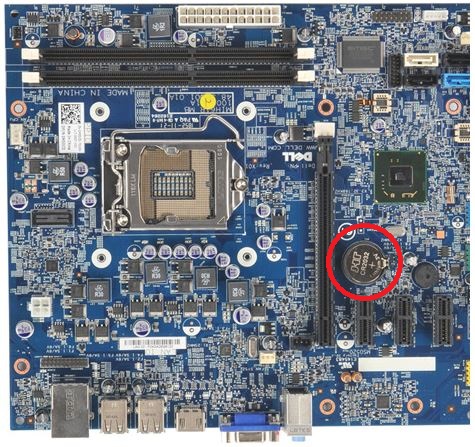
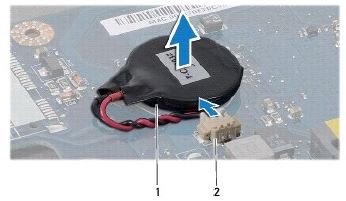
How to Clear CMOS via Battery Reseat (Desktops & Laptops)
Use this method if your system doesn’t have jumpers or if you’re using a laptop.
Note: This also clears BIOS passwords.
- Turn off your computer and unplug it.
- If you’re using a laptop, disconnect the battery if possible (check your manual).
- Open the case or access panel to find the small coin-cell battery.
- Carefully disconnect the coin-cell battery.
- Press and hold the power button for 10 to 20 seconds.
- Reconnect the battery and close the case.
- Power on your system.
You’ll likely see a message asking you to set the date and time. Press F2, update the settings, then choose Save and Exit.
How to Use RTC Reset (Newer Desktops Only)
If your Dell desktop was made after April 2020, this method is quick and easy.
- Shut down your computer and unplug the power cable.
- Press and hold the power button for 30 seconds.
- Plug the power cable back in and turn on your system.
This resets the BIOS and clears NVRAM.
Keep Your BIOS Up to Date
Resetting your BIOS can help fix issues, but keeping it updated is just as important. BIOS updates often include improvements for performance, security, and compatibility with new hardware.
Want to check if your system needs an update? Visit the Dell BIOS & UEFI Update Guide for easy steps and helpful tips.
BIOS Corrupted Error
If your computer displays "BIOS Corrupted" or similar error messages, Recover the BIOS using the BIOS Recovery feature.
Helpful Tips
- Always power off and unplug your system before opening it.
- Ground yourself to avoid static damage when touching internal parts.
- After a reset, you may need to set the date and time again.
- BIOS resets won’t affect your Windows login or online accounts.
- If you're unsure, check your Dell computer’s manual.
対象製品
Alienware, Dell All-in-One, Dell Pro All-in-One, Dell Pro Max Micro, Dell Pro Max Slim, Dell Pro Max Tower, Dell Pro Micro, Dell Pro Slim, Dell Pro Tower, Dell Slim, Dell Tower, Inspiron, Legacy Desktop Models, OptiPlex, Vostro, XPS, G Series
, Chromebook, G Series, Alienware, Dell Laptops, Dell Plus, Dell Pro, Dell Pro Max, Dell Pro Plus, Dell Pro Premium, Inspiron, Latitude, Dell Pro Rugged, Vostro, XPS, Legacy Laptop Models, Fixed Workstations, Mobile Workstations, Dell Pro Max Micro XE FCM2250, Dell Pro Max Slim XE FCS1250, Dell Pro Max Tower T2 XE FCT2250, Dell Pro Max 14 Premium MA14250, Dell Pro Max 16 Premium MA16250, Dell Pro Max 16 Plus MB16250, Dell Pro Max 18 Plus MB18250, Dell Pro Max 16 XE MC16250, Dell Pro Micro Plus XE QBM1250, Dell Pro Slim Plus XE5 QBS1250, Dell Pro Tower Plus XE5 QBT1250
...
文書のプロパティ
文書番号: 000124377
文書の種類: How To
最終更新: 10 11月 2025
バージョン: 32
質問に対する他のDellユーザーからの回答を見つける
サポート サービス
お使いのデバイスがサポート サービスの対象かどうかを確認してください。