Recover BIOS on Dell Computer or Tablet After Boot or POST Failure
概要: Dell BIOS recovery guide: Fix boot failure, black screen, or POST errors. Easy step-by-step instructions for hard drive and USB recovery methods.
この記事は次に適用されます:
この記事は次には適用されません:
この記事は、特定の製品に関連付けられていません。
すべての製品パージョンがこの記事に記載されているわけではありません。
手順
BIOS recovery restores corrupted BIOS firmware on Dell computers. Use this procedure if your computer doesn't start, displays a black screen, shows blinking LED patterns, or fails Power-On Self-Test (POST).
Note: BIOS recovery affects only the BIOS/UEFI firmware. Your data and Windows installation remain unchanged.
How to recover from booting issues using the BIOS Recovery Tool
Duration: 03:49
When available, closed caption (subtitles) language settings can be chosen using the Settings or CC icon on this video player.
When to use BIOS Recovery
Use BIOS recovery if your Dell computer has any of these symptoms:
- Powers on but doesn't start or show the boot screen (no POST)
- Shows a black screen on startup with no Dell logo
- Shows LED lights blinking in patterns (especially 3,6 or 3,7 patterns indicating a corrupt BIOS)
- Displays "BIOS corrupted" or similar error messages
- Restarts continuously without booting
Don't use BIOS recovery if:
- Your computer boots to Windows normally. Instead, use the standard BIOS update procedure.
- You see hardware error messages. Run diagnostics instead.
- Your computer has physical damage or liquid spill.
Understanding recovery methods
Dell computers support two BIOS recovery methods:
Method 1: Recovery from hard drive (Recommended, try this first)
- Uses a recovery file stored on your computer's hard drive
- No preparation required
- Enabled by default on supported systems
- Quickest and easiest method
Method 2: Recovery from USB drive (Use if Method 1 doesn’t work)
- Uses a recovery file on a USB drive
- Requires preparation on a working computer
- Use this method if hard drive recovery fails or isn't available
How the BIOS recovery feature works
When you initiate BIOS recovery:
- If a USB drive is connected, the system searches the USB drive first
- If no USB drive is present or no recovery file is found on USB, the system searches the hard drive
- If no recovery file is found in either location, recovery fails
Even though the system searches USB first when present, we recommend trying hard drive recovery first because it requires no preparation. Only create a USB recovery drive if needed.
What you need
For all devices:
- Battery charged to at least 25 percent for laptops (50 percent for tablets)
- AC adapter or power cable connected during recovery
For desktops and all-in-ones:
- Wired USB keyboard (Bluetooth or wireless keyboards don't work)
For USB recovery (if needed):
- Another working computer with internet access
- Your Dell Service Tag or Express Service Code
- Empty USB flash drive (at least 2 GB )
Method 1: Recover BIOS from hard drive (Recommended)
Try this method first. Latest Dell computers have a BIOS recovery file already stored on the hard drive.
Note: Don't create a USB drive yet. Try hard drive recovery first to save time.
Hard drive recovery works if your computer meets these conditions:
- Has the original factory hard drive (not replaced)
- Operating system wasn't reinstalled or drive wasn't reformatted
- BIOS boot mode is set to UEFI (not Legacy)
- Drive isn't encrypted with BitLocker or doesn't have a BIOS hard drive password
If you're unsure whether these conditions apply, try hard drive recovery first. The process will indicate if a recovery file isn't found.
Step 1: Start BIOS Recovery
Find your device type below and follow these steps:
Desktop or All-in-One
- Make sure no USB drives are plugged in
- Turn on your computer
- Immediately press and hold Ctrl + Esc together
- Let go when you see the recovery screen.
If nothing happens, try again or check if your computer supports BIOS Recovery.
Laptops
- Make sure no USB drives are plugged in
- Make sure battery is charged to at least 25%
- Unplug the power cable
- Press and hold Ctrl + Esc together
- While holding the keys, plug in the power cable
- For Alienware laptops, press the power button once.
- Let go when you see the recovery screen
You must use the laptop’s built-in keyboard. External keyboards don’t work.
Step 2: Check if recovery file was found
After your computer boots into the BIOS recovery, look at your screen:
If you see a recovery menu with options, continue to Step 3.
If you see “No recovery image found” or just blinking lights. Your computer doesn’t have the recovery file, try to recover BIOS from USB drive.

Step 3: Complete the recovery
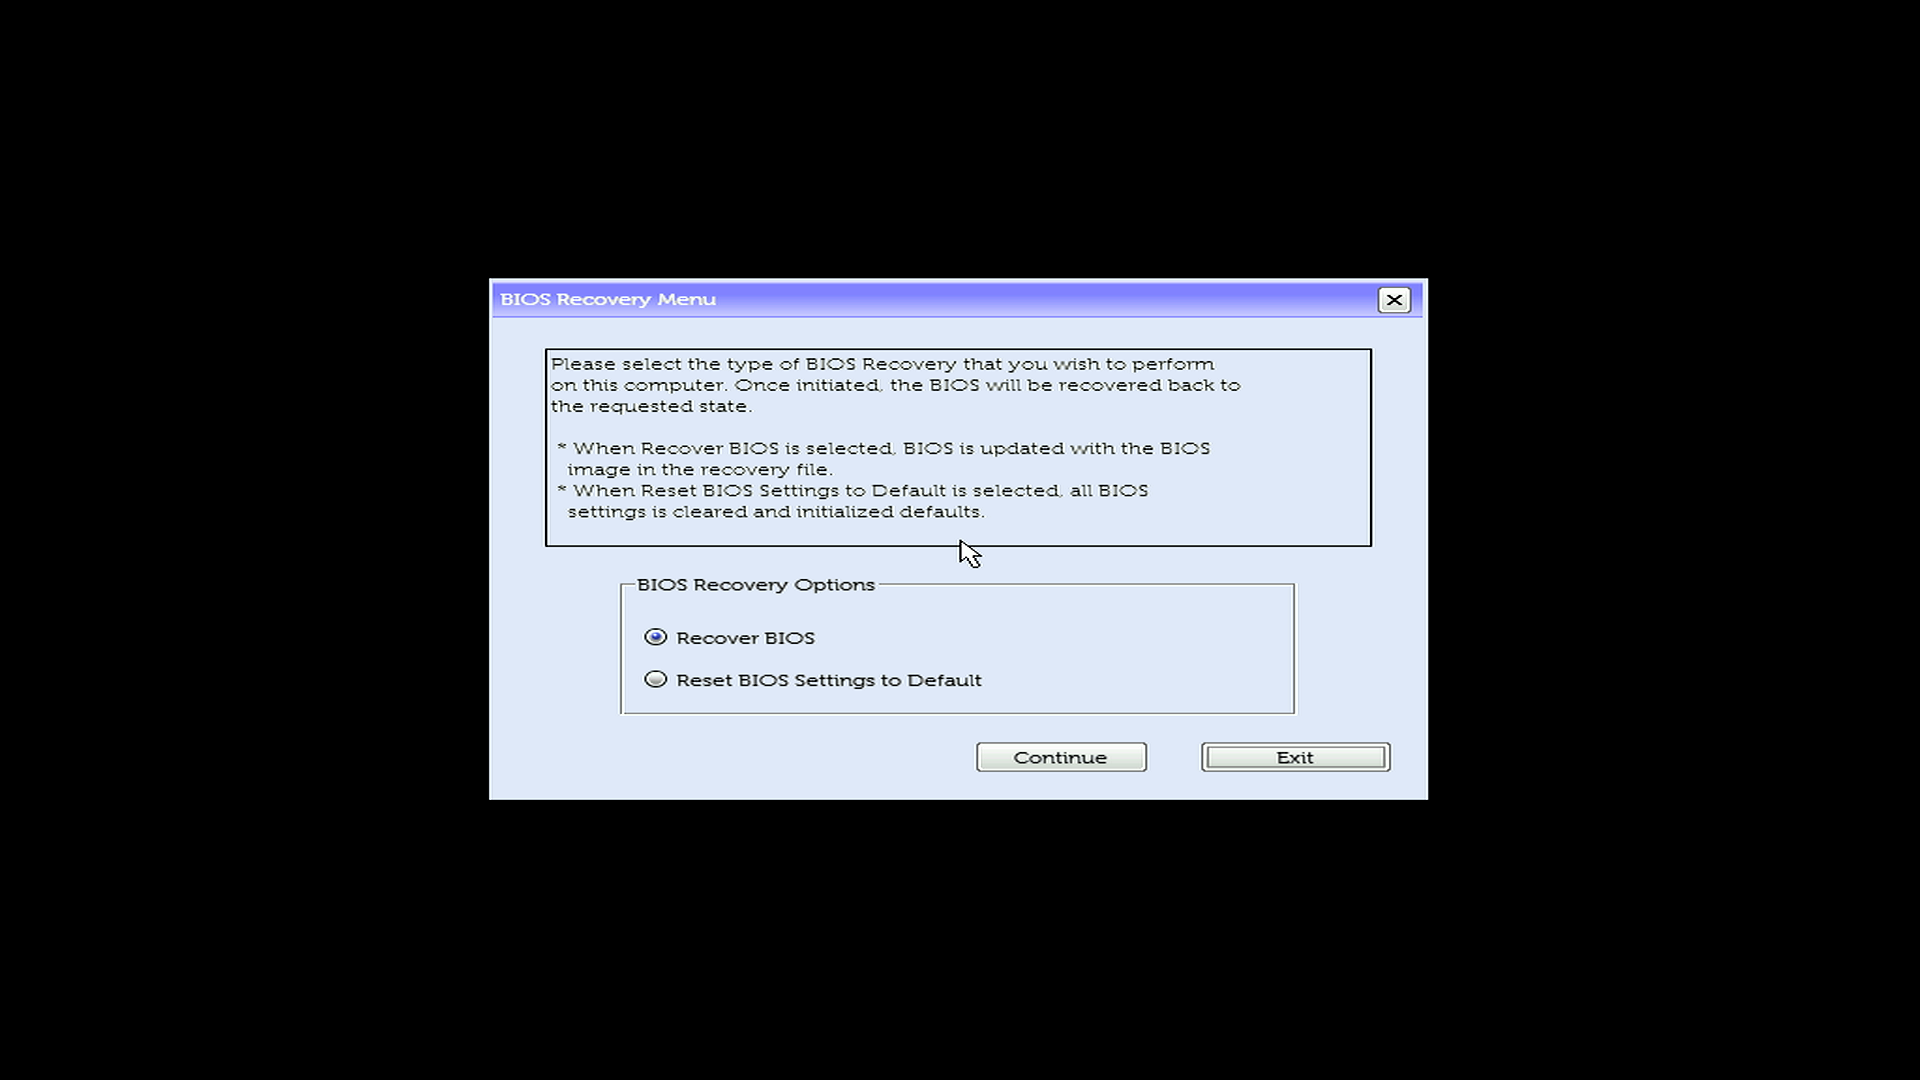
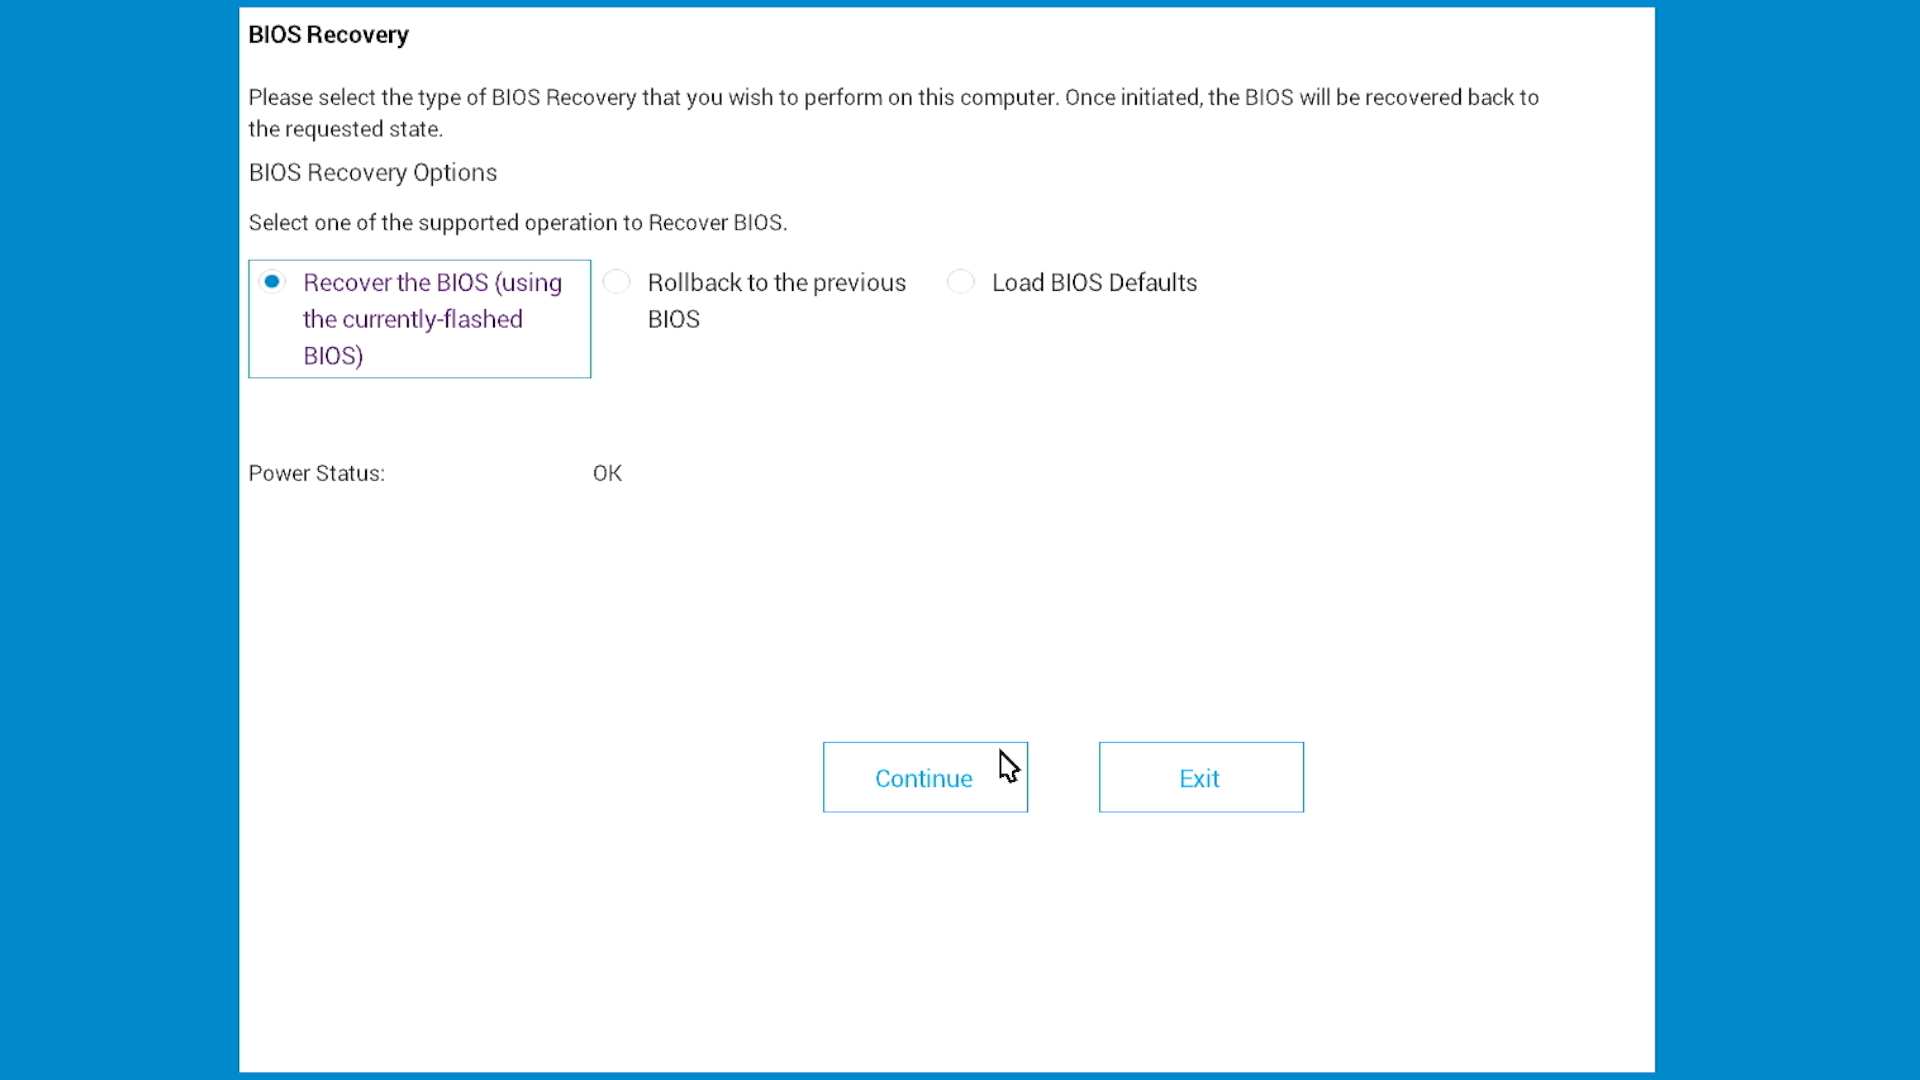
Now that you see the recovery menu:
- Select Recover BIOS (might also say “Recover the BIOS”)
- Select Continue or press Enter to start
- Wait while your computer recovers. Your computer will restart several times, this is normal.
- Do not turn off your computer
Some systems might show the BIOS Setup screen. If this happens, press Esc to exit and boot normally.
Method 2: Recover BIOS from USB drive (Fallback method)
Use this method only if hard drive recovery failed or isn't available.
When to use USB recovery:
- Hard drive recovery failed (showed "No recovery image found")
- Hard drive was replaced after purchase
- Operating system was reinstalled or drive was reformatted
- BIOS boot mode was changed from UEFI to Legacy
- Drive is encrypted or has a BIOS hard drive password
Overview of USB recovery process
Creating and using a USB recovery drive involves these steps:
- Download the BIOS recovery file on a working computer
- Format a USB drive to FAT32
- Copy the recovery file to the USB drive
- Use the USB drive to recover BIOS on the affected computer
Step 1: Download the BIOS recovery file
Complete these steps on a working computer.
- Go to Dell Drivers & Downloads.
- Identify your computer:
- Select Detect Product to automatically detect your computer, or
- Enter the Service Tag of your non-working computer.
- Select Drivers & Downloads.
- Under Category, select BIOS.
- Find the latest BIOS update for your model and download the BIOS file.
Rename the BIOS file
Show file extensions in Windows
- Open File Explorer. To open File Explorer, press the Windows logo key + E.
- On the View menu, select File name extensions.
Rename the file to BIOS_IMG.rcv
- Go to the folder where you downloaded the BIOS file. Example filename: Latitude_5420_1.18.0.exe
- Right-click the file, and then select Rename.
- Change the entire filename to BIOS_IMG.rcv. Make sure to:
- Delete the entire filename including the .exe extension
- Enter the new name exactly as shown: BIOS_IMG.rcv
- Use uppercase letters, include the underscore, and use the .rcv extension
- Press Enter.
- In the warning dialog box, select Yes. The file now appears as BIOS_IMG.rcv.
Step 2: Prepare the USB drive
Format the USB drive
Complete these steps on a working computer.
Note Formatting deletes all data on the USB drive. Back up any important files before you continue.
- Insert the USB drive into the working computer.
- Open File Explorer. To open File Explorer, press the Windows logo key + E.
- Right-click the USB drive, and then select Format.
- Configure these settings:
- File system: Select FAT32
- Volume label: (Optional) Enter BIOS_RECOVERY
- Quick Format: Select this checkbox
- Select Start.
- In the warning dialog box, select OK.
- When formatting completes, select OK.
Copy the recovery file to the USB drive
- Open File Explorer. To open File Explorer, press the Windows logo key + E.
- Go to the folder where you saved BIOS_IMG.rcv.
- Copy the file. To copy the file, right-click it and then select Copy, or press Ctrl + C.
- In File Explorer, open the USB drive.
- Paste the file. To paste the file, right-click in the USB drive window and then select Paste, or press Ctrl + V. Note The file must be in the root directory of the USB drive, not inside any folders.
- Eject the USB drive. In File Explorer, right-click the USB drive and select Eject.
Step 3: Initiate BIOS recovery from USB drive
Now that you have a USB recovery drive, use it to recover BIOS on your affected computer.
Find your device type below and follow these steps:
Desktop or All-in-One
- Make sure no USB drives are plugged in
- Turn on your computer
- Immediately press and hold Ctrl + Esc together
- Let go when you see the recovery screen.
If nothing happens, try again or check if your computer supports BIOS Recovery.
Laptops
- Make sure no USB drives are plugged in
- Make sure battery is charged to at least 25%
- Unplug the power cable
- Press and hold Ctrl + Esc together
- While holding the keys, plug in the power cable
- For Alienware laptops, press the power button once.
- Let go when you see the recovery screen
You must use the laptop’s built-in keyboard. External keyboards don’t work.

Step 4: Complete the recovery
Now that you see the recovery menu:
- Select Recover BIOS (might also say “Recover the BIOS”)
- Select Continue or press Enter to start
- Wait while your computer recovers. Your computer will restart several times, this is normal.
- Do not turn off your computer
Note: Some systems might show the BIOS Setup screen. If this happens, press Esc to exit and boot normally.
Check System Compatibility
Verify that your system supports BIOS recovery, follow these steps:
If your computer can start
- Restart your computer.
- During startup, press F2 repeatedly until BIOS Setup opens.
- Look for the BIOS Recovery from Hard Drive option.
If you find this option, your system supports BIOS Recovery.
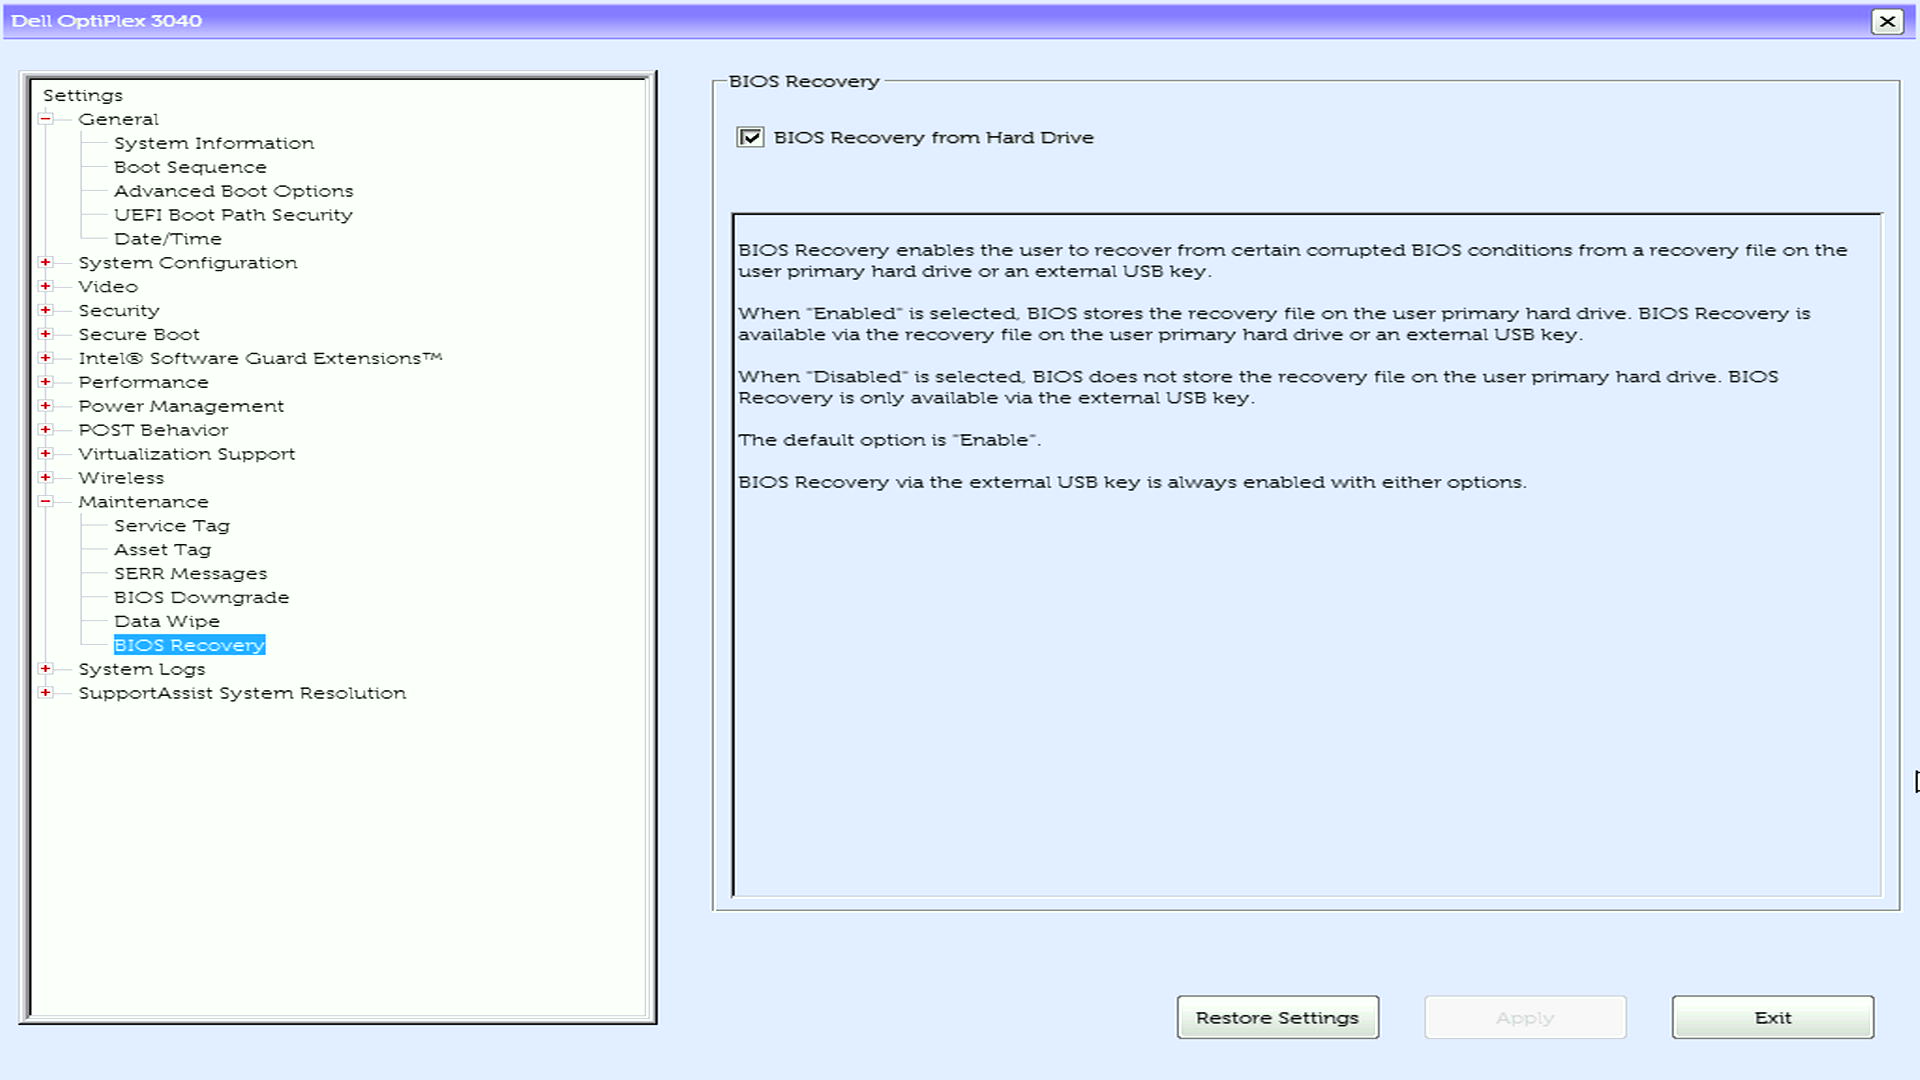
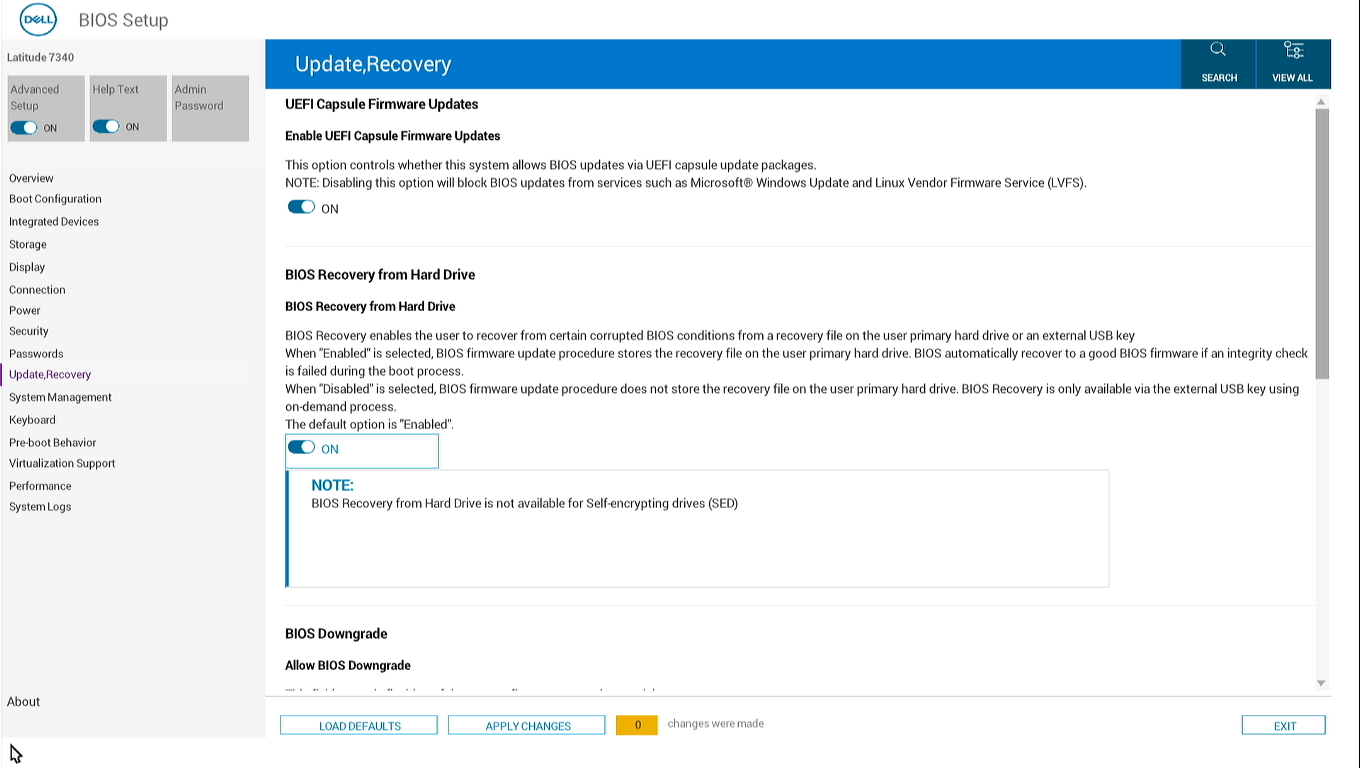
If your computer can’t start
Your computer likely supports BIOS Recovery if it meets any of these criteria:
- Manufactured December 2015 or later
- Has an Intel 6th Generation (Skylake) or newer processor
Not sure? Check your computer’s manual.
Restore the BIOS recovery file to your hard drive
If you used USB recovery because the hard drive didn't have the recovery file, you can put it back:
- Make sure your computer now starts normally and boots into Windows.
- Download the latest BIOS from Dell Drivers & Downloads page.
- Run the BIOS update (the .exe file you downloaded).
- Let it finish.
This restores the recovery file to your hard drive so Method 1 will work next time.
Troubleshoot BIOS recovery
Problem: Recovery screen doesn't appear
Try these steps:
- Hold the keys longer: Try holding Ctrl + Esc for 30 seconds instead of 15-20 seconds.
- Check your keyboard (laptops only): Make sure you're using the laptop's built-in keyboard, not an external keyboard.
- Try different USB ports (USB recovery only): Plug the USB drive into a different port. Try black USB ports (USB 2.0) before blue ones (USB 3.0).
- Check the USB file (USB recovery only):
- Make sure the file is named exactly: BIOS_IMG.rcv
- Make sure it's directly on the USB drive, not in a folder
- Make sure the USB drive is formatted as FAT32
Problem: "No recovery image found" appears
This means the recovery file isn't on your hard drive. This happens when:
- Hard drive was replaced
- Windows was reinstalled
- Drive was reformatted
- Drive is encrypted (BitLocker)
Solution: Use Method 2 (USB recovery) instead.
Problem: Computer keeps restarting but recovery doesn't finish
Make sure:
- Power cable stayed plugged in the whole time
- You waited at least 15 minutes
- You didn't press any keys or turn off the computer
- For USB recovery: USB drive stayed plugged in
If it still fails:
- Try creating a new recovery USB drive.
- Download the BIOS file again (it might have been corrupted).
- Try a different USB drive.
If recovery still fails after trying these steps, the motherboard might need to be replaced. Contact Dell Technical Support for repair options.
Problem: LED lights keep blinking
Common LED patterns:
- 3 blinks, then 6 blinks (repeats): BIOS corruption. Recovery should fix this.
- 3 blinks, then 7 blinks (repeats): BIOS/CPU failure. Try BIOS recovery.
- Other patterns: Might be hardware failure, not BIOS corruption.
What to do:
- Write down the exact blinking pattern.
- Try BIOS recovery.
- If blinking continues after recovery, lookup the error code in your system’s user manual.
BIOS settings are incorrect after recovery
After recovery, your BIOS settings return to factory defaults. You might need to change:
Boot order:
- Press F2 during startup to enter BIOS Setup.
- Go to Boot Sequence.
- Arrange your drives in the order you want.
- Save and exit.
Other common settings:
- Secure Boot: Enable for Windows 11 or 10, disable for some Linux versions
- Virtualization: Enable if you use VirtualBox, VMware, or Hyper-V
- SATA Mode: Keep as AHCI unless you were using RAID before
Restore the hard drive recovery partition
If you used USB recovery because the hard drive recovery file was missing:
- Ensure your computer boots to Windows normally.
- Verify BIOS is set to UEFI boot mode (not Legacy).
- Download the latest BIOS update from Dell Drivers & Downloads.
- Run the BIOS update utility (.exe file).
- Allow the update to complete.
The BIOS update automatically restores the recovery file to your hard drive, enabling hard drive recovery for future use.
Note: You can run the update even if you're already on the latest version.
Frequently asked questions
Will BIOS recovery erase my data or Windows installation?
No. BIOS recovery only restores the BIOS firmware. All your files, programs, and Windows remain unchanged.
Should I try hard drive recovery or USB recovery first?
Always try hard drive recovery first. It's faster, requires no preparation, and works on most systems with original hard drives. Only create a USB recovery drive if hard drive recovery fails.
Do I need to use the exact same BIOS version that was previously installed?
No. Download the latest BIOS version available for your model. The recovery process works with any version.
My hard drive recovery failed. How do I restore the recovery file for next time?
After you successfully recover using USB:
- Ensure BIOS is set to UEFI boot mode.
- Download the latest BIOS from Dell Drivers & Downloads.
- Run the BIOS update utility.
The update automatically restores the recovery file to your hard drive. You can run the update even if you're already on the latest version.
Can I create a USB recovery drive in advance as a backup?
Yes. You can create a USB recovery drive while your computer is working normally. Keep it in a safe place. Update the recovery file when you update your BIOS.
Do I need to reinstall Windows after BIOS recovery?
No. Windows and all software remain unchanged. After recovery completes, Windows boots normally. You might need to reconfigure some BIOS settings such as boot order.
Where is the BIOS recovery file stored on my hard drive?
On UEFI systems, the recovery file is in the EFI System Partition (ESP) at: \EFI\Dell\BIOS\
This partition is hidden from Windows File Explorer and is about 100 MB to 500 MB in size.
What's the difference between BR2 and BR3?
BIOS Recovery 2 (BR2):
- Manual recovery only (using Ctrl + Esc)
- Available on systems from December 2015+
BIOS Recovery 3 (BR3):
- Manual recovery (using Ctrl + Esc)
- Optional automatic recovery on boot (must be enabled)
- Available on systems from August 2016+
For most users, the difference doesn't matter. Both use the same recovery procedures.
What is "Reset NVRAM" and should I disable it?
NVRAM (Non-Volatile RAM) stores your BIOS settings. During recovery:
- Reset NVRAM Enabled (default): All BIOS settings return to factory defaults
- Reset NVRAM Disabled: Attempts to keep current BIOS settings
Recommendation:
- First recovery attempt: Disable Reset NVRAM to keep settings
- If recovery fails: Enable Reset NVRAM (complete reset might fix underlying issues)
Note: Not all systems show this option.
Why does the recovery search USB first if hard drive recovery is recommended?
This is by design for maximum flexibility:
- When USB is connected: System uses USB (for systems without hard drive recovery file)
- When USB isn't connected: System uses hard drive (faster, no preparation needed)
The search order ensures recovery works in all scenarios. You control which method is used by whether you connect a USB drive.
Can I use the same USB recovery drive on multiple Dell computers?
No. Each USB recovery drive is specific to a computer model. The BIOS_IMG.rcv file must match the exact model of the computer you're recovering. You must create separate USB recovery drives for different models.
What if BitLocker is enabled?
BIOS recovery might trigger BitLocker recovery mode. After recovery:
- BitLocker will ask for your 48-digit recovery key
- Enter the key to unlock your drive
- Everything will work normally after that
Note Find your BitLocker recovery key BEFORE attempting recovery. Check your Microsoft account or ask your IT department.
Can I use an external USB keyboard to trigger recovery on a laptop?
No. Laptops must use the integrated keyboard to initiate BIOS recovery. External USB keyboards and Bluetooth keyboards don't work for triggering recovery on laptops. Desktops and all-in-ones can use external wired USB keyboards.
How do I format a USB drive larger than 32 GB?
Windows can't format drives larger than 32 GB to FAT32 using the standard format dialog. Use PowerShell instead:
- Right-click Start, and then select Windows PowerShell (Admin) or Terminal (Admin).
- In the User Account Control dialog box, select Yes.
- At the prompt, enter this command:
format /FS:FAT32 X:Replace X with your USB drive letter. To find the drive letter, check File Explorer.
Example: format /FS:FAT32 D:
- Press Enter.
- When prompted, press Enter again.
- Wait for formatting to complete. This might take several minutes.
- Type exit and press Enter.
What's the difference between "Recover BIOS" and "Load BIOS Defaults"?
They're the same thing. Different Dell computers use different words for the same recovery option. Select whichever one you see.
Will this fix hardware problems?
No. BIOS recovery only fixes corrupted BIOS firmware. It won't fix:
- Failed RAM, hard drive, or other hardware
- Motherboard damage
- Broken screens or keyboards
If recovery completes successfully but problems continue, you likely have a hardware failure, run a hardware diagnostics.
My laptop battery is dead. Can I still recover?
Yes, as long as the power cable is plugged in. However, it's safer to have at least 25% battery charge in case power is interrupted.
対象製品
Alienware, Dell All-in-One, Dell Pro All-in-One, Dell Pro Max Micro, Dell Pro Max Slim, Dell Pro Max Tower, Dell Pro Micro, Dell Pro Slim, Dell Pro Tower, Dell Slim, Dell Tower, Inspiron, Legacy Desktop Models, OptiPlex, Vostro, XPS, G Series
, Chromebook, G Series, Alienware, Dell Laptops, Dell Plus, Dell Pro, Dell Pro Max, Dell Pro Plus, Dell Pro Premium, Inspiron, Latitude, Dell Pro Rugged, Vostro, XPS, Legacy Laptop Models, Latitude Tablets, Venue, XPS Tablets, Fixed Workstations, Mobile Workstations, Dell Pro Max Micro XE FCM2250
...
文書のプロパティ
文書番号: 000132453
文書の種類: How To
最終更新: 17 11月 2025
バージョン: 27
質問に対する他のDellユーザーからの回答を見つける
サポート サービス
お使いのデバイスがサポート サービスの対象かどうかを確認してください。