Dell Unity: How to connect to Unity XT platforms over serial connection
概要: Unity XT arrays (excluding XT 380/380F) have a micro serial port in the back that can be used for a direct connection into each SP.
この記事は次に適用されます:
この記事は次には適用されません:
この記事は、特定の製品に関連付けられていません。
すべての製品パージョンがこの記事に記載されているわけではありません。
手順
Unity XT arrays (excluding XT 380/380F) have a micro serial port in the back that can be used for a direct connection into the SP. This type of connection can be used instead of IPMI. However both cannot be used simultaneously.
A Micro DB-9 serial cable can be used to connect a computer directly to an SP.
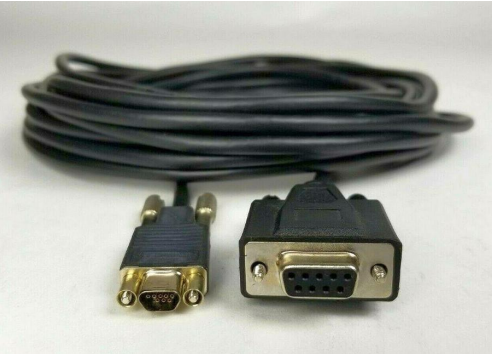
For computers that do not have a serial port a USB to DB-9 serial adapter cable can be used alongside the Micro DB-9 serial cable.

Location of serial port on each SP

Once the serial port is connected on the array open a terminal, select serial connection. Before connecting adjust the speed to 115200.
Note: Verify what COM represents the physical serial connection. Sometimes a different COM port is selected by default.

In the event strange output in the terminal is seen, turn the flow control off.

Once the putty session is opened, a login screen should be seen.

A Micro DB-9 serial cable can be used to connect a computer directly to an SP.
For computers that do not have a serial port a USB to DB-9 serial adapter cable can be used alongside the Micro DB-9 serial cable.
Location of serial port on each SP
Once the serial port is connected on the array open a terminal, select serial connection. Before connecting adjust the speed to 115200.
Note: Verify what COM represents the physical serial connection. Sometimes a different COM port is selected by default.
In the event strange output in the terminal is seen, turn the flow control off.
Once the putty session is opened, a login screen should be seen.
対象製品
Dell EMC Unity XT 480, Dell EMC Unity XT 480F, Dell EMC Unity XT 680, Dell EMC Unity XT 680F, Dell EMC Unity XT 880, Dell EMC Unity XT 880F文書のプロパティ
文書番号: 000208170
文書の種類: How To
最終更新: 28 8月 2023
バージョン: 1
質問に対する他のDellユーザーからの回答を見つける
サポート サービス
お使いのデバイスがサポート サービスの対象かどうかを確認してください。