SCSI to NVMe VMware VMFS Datastore Offline Migration Steps
概要: This document describes how to perform an offline migration from a VMware vSphere SCSI datastore to an NVMeoF datastore. Offline VMFS datastore migration from SCSI to NVMe does not involve movement of data, though requires downtime for the VMs involved. Details of the offline migration steps are described below. This KB applies to any Dell storage system that supports SCSI and NVMeoF protocols. This includes, but is not limited to, PowerFlex, PowerMax, and PowerStore. VMware and Dell collaborated on this KB. ...
この記事は次に適用されます:
この記事は次には適用されません:
この記事は、特定の製品に関連付けられていません。
すべての製品パージョンがこの記事に記載されているわけではありません。
手順
SCSI to NVMe Offline VMFS Datastore Migration Steps
Table of Contents
- SCSI to NVMe Offline VMFS Datastore Migration Steps 1
- Overview
- Scope
- Offline migration steps
- Pre-Migration
- Check both the number of devices and paths to each ESXi host 3
- Check for unsupported features 4
- Check for potential impact of of post-migration on supported features 4
- Migration
- Unmount VMFS volume from all hosts 5
- Check VMFS volume metadata consistency. 5
- Re-signature the VMFS volume 10
- Rename the VMFS datastore (optional) 11
- Check VMFS volume metadata consistency after re-signature. 11
- Present the device as NVMe to all ESXi hosts in the cluster 11
- Register and power on all the VMs 11
- Post Migration. 12
Overview
With NVMe adoption growing, more customers are looking at migrating data from SCSI to NVMe. This document describes one of the efficient, albeit disruptive, methods of migrating SCSI to NVMe known as offline migration. Offline VMFS datastore migration from SCSI to NVMe does not involve movement of data. The device that was previously presented to an ESXi host or cluster as a SCSI device, is unpresented and then re-presented as an NVMe device. The VMFS datastore is then re-signatured and made available to the hosts, retaining its VM contents. Details of the offline migration steps are described below.
Scope
- The steps for offline migration, outlined in the subsequent sections, are applicable for VMFS6 datastores only.
- The steps cover functional aspects of the migration and do not cover performance characteristics of workloads post-migration.
- The validation of scale (number of concurrent migrations, so forth) or limits (maximum paths per device, maximum VMDKs per VM, so forth) is not in scope.
- The terms device, volume, and LUN are used interchangeably in the document.
- Offline migration requires all VMs in the VMFS datastore to be powered off prior to starting.
- Offline migration steps
Offline migration of a VMFS6 datastore from SCSI to NVMe consists of three phases. Each phase might involve multiple checks or steps.
- Pre-Migration
This preparatory phase includes checks to understand characteristics of the environment and the features that are in use. This phase is required to determine if offline migration is feasible in the environment and also to understand the impact post-migration. Some of the important checks are listed below. This is not an exhaustive list, rather it covers the most common checks in a standard customer environment.
- Check for locking mode of VMFS volume
First, ensure that the LUN supports ATS mode. Migration should be attempted only if the VMFS6 datastore is using ATS-only locking mode and does not use SCSI-2 reservations.
To determine the locking mode of a given volume, run the commandesxcli storage vmfs lockmode list -l <volume name/label>on an ESXi host with access to the datastore. Offline migration is supported only if the locking mode for the VMFS6 volume is "ATS." The mode "ATS+SCSI" is not supported.
An example of a volume supporting offline migration:esxcli storage vmfs lockmode list -l testVol1 Volume Name UUID Type Locking Mode ATS Compatible ATS Upgrade Modes ATS Incompatibility Reason ----------- ----------------------------------- ------ ------------ -------------- ----------------- -------------------------- testVol1 5d1c5b0f-xxxxxxxx-xxxx-246e9xxxxdb0 VMFS-6 ATS true No upgrade needed An example of a volume not supporting offline migration: esxcli storage vmfs lockmode list -l testVol2 Volume Name UUID Type Locking Mode ATS Compatible ATS Upgrade Modes ATS Incompatibility Reason ----------- ----------------------------------- ------ ------------ -------------- ----------------- -------------------------- testVol2 63510e51-xxxxxxxx-xxxx-246e9xxxxde6 VMFS-6 ATS+SCSI false None Device does not support ATS -
Check if any
vmdkof any VM in the selected datastore is used as an RDM (physical or virtual)If a VM in the selected datastore has an RDM in SCSI mode, then it cannot be allowed to migrate to NVMe. There is no VMware command to discover if a VM has an RDM, however the Dell VSI Plugin lists the disk type for each VM. Below is a screenshot of the view in VSI which lists if any VMs (Runtime Name) have an RDM.
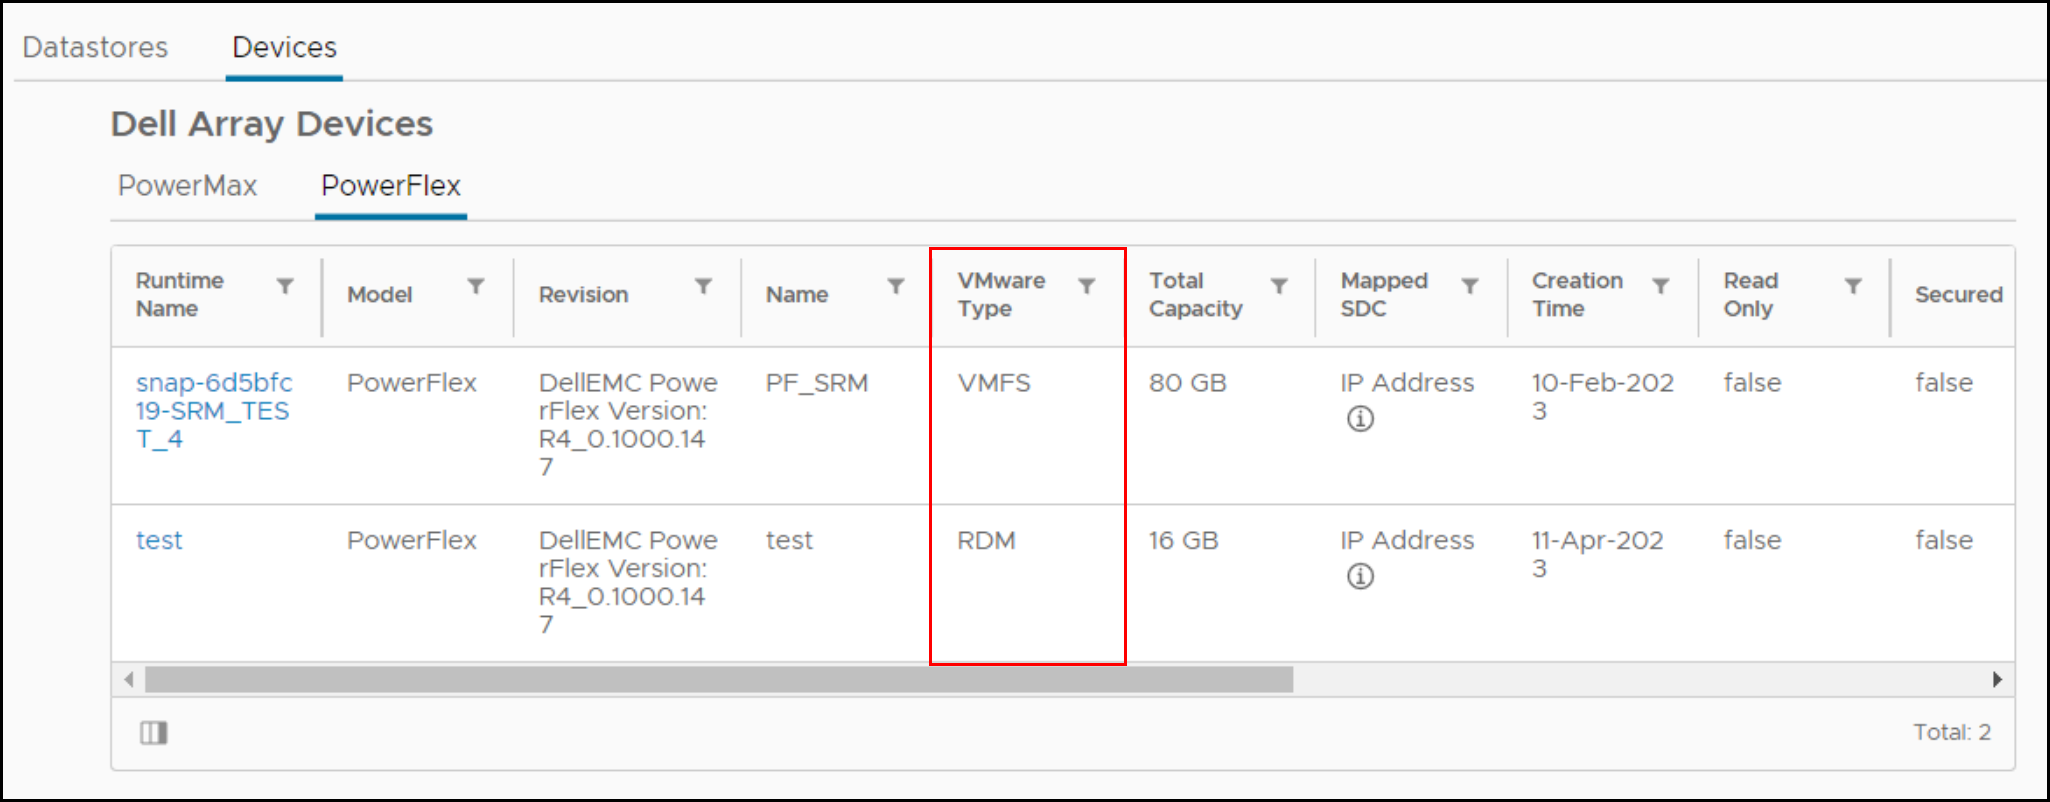
If a VM has an RDM, either the RDM must be removed from the VM, converted, or the VM moved to another datastore before migration.
-
1.3 Check claim rules/settings mapping to the device hosting VMFS datastore
If there are any custom claim rules on the SCSI device before migration, they will likely not be applied to the device when presented using NVMe. NVMe devices are not presented with separate vendor and model fields when accessed through inquiry. The fields are together, and thus a new claim rule is necessary if so wanted. In addition, claim rules based on device identifiers, e.g., World Wide Name (WWN) will fail since the SCSI identifier and NVMe identifier are distinct.
By default, VMware will claim newly presented NVMe devices with the default pathing plugin ofHPP. -
Check both the number of devices and paths to each ESXi host
NVMe supports fewer devices and paths than SCSI to each ESXi host. If the number of SCSI devices exceeds the NVMe limits, it is not possible to convert all datastores on the same ESXi host. As a solution, customers can employ more ESXi hosts or consolidate datastores either before or after conversion using Storage vMotion.
- SCSI - 1024 devices/4096 paths
- NVMe - 256 devices/2048 paths
-
Check for unsupported features
Some VMware features are not currently supported with NVMe. Check for supportability before migration.
For example, the following features are not currently supported on NVMe running on ESXi (through release 8.0U1).
Feature Brief description Remarks Guest Clustering Clustered VMDK feature that supports high availability solutions such as Windows Server Failover Cluster (WSFC) A VMFS datastore with clustered VMDKenabled cannot be migrated.SRM Array-based replication with SRM is not supported on NVMe. Migrating datastores involved with SRM array replication renders the solution useless. Note: The above list is not exhaustive. Customers should check with the array-specific documentation regarding the impact of the migration on the critical features. -
Check for potential impact of post-migration on supported features
The lack of integration of the following features may change how certain operations perform on NVMe compared to SCSI.
Feature Nature of Impact Action to be taken Hardware Accelerated Move - XCOPY There is currently no equivalent command to XCOPY. VMware software data mover is used instead. This could decrease performance of operations that use the primitive such as cloning orSvMotion.None Write Same/UNMAP If an NVMe device does not support the NVMe equivalent of write zeroes or unmap, there could be a performance impact.None
- Pre-Migration
-
Migration
This phase involves the steps to migrate the datastore from SCSI to NVMe.
-
Power down all VMs and unregister
Power down and unregister all the VMs hosted on the datastore to be migrated. Be sure not to delete them, only unregister.
-
Unmount VMFS volume from all hosts
Unmount the VMFS volume from all ESXi hosts once all VMs are unregistered. This is to ensure that it is not in use when the consistency check and migration is performed
-
Check VMFS volume metadata consistency
Before initiating the migration check the consistency of VMFS on-disk metadata. This ensures that there are no inconsistencies before beginning.
- Run
VOMA(VMware On-Disk Metadata Analyzer) in check mode by running:
voma -m vmfs -f check -d /vmfs/devices/disks/<DEVICE>:<PARTITION> -s <OUTPUT FILE>Where:
DEVICE is the SCSI device hosting the VMFS6 volume that is being migrated
PARTITION is the partition number on which the VMFS volume is formatted on the device
OUTPUT FILE is the absolute path of the file in which output of the command must be saved. This file can be located in
/tmpif it has enough space or any VMFS volume other than the one being migrated.As in:
voma -m vmfs -f check -d naa.60000970000120200302533030313031:1 -s /tmp/voma.outThe output should appear similar to the following:
[root@dsib0184:/dev/disks] voma -m vmfs -f check -d naa.60000970000120200302533030313031:1 Running VMFS Checker version 2.1 in check mode Initializing LVM metadata, Basic Checks will be done Checking for filesystem activity Scsi 2 reservation successful st activity (4096 bytes/HB, 1024 HBs). Phase 1: Checking VMFS header and resource files Detected VMFS-6 file system (labeled:'SRM_UPGRADE_1') with UUID:6418928f-d0fb0a78-fa29-34800d0ed39c, Version 6:82 Phase 2: Checking VMFS heartbeat region Phase 3: Checking all file descriptors. Phase 4: Checking pathname and connectivity. Phase 5: Checking resource reference counts. Total Errors Found: 0Note: If the command receives the following error, then the VMFS is not unmounted properly: - Run
VOMA failed to check device: Device or Resource busy
- Analyze the output file to see if there are any metadata inconsistencies reported by
voma. If there are any, then they must be addressed by runningvomain advanced fix mode before continuing. The following is an example:
[root@dsib0184:/dev/disks] voma -m vmfs -f fix -d naa.60000970000120200302533030313031:1
Running VMFS Checker version 2.1 in fix mode
Initializing LVM metadata, Basic Checks will be done
Checking for filesystem activity
Scsi 2 reservation successful st activity (4096 bytes/HB, 1024 HBs).
Phase 1: Checking VMFS header and resource files
Detected VMFS-6 file system (labeled:'SRM_UPGRADE_1') with UUID:6418928f-d0fb0a78-fa29-34800d0ed39c, Version 6:82
Phase 2: Checking VMFS heartbeat region
Phase 3: Checking all file descriptors.
Phase 4: Checking pathname and connectivity.
Phase 5: Checking resource reference counts.
Total Errors Found: 0
Total Errors Fixed: 0
Total Partially Fixed errors: 0
- Collect and save VMFS metadata dump. This would be required if any metadata inconsistencies are seen in subsequent steps.
Please see https://docs.vmware.com/en/VMware-vSphere/8.0/vsphere-storage/GUID-6F991DB5-9AF0-4F9F-809C-B82D3EED7DAF.html for more details on using
voma in check, advanced fix mode or dump mode.
Detach SCSI LUN from ESXi hosts
Detach SCSI LUN from each ESXi host in the VC. See the KB article https://kb.vmware.com/s/article/2004605 for detailed steps.
Stop presenting SCSI LUN from array.
The steps to unpresent the SCSI LUN are specific to the storage array. Customers should check with the array-specific documentation on the procedure.
Present the device as NVMe to one ESXi host.
The steps to re-present the device using NVMe are storage array specific. Customers should check with the array-specific documentation on the procedure.
Initiate device rescan on the host.
Once the device is presented to the ESXi host using NVMe, discovery is typically immediate. However, if the device does not appear, rescan one or more adapters using the vSphere UI or CLI:
esxcli storage core adapter rescan -a
Check VMFS volume metadata consistency after conversion.
On the ESXi host which has access to the device, once again run voma in check mode to validate that the VMFS on-disk metadata is still consistent. Any metadata inconsistencies must be investigated before proceeding. Voma uses the SCSI-2 reserve command to lock the device in order to prevent any concurrent access or modification of the VMFS volume when the voma session is active. However, NVMe devices do not support an equivalent of a SCSI-2 reservation. In order to workaround this, the user must pass the "-N" option to VOMA when the backend device is NVMe. For example:
- Run
VOMA(VMware On-Disk Metadata Analyzer) in check mode by running:
voma -m vmfs -f check -N -d /vmfs/devices/disks/<DEVICE>:<PARTITION> -s <OUTPUT FILE>
When voma is invoked with "-N" option the following warning message is displayed.
########################################################################
# Warning !!! #
# #
# You are about to execute VOMA without device reservation. #
# Any access to this device from other hosts when VOMA is running #
# can cause severe data corruption #
# #
# This mode is supported only under VMware Support supervision. #
########################################################################
VMware ESXi Question:
Do you want to continue (Y/N)?
0) _Yes
1) _No
Select a number from 0-1:
This is to notify that it is the user's responsibility to prevent the volume from getting mounted or accessed concurrently from other hosts while the current voma session is in progress. If the steps outlined here have been followed, and the device has been mapped and discovered on only one ESXi host, then it should be safe to proceed. The user should enter "0" at the prompt to continue with voma check mode. An example follows:
[root@dsib0180:~] voma -m vmfs -f check -N -d /vmfs/devices/disks/eui.03025330303130420000976000012020:1
Running VMFS Checker version 2.1 in check mode
Initializing LVM metadata, Basic Checks are done
Checking for file system activity
Reservation Support is not present for NVMe devices st activity (4096 bytes/HB, 1024 HBs). \
Performing file system liveness check..|
########################################################################
# Warning !!! #
# #
# You are about to execute VOMA without device reservation. #
# Any access to this device from other hosts when VOMA is running #
# can cause severe data corruption #
# #
# This mode is supported only under VMware support supervision. #
########################################################################
VMware ESXi Question:
Do you want to continue (Y/N)?
0) _Yes
1) _No
Select a number from 0-1: 0
Phase 1: Checking VMFS header and resource files
Detected VMFS-6 file system (labeled:'Temp_Datastore') with UUID:64359f88-dd0fd27e-af5a-34800d0ed39c, Version 6:82
Phase 2: Checking VMFS heartbeat region
Phase 3: Checking all file descriptors.
Phase 4: Checking pathname and connectivity.
Phase 5: Checking resource reference counts.
Total Errors Found: 0
Re-signature the VMFS volume
Now that the device is presented as NVMe, it is necessary to update the signature that is on the datastore. This is because the current signature is based, in part, on the WWN of the device when presented using SCSI. As the NVMe device id is different, a new signature must be generated. Therefore, on the same ESXi host that was used in the previous two steps, run the following to re-signature the volume:
- Although redundant, rescan the file system by running the command:
esxcli storage filesystem rescan- Next, run the following command to get a list of VMFS snapshot LUNs:
esxcli storage vmfs snapshot list
The newly presented NVMe device should be present, though depending on the environment there could be other snapshots unrelated to this process.
- Re-signature the VMFS volume by running the following:
esxcli storage vmfs snapshot resignature --volume-label=<label>|–volume-uuid=<id>
An example is below:
[root@dsib0180:~] esxcli storage filesystem rescan
[root@dsib0180:~] esxcli storage vmfs snapshot list
64359f88-dd0fd27e-af5a-34800d0ed39c
Volume Name: Temp_Datastore
VMFS UUID: 64359f88-dd0fd27e-af5a-34800d0ed39c
Can mount: true
Reason for un-mountability:
Can resignature: true
Reason for non-resignaturability:
Unresolved Extent Count: 1
[root@dsib0180:~] esxcli storage vmfs snapshot resignature -l Temp_DatastoreRename the VMFS datastore (optional)
When a VMFS volume is re-signatured, the VMFS volume label is prefixed with the tag "snap" followed by an alphanumeric string. For example, the VMFS datastore in the previous step is now named: snap-5c42a2bc-Temp_Datastore If wanted, rename the datastore back to the original name, removing the prefix.
Check VMFS volume metadata consistency after re-signature.
Once again, validate that the on-disk VMFS metadata is consistent after re-signature. Run voma in check mode on the VMFS volume. See section 2.8 for the voma command line which must include the "-N" flag. Verify if voma is reporting any inconsistencies. Proceed if voma does not report any errors.
Present the device as NVMe to all ESXi hosts in the cluster.
If there were no issues in any of the previous steps, the device can now be presented using NVMe to all the ESXi hosts in the cluster. As noted, NVMe devices are recognized immediately, but if not rescan the adapters through the vSphere UI or CLI. Verify that the VMFS6 volume is mounted and accessible on all hosts.
Register and power on all the VMs
Register all the VMs hosted on the datastore and power them on. Verify that the VMs are powering on successfully and can access the vmdks. As a best practice, the user can register and power on VMs on a single ESXi. Once successful, they could be migrated to other hosts.
Note: When powering on the VMs from the vCenter UI, there might be a pop-up window such as the one shown below. This prompts the user to record if the VM was copied or moved. Select "I Copied it" in the pop-up.
Post Migration
Check for impact on any key features and perform any cleanup if required.
1.4 Check both the number of devices and paths to each ESXi host 3
1.5 Check for unsupported features 4
1.6 Check for potential impact post-migration on supported features 4
2. Migration 4
2.2 Unmount VMFS volume from all hosts 5
2.3 Check VMFS volume metadata consistency. 5
2.9 Re-signature the VMFS volume 10
2.10 Rename the VMFS datastore (optional) 11
2.11 Check VMFS volume metadata consistency after re-signature. 11
2.12 Present the device as NVMe to all ESXi hosts in the cluster 11
2.13 Register and power on all the VMs 11
3. Post Migration. 12
Overview
With NVMe adoption growing, more customers are looking at migrating data from SCSI to NVMe. This document describes one of the efficient, albeit disruptive, methods of migrating SCSI to NVMe known as offline migration. Offline VMFS datastore migration from SCSI to NVMe does not involve movement of data. The device that was previously presented to an ESXi host or cluster as a SCSI device, is unpresented and then re-presented as an NVMe device. The VMFS datastore is then re-signatured and made available to the hosts, retaining its VM contents. Details of the offline migration steps are described below.
Scope
- The steps for offline migration, outlined in the subsequent sections, are applicable for VMFS6 datastores only.
- The steps cover functional aspects of the migration and do not cover performance characteristics of workloads post-migration.
- The validation of scale (number of concurrent migrations, so forth) or limits (maximum paths per device, maximum VMDKs per VM, so forth) is not in scope.
- The terms device, volume, and LUN is used interchangeably in the document.
- Offline migration requires all VMs in the VMFS datastore to be powered down prior to starting.
Offline migration steps
Offline migration of a VMFS6 datastore from SCSI to NVMe consists of three phases. Each phase might involve multiple checks or steps.
Pre-Migration
This preparatory phase includes checks to understand characteristics of the environment and the features that are in use. This phase is required to determine if offline migration is feasible in the environment and also to understand the impact post-migration. Some of the important checks are listed below. This is not an exhaustive list, rather it covers the most common checks in a standard customer environment.
Check for locking mode of VMFS volume.
First, ensure that the LUN supports ATS mode. Migration should be attempted only if the VMFS6 datastore is using ATS-only locking mode and does not use SCSI-2 reservations.
To determine the locking mode of a given volume, run the command esxcli storage vmfs lockmode list -l <volume name/label> on an ESXi host with access to the datastore. Offline migration is supported only if the locking mode for the VMFS6 volume is "ATS." The mode "ATS+SCSI" is not supported.
An example of a volume supporting offline migration:
esxcli storage vmfs lockmode list -l testVol1
Volume Name UUID                                Type   Locking Mode ATS Compatible ATS Upgrade Modes ATS Incompatibility Reason

----------- ----------------------------------- ------ ------------ -------------- ----------------- --------------------------

testVol1    5d1c5b0f-xxxxxxxx-xxxx-246e9xxxxdb0 VMFS-6 ATS          true           No upgrade needed

An example of a volume not supporting offline migration:

esxcli storage vmfs lockmode list -l testVol2
 Volume Name UUID                                Type   Locking Mode ATS Compatible ATS Upgrade Modes ATS Incompatibility Reason

----------- ----------------------------------- ------ ------------ -------------- ----------------- --------------------------

testVol2 63510e51-xxxxxxxx-xxxx-246e9xxxxde6 VMFS-6 ATS+SCSI false None Device does not support ATS1.2 Check if any vmdk of any VM in the selected datastore is used as an RDM (physical or virtual)
If a VM in the selected datastore has an RDM in SCSI mode, then it cannot be allowed to migrate to NVMe. There is no VMware command to discover if a VM has an RDM, however the Dell VSI Plugin lists the disk type for each VM. Below is a screenshot of the view in VSI which will list if any VMs (Runtime Name) have an RDM.
If a VM has an RDM, either the RDM must be removed from the VM, converted, or the VM moved to another datastore before migration.
1.3 Check claim rules/settings mapping to the device hosting VMFS datastore.
If there are any custom claim rules on the SCSI device before migration, they will likely not be applied to the device when presented using NVMe. NVMe devices are not presented with separate vendor and model fields when accessed through inquiry. The fields are together, and thus a new claim rule is necessary if so wanted. In addition, claim rules based on device identifiers, e.g., World Wide Name (WWN) will fail since the SCSI identifier and NVMe identifier are distinct.
By default, VMware claims newly presented NVMe devices with the default pathing plugin of HPP.
1.4 Check both the number of devices and paths to each ESXi host.
NVMe supports fewer devices and paths than SCSI to each ESXi host. If the number of SCSI devices exceeds the NVMe limits, it will not be possible to convert all datastores on the same ESXi host. As a solution, customers can employ more ESXi hosts or consolidate datastores either before or after conversion using Storage vMotion.
- SCSI - 1024 devices/4096 paths
- NVMe - 256 devices/2048 paths
1.5 Check for unsupported features.
Some VMware features are not currently supported with NVMe. Check for supportability before migration.
For example, the following features are not currently supported on NVMe running on ESXi (through release 8.0U1).
| Feature | Brief description | Remarks |
| Guest Clustering | Clustered VMDK feature that supports high availability solutions such as Windows Server Failover Cluster (WSFC) | A VMFS datastore with clustered VMDK enabled cannot be migrated. |
| SRM | Array-based replication with SRM is not supported on NVMe. | Migrating datastores involved with SRM array replication renders the solution useless. |
Note: The above list is not exhaustive. Customers should check with the array-specific documentation regarding the impact of the migration on the critical features.
Check for potential impact of post-migration on supported features.
The lack of integration of the following features may change how certain operations perform on NVMe compared to SCSI.
| Feature | Nature of Impact | Action to be taken |
| Hardware Accelerated Move - XCOPY | There is currently no equivalent command to XCOPY. VMware software data mover will be used instead. This could decrease performance of operations that normally use the primitive such as cloning or SvMotion. |
None |
| Write Same/UNMAP | If an NVMe device does not support the NVMe equivalent of write zeroes or unmap, there could be a performance impact. |
None |
Migration
This phase involves the steps to migrate the datastore from SCSI to NVMe.
Power down all VMs and unregister
Power down and unregister all the VMs hosted on the datastore to be migrated. Be sure not to delete them, only unregister.
Unmount VMFS volume from all hosts
Unmount the VMFS volume from all ESXi hosts once all VMs are unregistered. This is to ensure that it is not in use when the consistency check and migration is performed.
Check VMFS volume metadata consistency.
Before initiating the migration check the consistency of VMFS on-disk metadata. This ensures that there are no inconsistencies before the beginning.
- Run
VOMA(VMware On-Disk Metadata Analyzer) in check mode by running:
voma -m vmfs -f check -d /vmfs/devices/disks/<DEVICE>:<PARTITION> -s <OUTPUT FILE>
Where:
DEVICE is the SCSI device hosting the VMFS6 volume that is being migrated.
PARTITION is the partition number on which the VMFS volume is formatted on the device.
OUTPUT FILE is the absolute path of the file in which output of the command must be saved. This file can be located in /tmp if it has enough space or any VMFS volume other than the one being migrated.
For example:
voma -m vmfs -f check -d naa.60000970000120200302533030313031:1 -s /tmp/voma.out
The output should appear similar to the following:
[root@dsib0184:/dev/disks] voma -m vmfs -f check -d naa.60000970000120200302533030313031:1
Running VMFS Checker version 2.1 in check mode
Initializing LVM metadata, Basic Checks will be done

Checking for filesystem activity
         Scsi 2 reservation successful                       st activity (4096 bytes/HB, 1024 HBs).
Phase 1: Checking VMFS header and resource files
   Detected VMFS-6 file system (labeled:'SRM_UPGRADE_1') with UUID:6418928f-d0fb0a78-fa29-34800d0ed39c, Version 6:82
Phase 2: Checking VMFS heartbeat region
Phase 3: Checking all file descriptors.
Phase 4: Checking pathname and connectivity.
Phase 5: Checking resource reference counts.
Total Errors Found:           0
Note: If the command receives the following error, then the VMFS is not unmounted properly:
VOMA failed to check device: Device or Resource busy
- Analyze the output file to see if there are any metadata inconsistencies reported by
voma. If there are any, then they must be addressed by runningvomain advanced fix mode before continuing. The following is an example:
[root@dsib0184:/dev/disks] voma -m vmfs -f fix -d naa.60000970000120200302533030313031:1
Running VMFS Checker version 2.1 in fix mode
Initializing LVM metadata, Basic Checks will be done
Checking for filesystem activity
         Scsi 2 reservation successful                       st activity (4096 bytes/HB, 1024 HBs).
Phase 1: Checking VMFS header and resource files
   Detected VMFS-6 file system (labeled:'SRM_UPGRADE_1') with UUID:6418928f-d0fb0a78-fa29-34800d0ed39c, Version 6:82
Phase 2: Checking VMFS heartbeat region
Phase 3: Checking all file descriptors.
Phase 4: Checking pathname and connectivity.
Phase 5: Checking resource reference counts.
Total Errors Found:           0
Total Errors Fixed:           0
Total Partially Fixed errors: 0
- Collect and save VMFS metadata dump. This would be required if any metadata inconsistencies are seen in subsequent steps.
Please see https://docs.vmware.com/en/VMware-vSphere/8.0/vsphere-storage/GUID-6F991DB5-9AF0-4F9F-809C-B82D3EED7DAF.html for more details on using
voma in check, advanced fix mode or dump mode.
Detach SCSI LUN from ESXi hosts
Detach SCSI LUN from each ESXi host in the VC. See the KB article https://kb.vmware.com/s/article/2004605 for detailed steps.
Stop presenting SCSI LUN from array.
The steps to unpresent the SCSI LUN are specific to the storage array. Customers should check with the array-specific documentation on the procedure.
Present the device as NVMe to one ESXi host.
The steps to re-present the device using NVMe are storage array specific. Customers should check with the array-specific documentation on the procedure.
Initiate device rescan on the host.
Once the device is presented to the ESXi host using NVMe, discovery is typically immediate. However, if the device does not appear, rescan one or more adapters using the vSphere UI or CLI:
esxcli storage core adapter rescan -aCheck VMFS volume metadata consistency after conversion.
On the ESXi host which has access to the device, once again run voma in check mode to validate that the VMFS on-disk metadata is still consistent. Any metadata inconsistencies must be investigated before proceeding.
Voma uses the SCSI-2 reserve command to lock the device in order to prevent any concurrent access or modification of the VMFS volume when the voma session is active. However, NVMe devices do not support an equivalent of a SCSI-2 reservation. In order to workaround this, the user must pass the "-N" option to VOMA when the backend device is NVMe. For example:
- Run VOMA (VMware On-Disk Metadata Analyzer) in check mode by running:
voma -m vmfs -f check -N -d /vmfs/devices/disks/<DEVICE>:<PARTITION> -s <OUTPUT FILE>
When voma is invoked with "-N" option following warning message is displayed.
########################################################################
# Warning !!! #
# #
# You are about to execute VOMA without device reservation. #
# Any access to this device from other hosts when VOMA is running #
# can cause severe data corruption #
# #
# This mode is supported only under VMware Support supervision. #
########################################################################
VMware ESXi Question:
Do you want to continue (Y/N)?
0) _Yes
1) _No
Select a number from 0-1:
This is to notify that it is the user's responsibility to prevent the volume from getting mounted or accessed concurrently from other hosts while the current voma session is in progress. If the steps outlined here have been followed, and the device has been mapped and discovered on only one ESXi host, then it should be safe to proceed. The user should enter "0" at the prompt to continue with voma check mode. An example follows:
[root@dsib0180:~] voma -m vmfs -f check -N -d /vmfs/devices/disks/eui.03025330303130420000976000012020:1
Running VMFS Checker version 2.1 in check mode
Initializing LVM metadata, Basic Checks are done
Checking for file system activity
Reservation Support is not present for NVMe devices st activity (4096 bytes/HB, 1024 HBs). \
Performing filesystem liveness check..|
########################################################################
#   Warning !!!                                                        #
#                                                                      #
#   You are about to execute VOMA without device reservation.          #
#   Any access to this device from other hosts when VOMA is running    #
#   can cause severe data corruption                                   #
#                                                                      #
#   This mode is supported only under VMware support supervision.      #
########################################################################

VMware ESXi Question:
Do you want to continue (Y/N)?

0) _Yes
1) _No

Select a number from 0-1: 0

Phase 1: Checking VMFS header and resource files
   Detected VMFS-6 file system (labeled:'Temp_Datastore') with UUID:64359f88-dd0fd27e-af5a-34800d0ed39c, Version 6:82
Phase 2: Checking VMFS heartbeat region
Phase 3: Checking all file descriptors.
Phase 4: Checking pathname and connectivity.
Phase 5: Checking resource reference counts.
Total Errors Found:           0
Re-signature the VMFS volume
Now that the device is presented as NVMe, it is necessary to update the signature that is on the datastore. This is because the current signature is based, in part, on the WWN of the device when presented using SCSI. As the NVMe device id is different, a new signature must be generated. Therefore, on the same ESXi host that was used in the previous two steps, run the following to re-signature the volume:
- Although redundant, rescan the file system by running the command:
esxcli storage file system rescan
- Next, run the following command to get a list of VMFS snapshot LUNs:
esxcli storage vmfs snapshot list
The newly presented NVMe device should be present, though depending on the environment there could be other snapshots unrelated to this process.
- Re-signature the VMFS volume by running the following:
esxcli storage vmfs snapshot resignature --volume-label=<label>|–volume-uuid=<id>
An example is below:
[root@dsib0180:~] esxcli storage filesystem rescan
[root@dsib0180:~] esxcli storage vmfs snapshot list
64359f88-dd0fd27e-af5a-34800d0ed39c
   Volume Name: Temp_Datastore
   VMFS UUID: 64359f88-dd0fd27e-af5a-34800d0ed39c
   Can mount: true
   Reason for un-mountability:
   Can resignature: true
   Reason for non-resignaturability:
   Unresolved Extent Count: 1
[root@dsib0180:~] esxcli storage vmfs snapshot resignature -l Temp_Datastore
Rename the VMFS datastore (optional)
When a VMFS volume is re-signatured, the VMFS volume label is prefixed with the tag "snap" followed by an alphanumeric string. For example, the VMFS datastore in the previous step is now named: snap-5c42a2bc-Temp_Datastore. If wanted, rename the datastore back to the original name, removing the prefix.
Check VMFS volume metadata consistency after re-signature.
Once again, validate that the on-disk VMFS metadata is consistent after re-signature. Run voma in check mode on the VMFS volume. See section 2.8 for the voma command line which must include the "-N" flag. Verify if voma is reporting any inconsistencies. Proceed if voma does not report any errors.
Present the device as NVMe to all ESXi hosts in the cluster.
If there were no issues in any of the previous steps, the device can now be presented using NVMe to all the ESXi hosts in the cluster. As noted, NVMe devices are recognized immediately, but if not rescan the adapters through the vSphere UI or CLI. Verify that the VMFS6 volume is mounted and accessible on all hosts.
Register and power on all the VMs
Register all the VMs hosted on the datastore and power them on. Verify that the VMs are powering on successfully and can access the vmdks. As a best practice, the user can register and power on VMs on a single ESXi. Once successful, they could be migrated to other hosts.
Note: When powering on the VMs from the vCenter UI, there might be a pop-up window such as the one shown below. This prompts the user to record if the VM was copied or moved. Select "I Copied it" in the pop-up.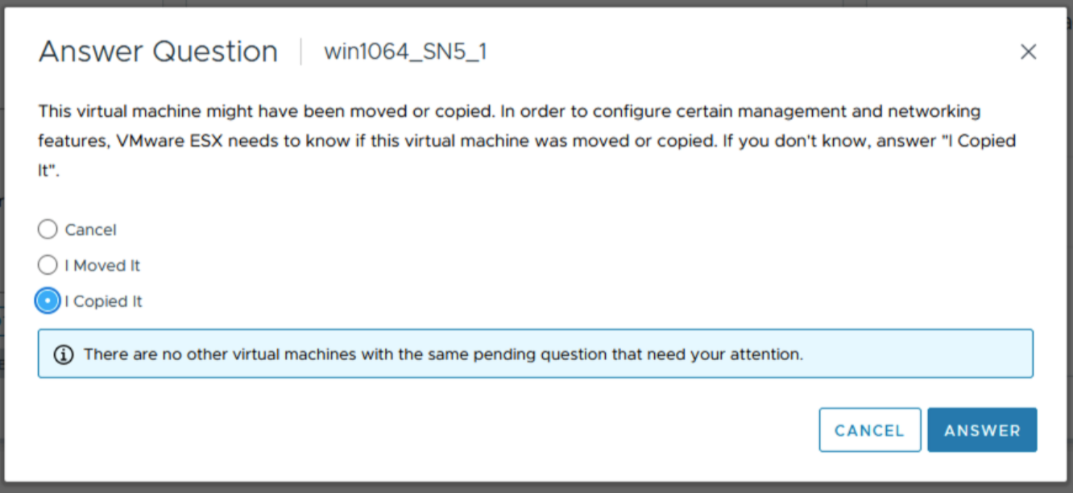
Post Migration
Check for impact on any key features and perform any cleanup if required.
その他の情報
This is an officially vetted process by VMware for offline datastore migration. Online migrations of individual VMs can be accomplished using Storage vMotion. VMware does not have a separate KB for this process.
対象製品
PowerFlex Appliance, PowerFlex custom node, PowerMax 2000, PowerMax 2500, PowerMax 8000, PowerMax 8500, PowerStore 1000X, PowerStore 1000T, PowerStore 1200T, PowerStore 3000X, PowerStore 3000T, PowerStore 3200T, PowerStore 5000X, PowerStore 5000T
, PowerStore 500T, PowerStore 5200T, PowerStore 7000X, PowerStore 7000T, PowerStore 9000X, PowerStore 9000T, PowerStore 9200T, VMAX 250F, VMAX 450F, VMAX 950F, VMware ESXi 7.x, VMware ESXi 8.x
...
文書のプロパティ
文書番号: 000213232
文書の種類: How To
最終更新: 14 3月 2025
バージョン: 2
質問に対する他のDellユーザーからの回答を見つける
サポート サービス
お使いのデバイスがサポート サービスの対象かどうかを確認してください。