NVP: vProxy registration does not complete with the message "HTTP Error 500: Failed to find virtual machine with IP address"
摘要: vProxy registration fails with message "HTTP Error 500: Failed to find a virtual machine with IP address "vPROXY_IP_ADDRESs" when configuring a new environment for vProxy backups. The NMC VMware View and the new vProxy Wizard show no VMware resources. ...
本文适用于
本文不适用于
本文并非针对某种特定的产品。
本文并非包含所有产品版本。
症状
- A new NetWorker VMware Protection (NVP) vProxy appliance registration does not complete with the error code:
Unable to register NSR VMware proxy 'vPROXY_NAME': Received an HTTP code: 500, libCURL message: "", vProxy message: "Error received from vProxy ="500: Failed to find virtual machine with IP address "vPROXY_IP_ADDRESS".".
- This error is seen in the NetWorker server's /nsr/logs/daemon.raw file and in the NetWorker Management Console (NMC) Alerts window.
- See Dell article 22793, NetWorker: How to use nsr_render_log.
- The new vProxy Wizard does not show any VMware resources.
- The NMC's VMware View tab does not show anything, even after performing a VMware View Refresh:

Figure 1: NMC's VMware View tab does not show anything.
原因
The vCenter was added to NetWorker using a customized role. The VMware user is assigned Global Permissions at the vCenter level but Propagate is set to False.
解决方案
- Confirm which user account is used to add a vCenter to NetWorker. This is done using nsradmin command on the NetWorker server:
nsradmin
print type: nsr hypervisor
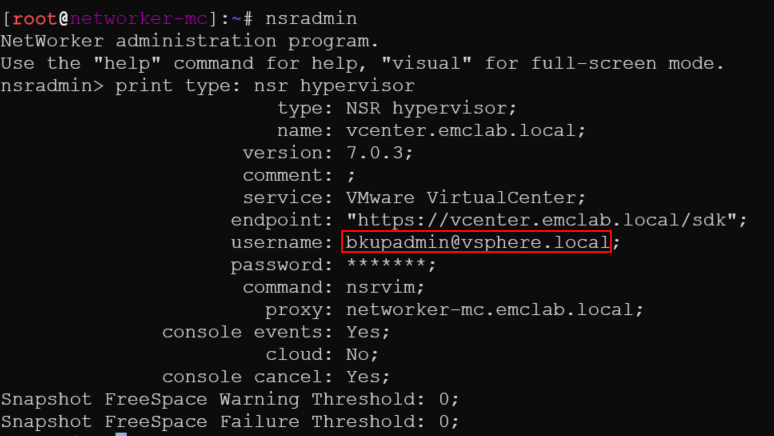
Figure 2: Result of nsradmin command to find username.
NOTE: A VMware administrator or team, or VMware user account with Administrative rights must complete the following actions.
- Log in to the vCenter vSphere web client and log in using the administrator@vsphere.local account (or another administrator level account).
- Go to Administration > Access Control > Global Permissions and find the user account from step 1.

Figure 3: Administration > Access Control > Global Permissions > User account from step 1
- Ensure Propagate checked and identify the Role:
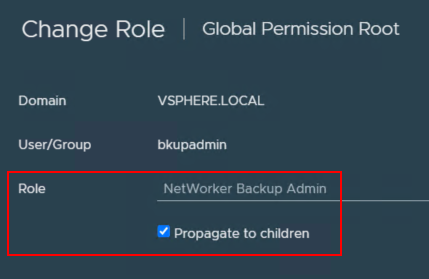
Figure 4: Ensure that Propagate is checked off for the Role.
- Go to Administration > Access Control > Roles and ensure that it shows the correct VMware user account with Propagate set to True.

Figure 5: Administration > Access Control > Roles > User account with Propagate set to True.
NOTE: This field should only show true. If it has two entries showing "False" and "True," then the issue persists.
- Return to the NMC and ensure that VMware View loads and is showing VMware resources.

Figure 6: NMC showing that VMware View loads and has VMware resources.
- If VMware View loads correctly, return to Devices > VMware Proxies and register the vProxy.
受影响的产品
NetWorker产品
NetWorker Series文章属性
文章编号: 000215265
文章类型: Solution
上次修改时间: 27 3月 2025
版本: 4
从其他戴尔用户那里查找问题的答案
支持服务
检查您的设备是否在支持服务涵盖的范围内。