NVP-vProxy: Data Protection Restore Client Does Not List SQL VM Backups
Summary: The NetWorker VMware Protection (NVP) vProxy is used to backup Microsoft SQL Virtual Machines (VM). The environment consists of multiple vCenter environments, and the SQL VM was copied to another vCenter outside of NetWorker practices. SQL VM restores are performed from the Data Protection Restore Client (DPRC). The DPRC wizard does not show SQL backups for a VM, no error is returned. ...
Symptoms
- The Data Protection Restore Client (DPRC) is accessed from a web browser:
https://NetWorker_Server_Address:9090/flr - The Admin and App options are selected and the user authenticates successfully.
- The source vCenter and a time range are specified, the SQL VM is selected but no backups are displayed:
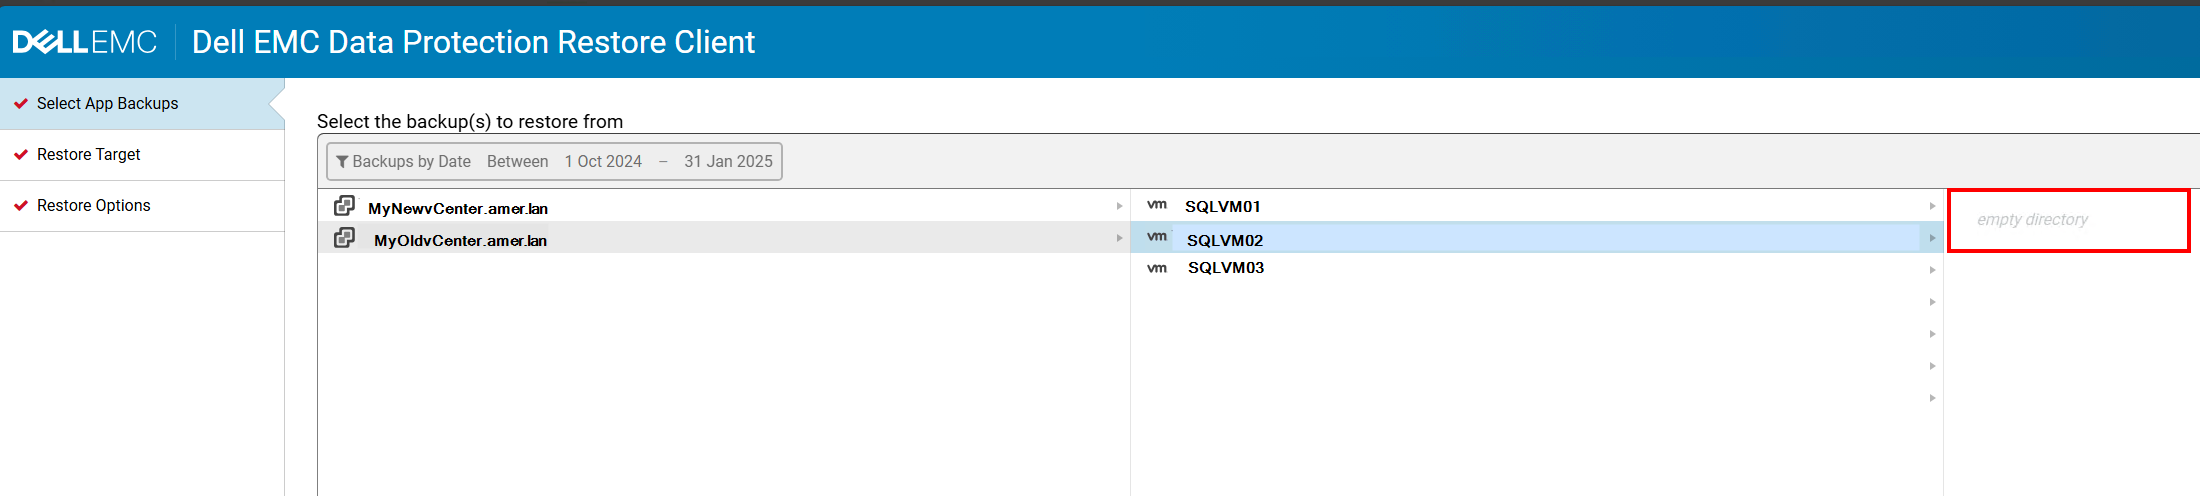
- The environment consists of multiple vCenter servers. The SQL VM selected for restore was copied (or replicated) to the new vCenter. The VM exists (or existed) in both vCenter environments. The replication method used was external to NetWorker.
Cause
The VM was replicated using a method which resulted in a "copied" VMware Universally Unique Identifier (UUID). The NetWorker media database lists the same UUID under two different vCenters. For example:
Windows NetWorker server (PowerShell):
mminfo -avot -q vmname=SQL_VM_NAME -r name | Sort-Object | Get-Unique
Linux NetWorker Server:
mminfo -avot -q vmname=SQL_VM_NAME -r name | sort | uniq
Example:
[root@nsr ~]# mminfo -avot -q vmname=SQLVM02 -r name | sort | uniq
vm:503df65c-90cd-e729-13a4-2f5711ba5b85:MyOldvCente.amer.lan
vm:503df65c-90cd-e729-13a4-2f5711ba5b85:MyNewvCenter.amer.lan
This is not expected behavior. The inherent expectation with a UUID is that it is unique. When querying for a VM UUID, only the results for one VM in one vCenter are expected.
A defect was identified in the workflow used by the DPRC APP restore save set selection. No issue is observed while performing File Level Restore (FLR) or full image restore using the same save sets.
Resolution
This issue will be addressed in a future NetWorker release through NETWORKER-131555.
It is not possible to recover the SQL APP data from DPRC due to the UUID conflict in VMware environments; use the below workaround to recover the SQL data.
Workaround:
.mdf and .ldf files are copied from the disk to another location on the VM and imported into the SQL Server Management Studio (SSMS).
Prerequisite:
- The save set required for restore must be a database save set, not a
txnlogbackup. This can be identified using the NetWorker servermminfocommand:
mminfo -avot -q vmname=SQL_VM-NAME
Example:
[root@nsr ~]# mminfo -avot -q vmname=win-sql01.amer.lan
 volume        type   client           date     time         size ssid      fl   lvl name
...
VMBackupPool.002 Data Domain vcsa.amer.lan 04/11/2026 11:38:14 AM 104 GB 4124732135 cr full vm:503ea434-0331-8ed6-8b19-b9cd408cce7a:vcsa.amer.lan
VMBackupPool.002 Data Domain vcsa.amer.lan 04/11/2026 12:30:09 PM 2341 KB 4107958035 cr txnlog vm:503ea434-0331-8ed6-8b19-b9cd408cce7a:vcsa.amer.lan
The full backup is a full database backup including the Virtual Machine Disk (VMDK). The txnlog backup only contains the transaction logs and does not include the databases.
- The VM backup must reside on a Data Domain, if it is on another media type (Tape, CloudBoost, AFTD), clone the backup from tape to a Data Domain that is accessible to the vCenter: NVP vProxy: How to manually clone a VM save set from a non-Data Domain device to a Data Domain clone device
- The process for creating the NFS export and mounting it to VMware and the target VM is documented in the following article: NetWorker: Manually Mounting Windows VM Save Set Disk For FLR Process Without vProxy Appliance
Data Recovery:
After performing the pre-requisite steps, the VM disk containing the SQL data should be mounted to the SQL VM with a random drive letter. Perform the following steps:
- Copy the SQL database
.mdfand.ldffiles from the attached disk to another location on the VM. For example, the following databases are found in the attached disk:
PS R:\Program Files\Microsoft SQL Server\MSSQL15.MSSQLSERVER\MSSQL\DATA> dir


    Directory: R:\Program Files\Microsoft SQL Server\MSSQL15.MSSQLSERVER\MSSQL\DATA


Mode                 LastWriteTime         Length Name
----                 -------------         ------ ----
...
-a----         4/10/2026  11:46 AM        8388608 NetWorkerSupport.mdf
-a----         4/10/2026  11:32 AM        8388608 NetWorkerSupport_log.ldf
...
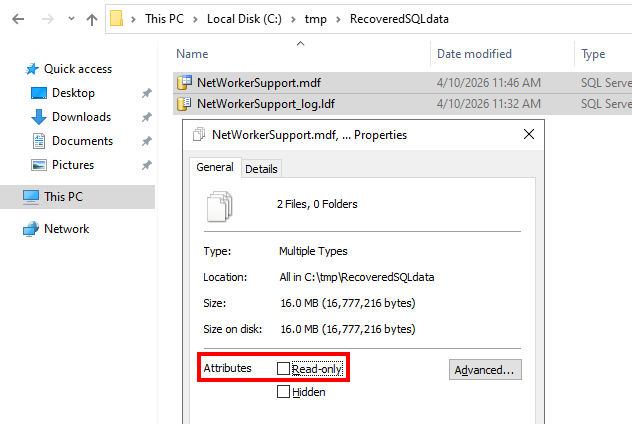
C:\tmp\RecoveredSQLdata:
PS C:\tmp\RecoveredSQLdata> dir


    Directory: C:\tmp\RecoveredSQLdata


Mode                 LastWriteTime         Length Name
----                 -------------         ------ ----
-a----         4/10/2026  11:46 AM        8388608 NetWorkerSupport.mdf
-a----         4/10/2026  11:32 AM        8388608 NetWorkerSupport_log.ldf
- Ensure that the files are and folders are not "Read Only." Right-click the folder path to the data and ensure "Read Only" is not checked. The files must also not have "Read Only" selected:
- Log in to SQL Server Management Studio (SSMS) with an administrative user account.
- Right click Databases, then click Attach.
- In the Databases to attach window, click Add. Browse to the location the
.mdffile was copied to and select it. - If the SQL server contains a database with the same name as the original database, you must rename the database you are importing. Select the Attach As field and rename the database, for example add
_OLD.
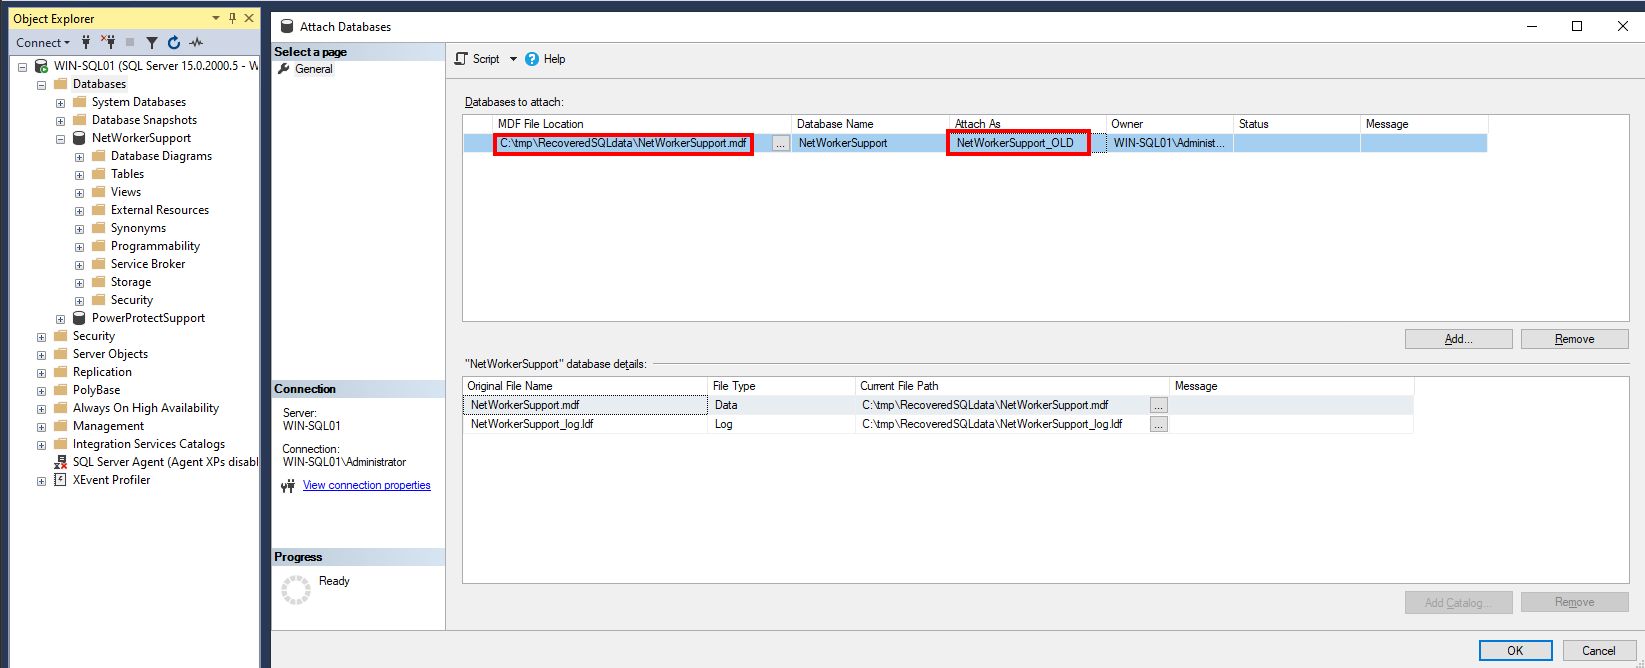
- Click OK, the database imports into the SQL Server Management Studio.
WARNING: Any permissions or OS-based import errors must be resolved by the system or database administrator.
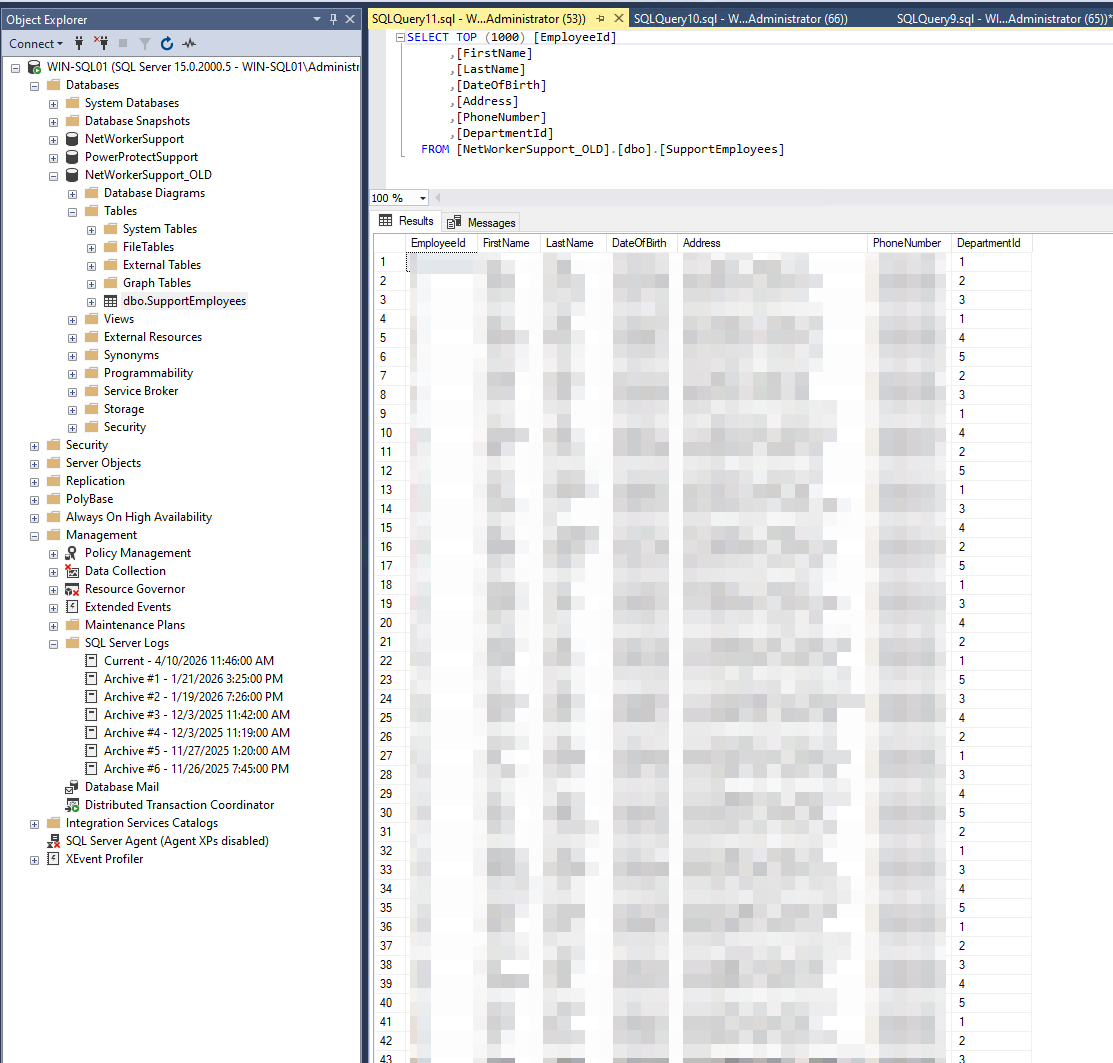
In this example, the original database NetWorkerSupport exists and the backup copy "NetWorkerSupport_OLD" is imported.
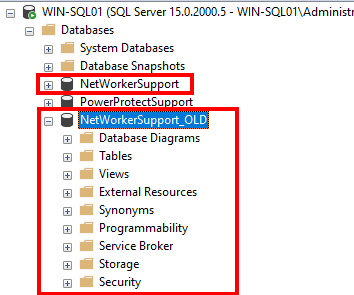
The database table contains content from the original database at the time of backup:
The SQL data is recovered to the system and is manageable by the SQL Database Administrator. Once the data is recovered and no further data is required from the backup media, the disk can be detached from VMware. The temporary NFS datastore can also be detached from VMware, and the NFS export on the Data Domain can be removed. These cleanup steps are detailed in the Cleaning Up After Restore Operations section of: NetWorker: Manually Mounting Windows VM Save Set Disk For FLR Process Without vProxy Appliance
Additional Information
The following steps can correct the duplicate UUID; however, this does not make the existing backup data recoverable. This below change is a corrective action for backups taken after the change and onward. Once the backups using the duplicate UUID have expired from NetWorker, the recover UI correctly finds the VM backups using their Universally Unique ID (UUID).
- For the duplicate VM, remove it from any NetWorker protection groups where it is currently backed up.
- Power of the new VM in VMware.
- Unregister the VM from the vCenter inventory (select "Remove from Inventory"). Do not delete the VM.
- Reregister the VM: Browse the datastore, right-click the
.vmxfile, and select "Register VM." - Power on the VM. When prompted by vCenter, select "I copied it." This forces vSphere to generate a brand-new, unique BIOS and Instance UUID.
- Add the Virtual Machine (VM) back to the protection groups from which it was removed in step 1.
See the following VMware documentation regarding the impacts of duplicate UUID: Changing or keeping a UUID for a moved virtual machine