PowerFlex Management Platform - How to perform a Single Component Upgrade
Summary: Customers can update a single or a few components outside of the catalog in the existing RCM or IC using the Single Component Upgrade (SCU) feature. SCU helps with addressing business needs (zero-day security, updating, and so on) in a quick and expedited manner. ...
This article applies to
This article does not apply to
This article is not tied to any specific product.
Not all product versions are identified in this article.
Instructions
Before running the procedure, in case the SCU feature is not enabled, follow this KB to enable it: PowerFlex Management Platform - How to enable the Single Component Upgrade feature.
NOTE: The user can modify the RCM or IC catalog any number of times.
Procedure
- Log in to the PFMP UI using admin credentials
- Go to Settings > Repositories > Compliance Versions, select the current RCM bundle, and click View Bundles
- From the list of bundles, verify which bundle must be modified
Example: To modify components on the R660 server, select System Bundle (Windows x64) PER660 v850 or select the other appropriate components, such as switches, CloudLink, or OS bundles:
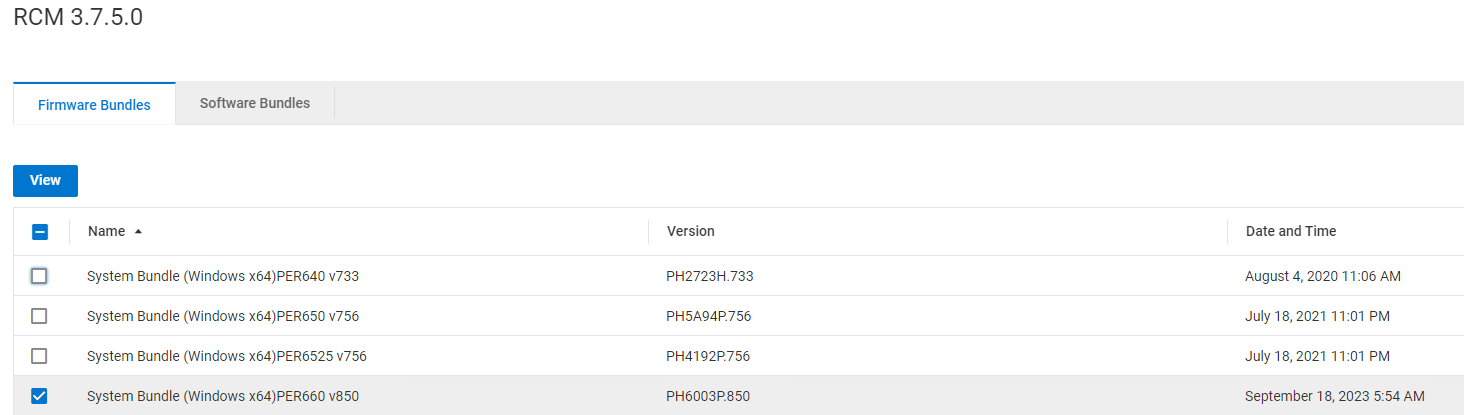
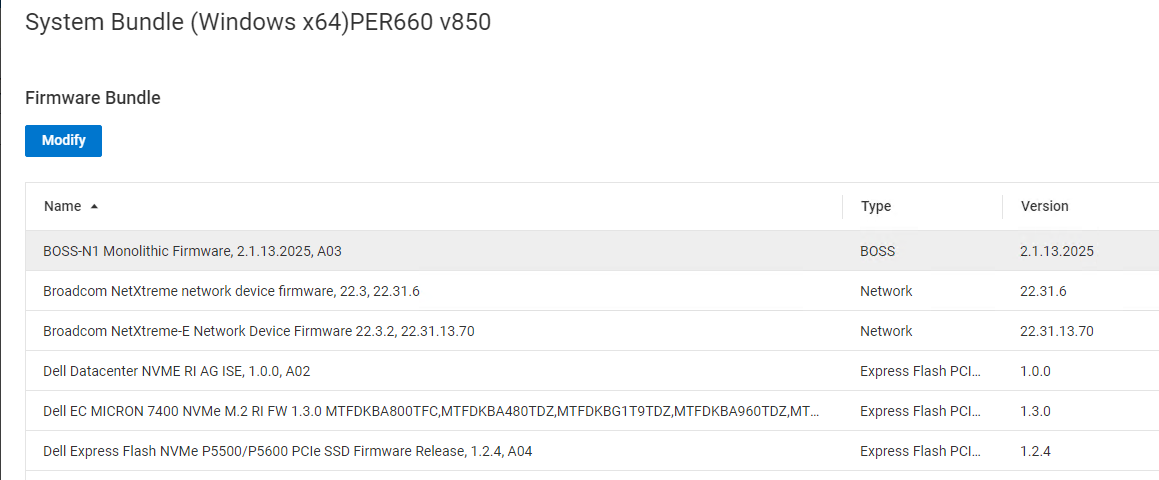
- Select the appropriate bundle to be upgraded and click View
- Select the specific component that must be upgraded from the new window and click Modify
NOTE: Only a single component can be modified at a time; repeat the steps for other components.
- On the Update Bundle Component page:
- Choose the option from Download from local network path or Upload from local, and provide the required details
- Provide the New Bundle Version (if it is not picked automatically) to match the existing bundle version
- Type MODIFY COMPLIANCE FILE in the field and click Proceed
- Repeat the steps above for additional components as needed. Once finished, go to the next step
- Go to Repositories > Compliance Versions and verify that the modified RCM or IC, a wrench icon, and the text "Modified" are displayed next to the name of the RCM or IC
- To update the resources:
- Click Lifecycle > Resource Groups
- Select the resource group that must be modified and click View Details
- Click View Compliance Report
- Select the nodes or other components marked with a wrench icon and the text "Modified" and click Update Resources
- Under the Apply Resource Updates Page, select Allow PowerFlex Manager to perform firmware and software updates now
- Select the appropriate Maintenance Mode and click Apply.
- Monitor the job and confirm that the component is updated with the new version:
- Verify that the required component has been upgraded. Click Lifecycle > Resource Groups
- Select the resource group that you already modified and click View Details
- On the Resource Group Information, verify that the resource group compliance status is Compliant.
- If the upgrade fails, contact Dell Support for Assistance
ESXi upgrades using the Single Component upgrade feature.
For ESXi upgrades, the SCU feature requires PFMP version 4.6.1 or higher.
NOTE: It is required that users should upload the ESXi patch bundle and the ESXi ISO file to PFMP, and both files should be of the same version.
ESXi Patch Depot Upload
See below the minimum versions of PFMP, RCM, and IC for performing a Patch Depot upgrade using the SCU procedure:
- PFMP: 4.6.x
- RCM: 3.7.5.x or 3.8.x.x
- IC: 46.375.xx or 46.380.xx
Procedure
- Log in to PFMP UI
- Click Settings > Repositories > Compliance Versions
- Select the RCM bundle that must be modified and click View Bundles
- On the message screen, click Software Bundles
- Check the box on ESXi Software Bundle, clear the others, and click View
- Click Upload Software Depot and Upload ESXi Path Depot file.
Important: Files larger than 500MB should use the Download from local network path option:
- Select Download from the Local Network path
- Provide the required details
- Type MODIFY COMPLIANCE FILE in the Answer field
- Click Proceed and wait for the Compliance file to synchronize, and verify that the status of the Compliance file shows as Available and the Version tab shows as Modified
- Click Lifecycle and select Resource Group
- Choose the service that you want to upgrade
- Click Non-Compliant in the Resource Group Information tab
- Click the Software Components tab, select all the listed nodes, and click Update Resources
- Choose Protected Maintenance Mode and click Apply
- Monitor the job that is completed successfully:
- Verify that the required component has been upgraded. Click Lifecycle > Resource Groups
- Select the resource group that you already modified and click View Details
- On the Resource Group Information, verify that the resource group compliance status is Compliant
- If the upgrade fails, contact Dell Support for assistance
ESXi Standard ISO Image Upload
- Use this procedure to add an ESXi ISO image to the repository when the SDC is enabled. When using this method, the user deviates from the standard RCM-qualified images.
- Customers must procure and provide the VMware ESXi patch depot bundle and ESXi ISO images for PowerFlex Hyperconverged or PowerFlex compute-only nodes, from the Broadcom support portal.
- This task is the mandatory setup for uploading the VMware ESXi image. You must obtain the standard ISO image and upload it to PFMP.
Prerequisites
Upload operating system images only for deploying VMware ESXi-based hyperconverged and compute-only Resource Groups (RGs).
Procedure
- From the menu, click Settings > Repositories > OS Images
- Click Add.
- In the Add OS image Repository dialog, enter the following:
- For Repository Name, enter the name of the repository. The repository name must be unique and case-insensitive.
- For Image Type, enter the image type. In your use case, you use the image type as ESXi
- For Source Path and Filename, enter the path of the operating system image file name in a file share.
- To enter the CIFS share, use the following format example:
\\host\lab\isos\filename.iso
If you are using the CIFS share, enter the Username and Password to access the share. - To enter the HTTP share, use the following format example:
http://ipaddress/shares/file.iso - Click Test Connection to verify that the file share can communicate with PFMP
- Click Add
- Use the new image that is uploaded.
ESXi NVIDIA VIBs Verification
- Use this procedure to verify the VIBs for NVIDIA Connect NIC cards.
- For customers who have PowerFlex nodes with NVIDIA ConnectX NIC cards, before you upgrade, ensure nmlx5-core and nmlx5-rdma have the same driver version. If a version mismatch occurs, remove the
nmlx5-rdmapackage by running the following:#esxcli software vib remove --vibname=nmlx5-rdma
Example output:
#esxcli software vib list grep -i nmlx5
nmlx5-core 4.22.73.1004-lOEM.703.0.0.18644231 MEL VMwareCertified 2024-03-30
nmlx5-rdma 4.22.73.1004-lOEM.703.0.0.18644231 MEL VMwareCertified 2024-03-30
CloudLink Upgrade Procedure
- Customer can upgrade their CloudLink versions on PowerFlex Rack and Appliance environments using the SCU feature.
- The CloudLink ISO is required to start the CloudLink version upgrade using the SCU procedure.
Procedure
- Log in to PFxM UI using admin credentials.
- Go to Settings > Repositories > Compliance Version select the current RCM bundle, and click View Bundles
- From the list of bundles, select System Bundle CloudLink from Firmware Bundles and click View
- Select the component clc that must be upgraded and click Modify
Note: Only a single component can be modified at a time; repeat the steps for other components. - On the Update Bundle Component page:
- Choose the option to download from the local network path and upload the CloudLink ISO file
- Provide the New Bundle Version (if it is not picked automatically) to match with the existing bundle version
- Type MODIFY COMPLIANCE FILE in the field and click Proceed
- Go to Repositories > Compliance Versions and verify that the modified RCM or IC, a wrench icon, and the text Modified is displayed next to the name of the RCM or IC
- To update the resources
- Go to the Resources tab
- Select both CloudLink resources and click Run Inventory
- Wait for 1-2 minutes to complete the inventory and refresh your browser
- Select the CloudLink Center that must be upgraded and click Non-Compliant
- Click Update Resource
- Under Apply Resource Updates Page, select Allow PowerFlex Manager to perform firmware and software updates now and click Apply Updates.
- Upgrade takes some time to complete, wait until the deployment status becomes Available
- On the Resources page, click CloudLink Center > View Details to verify the upgraded version
- Wait for 3-4 minutes
- Start manually upgrading the SecureVM agent on all the nodes from CloudLink Center UI:
- In your web browser, type the URL for CloudLink Center in the following format: https://clc_address
- Log in with the username secadmin and the secadmin password specified during deployment
- Click AGENTS > Machines, and select Node
- Click Actions > Upgrade
Note: The Upgrade button is unavailable if there are NO SecureVM agent upgrades required. - Repeat the steps for every machine that requires a CloudLink agent upgrade.
- Verify the SecureVM agent version
- Click AGENTS > Machines, select the node, and check the Version
- Once the agents are updated on all the nodes, download the agent file from the CloudLink Center UI and modify the SecureVM agent component in the RCM bundle
- Click AGENTS > Agent Download, download the 64-bit SUSE RPM package or 64-bit CentOS RPM package depending on the operating system running on the nodes.
- Modify the SecureVM Agent component in the RCM bundle
- Log in to PFxM UI using admin credentials.
- Go to Settings > Repositories >Compliance Versions select the current RCM bundle and click View Bundles
- Click Software Bundles > CloudLink SecureVM > View
Note: There are two CloudLink secureVM bundles with the same name, one for SUSE and the other for CentOS. Select the bundle and click View to differentiate the bundle for SUSE or CentOS, select the bundle based on the operating system installed on PowerFlex nodes. - Click Modify
- On the Update Bundle Component page, choose the option from Download from local network path or Upload from local, and choose the file downloaded in step 12
- Provide the New Bundle Version (if it is not picked automatically) to match with the existing bundle version
- Type MODIFY COMPLIANCE FILE in the field and click Proceed.
- Update the Resource Group details
- Click Lifecycle > Resource Groups
- Select the resource group that must be modified and click View Details
- Click More Actions > Update Resource Group Details
- On the Resource Group Information, verify that the resource group compliance status is Compliant
- If the upgrade fails, contact Dell Support for assistance
Affected Products
PowerFlex rack, PowerFlex ApplianceArticle Properties
Article Number: 000223004
Article Type: How To
Last Modified: 01 Oct 2025
Version: 5
Find answers to your questions from other Dell users
Support Services
Check if your device is covered by Support Services.