Dell C6522QT Monitor Usage and Troubleshooting Guide
Summary: Learn how to use and troubleshoot issues related to the Dell 65 4K Interactive Touch Monitor - C6522QT.
Instructions

For help with video or display issues such as: no video or no display, blank or black screen, flickering, resolution or color issues, horizontal or vertical lines, etc. refer to an expanding section below.
The Dell C6522QT display has an active matrix, thin film transistor (TFT), liquid crystal display (LCD), and LED backlight. The display features include:
- 163.906 cm (64.53 in.) active area display (Measured diagonally) 3840 x 2160 (16:9 aspect ratio) resolution, plus full-screen support for lower resolutions.
- Video Electronics Standards Association (VESA™) 400 x 300 mm mounting holes.
- Built-in speakers (2 x 20 W).
- Plug and play capability if supported by your system.
- On-Screen Display (OSD) adjustments for ease of set-up and screen optimization.
- Security lock slot.
- Supports Asset Management Capability.
- Arsenic-Free glass and Mercury-Free for Panel only.
- Wattage 0.3 standby power when in the sleep mode.
- Easily setup with Dell OptiPlex Micro PC (Micro Form Factor).
- Up to 20 points and 4 pens InGlassTM Touch technology.
- Optimize eye comfort with a flicker-free screen.
This section provides some specifications of the Dell C6522QT monitor. To learn more about the specifications of Dell C6522QT monitor, refer to the User's Guide at the Dell Manuals website.
| Screen type |
|
|---|---|
| Panel technology |
|
| Maximum resolution |
|
| Viewing angle |
|
| Contrast ratio |
|
| Response time |
|
| Color gamut |
|
| Color depth |
|
| Connectivity |
|
Ensuring that your Dell monitor is set up properly. Assembling the monitor stand and setting up the monitor ergonomically. Connecting the cables and organizing them. These will only help make the viewing experience the best it possibly can be.
Attaching the stand
The standard monitor stand is detached when the monitor is shipped from the factory. To learn more about attaching the standard monitor stand. Refer to the Setting Up the Monitor section in the User's Guide of your Dell C6522QT monitor.
To learn how to set up any other stand with a monitor, refer to the respective stand setup guide for setup instructions.
Ergonomics
Where you put your monitor is almost as important as what model you buy. The monitor should be directly in front of you, at an arm’s length away (between 20-40 inches from your eyes). The top edge of the screen at eye level when you are sitting comfortably. You may need to adjust your chair height or the height of the monitor to achieve this.
Connecting your monitor to the PC
To connect your Dell C6522QT monitor to your PC:
- Turn off your PC and disconnect the power cable.
- Connect the DisplayPort, HDMI, or USB Type-C cable to the corresponding video or display port on the back of your PC.
To learn more about connecting your monitor to the PC, refer to the Dell knowledge-base article: How do I connect a monitor to a PC?
- Connect the USB upstream cable to the monitor and PC.
- Switch on your display
- Select the correct input source at Display OSD Menu and turn on your computer.
Dell C6522QT monitor orientation must always be in landscape mode. This includes any wall-mounted monitors and monitors on a stand. In a multiple monitor setup, Dell C6522QT should not be rotated either to 180° (landscape) or 90° (portrait).
When setting up your Dell C6522QT monitor, ensure that the monitor front panel buttons is on the bottom right.
When mounted on the wall or on a monitor arm, the set-up must comply to the recommended panel orientation and working angle.
Wall Mounting
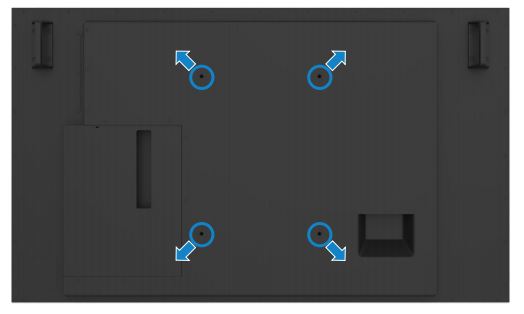
Figure 1: Wall Mounting
(Screw dimension: M8 x 35 mm).
Refer to installation instruction that comes with the 3rd party wall mount that customer purchases. Vesa-compatible base mounting kit (400 x 300) mm.
-
Install Wall Plate to Wall.
-
Place the display panel on a soft cloth or cushion on a stable flat table.
-
Attach the mounting brackets from the wall mounting kit to the display.
-
Install Display to Wall Plate.
-
Ensure display is mounted vertically with no tilt forward or backward and a leveler is used to assist to mount the display.
Touch OSD launcher
This display comes with a touch OSD functionalities. Press the OSD launcher touch key to access the functionalities.

Figure 2: OSD launcher
Learn more about using the On-Screen Display (OSD) menu. Refer to the Operating Your Monitor section in the User's Guide of Dell C6522QT monitor.
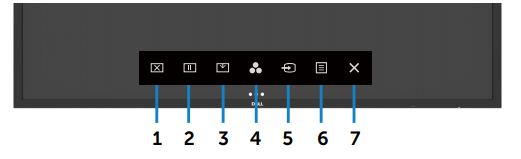
Figure 3: Dell C6522QT Front Panel Buttons
| Button | Function | Description |
|---|---|---|
| Button 1 | Power On/Off. | Use this icon to switch screen to black or white. Go to Menu to select screen off color. Use touch key to screen restore. |
| Button 2 | Suspend | To a freeze screen when press/activate. Use touch key to screen restore. |
| Button 3 | Screen Drop Down | Screen Drop Down so that you can easily reach the top of the image. Use touch key to screen restore. |
| Button 4 | Preset Modes | Use this icon to choose from a list of preset color modes. |
| Button 5 | Input Source | Use this icon to choose from a list of Input Source. |
| Button 6 | Menu | Use this menu icon to launch the on-screen display (OSD) and select the OSD menu. |
| Button 7 | Exit | Use this icon to go back to the main menu or exit the OSD main menu. |
Resetting a monitor to factory defaults can help resolve many video or display issues. To reset your Dell C6522QT monitor to factory default settings, follow these instructions:
- Press Button 6 (Figure 3) on the monitor to enter the On-Screen Display (OSD) Menu.
- Use the touch OSD control and scroll down to Others
- Select Factory Reset.

Figure 4: Dell C6522QT Factory Reset
If your Dell monitor has a blank or black screen, fuzzy or blurry image, flickering, distorted or any other screen abnormalities, running a diagnostic test will help determine if the Dell monitor is functioning normally. To learn more about diagnostic options on a Dell monitor, refer to the Dell knowledge-base article: How do I run diagnostics on a Dell monitor?
It is always essential to isolate the monitor while troubleshooting your computer for the following scenarios:
- No Power - Your computer is not powering ON or showing any signs of power.
- No POST - Your computer is not showing any indication of activity, the screen might be blank and will not display the Dell logo during start-up.
- No Video - You are unable to see any display on the screen, able to hear the windows chime but no display is seen.
Your Dell C6522QT Monitor provides a self-test feature check that allows you to check whether the monitor is functioning properly. If the monitor and computer are properly connected but the monitor screen remains dark, run the monitor self-test by performing the following steps:
- Turn off both your computer and the monitor.
- Unplug the video cable from the back of the computer. To ensure proper Self-Test operation, remove the video cables (VGA, DVI, HDMI, or DisplayPort) from the back of the computer.
- Turn on the monitor.
- Turn off your monitor and reconnect the video cable: then turn on both your computer and the monitor.
- If your monitor screen remains blank after you use the previous procedure, check your video card (GPU) and computer, because your monitor is functioning properly.
Your Dell C6522QT monitor has a built-in diagnostic tool. It helps to determine if the screen abnormality you are experiencing is a problem with the monitor or with the video card on your computer.
When you notice screen abnormalities like distortion, clarity, horizontal or vertical lines, color fade, it is always a good practice to isolate the monitor by running the Built-In Diagnostics.

Figure 5: Dell C6522QT Built-in diagnostics
- Make sure that the screen is clean (no dust particles on the surface of the screen).
- Touch and hold Button 1 for 5 seconds in lock Select Option. Touch the self-inspection icon A gray screen appears
- Carefully inspect the screen for abnormalities.
- Touch the front panel. The color of the screen changes to red.
- Inspect the display for any abnormalities.
- Repeat step 4 and step 5 to inspect the display in green, blue, black, white, and text screens.
The test is complete when the text screen appears. To exit, touch panel again.
If you notice any abnormalities during Built-In Diagnostics, you may get the monitor repaired or replaced if it is under warranty by contacting Dell Technical Support.
During the LCD Monitor manufacturing process, it is not uncommon for one or more pixels to become fixed in an unchanging state. Which is hard to see and do not affect the display quality or usability. For more information, refer to the Dell knowledge-base article Dell LCD Monitor Pixel Guidelines.
This section provides information about troubleshooting steps that can help resolve the most common issues with the Dell C6522QT monitor. Alternatively, to learn more about troubleshooting common issues on Dell monitors, refer to the Dell knowledge-base article Troubleshooting Display or Video Issues on a Dell Monitor.
| Common Problem | What User Experiences | Possible Solution |
|---|---|---|
| No Video - Power LED Off | No picture |
|
| No Video - Power LED On | No picture or no brightness. |
|
| Poor Focus | Picture is fuzzy, blurry, or ghosting. |
|
| Shaky or Jittery Video | Wavy picture or fine movement. |
|
| Missing Pixels | LCD screen has spots. |
|
| Stuck-On/Off Pixels | LCD screen has bright spot. |
|
| Brightness Problems | Picture too dim or too bright. |
|
| Geometric Distortion | Screen not centered correctly. |
Note:When using DisplayPort input, the positioning adjustments are not available.
|
| Horizontal or Vertical Lines | Screen has one or more lines. |
Note:When using DisplayPort input, the positioning adjustments are not available.
|
| Synchronization Problems | Screen is scrambled or appears torn. |
|
| Safety-Related Issues | Visible signs of smoke or sparks. |
|
| Intermittent Problems | Monitor malfunctions on and off. |
|
| Missing Color | Picture does not have color. |
|
| Wrong Color | Picture color is not good. |
|
| Image Retention from a Static Image Left on the Monitor for a Long Period | Faint shadow from the static image appears on the screen. |
|
| Screen image is too small. | Image is centered on screen, but does not fill entire viewing area. |
|
| Image Ghosting | Fast moving images leave a trail of shadow images. | On certain video and applications with fast moving images, imaging ghosting, which appears as a trailing shadow, may occur. Change the Response Time to Fast in the Display menu. |
| No Input Signal when user controls are pressed. | No picture, the power LED light is white. |
|
| The picture does not fill the entire screen. | The picture cannot fill the height or width of the screen. |
|
| No Video, No Display | No video when connecting docking, dongle, or Blu-ray DVD players | Due to legacy platform cannot recognize or output 3840 x 2160 , we suggest changing EDID to lower resolution to cover this compatibility problem.
|
| Unable to switch back to native resolution (3840 x 2160 ) after Picture by Picture is turned off. | Dell C6522QT supports Picture by Picture (PBP) mode. Picture by Picture (PBP) mode is 2 side-by-side images with each image that is displayed at 2560 x 1440 resolution. When the monitor is connected to a PC via HDMI and PBP mode is turned off, the monitor may display images at the lower resolution (2560 x 1440) rather than automatically switching to the native resolution (3840 x 2160 ). |
|
| Display mode changes from "Second screen only" to "Extended mode" after opening and closing the laptop LCD. | The display mode on your PC reverts to "Duplicate" or "Extend,". This depends on which was selected before you changed to "Second screen only" or "Projector only" when you close and open the laptop screen. When you close and then reopen the lid on a laptop, the Connecting and Configuring Displays (CCD) feature in Windows automatically reverts the display mode to the last active selection. This behavior is by design in Microsoft Windows. |
Switch to the display mode that you want after you close and reopen the laptop screen manually:
|
| Monitor blinks twice when connected to PC with Nvidia NVS 310 video or graphics card. | When the monitor is turned-off and back on, the monitor may blink twice. This issue may occur if the PC is using a Nvidia Graphic NVS 310 card and graphics card resolution setting is 2560 x 1600. |
To resolve this issue, manually set the resolution to 2560 x 1440 using the Nvidia Control Panel.
|
| Monitor has sound icon when Dell C6522QT is connected to a laptop using HDMI. | Dell C6522QT does not support audio or sound via HDMI. Speakers or headphones must be connected via the audio connector on the PC. |
To resolve the audio icon displaying, update the video or graphics (GPU) driver to the latest version. To learn how to download and update a device driver, refer to the Dell knowledge-base article How do I download and install a device driver? |
| Monitor will not display Blu-Ray video after the monitor is powered-off and powered on. | If the monitor is powered-off and powered-on when displaying the Blu-Ray video, the Blu-ray player may lose the data signal from the system to the monitor. |
|
| Cannot enable YCbCr color mode on the monitor. | When monitor is connect to the PC via HDMI, the video or graphics card (GPU) controls the YCbCr setting | Disable the YCbCr setting from the video or graphics utility like Intel HD Graphics Control Panel. |
| Monitor will not support the YCbCr color format when a USB Type-C to HDMI dongle is connected from the monitor to the PC. | Some combinations of USB Type-C to HDMI dongle and video or graphics card (GPU) are not compatible to support the YCbCr color format. |
|
| When changing the monitor’s resolution from Windows Display Settings, the image quality may not be good. | Windows Display Settings and the resolution settings on the laptop's video or graphics utility may not be compatible. | Change the resolution using the video or graphics card (GPU) utility like Intel HD Graphics Control Panel. |
| No video when the monitor is connected to a Dell docking station. | The monitor may not receive video signals from the PC when connected to a Dell docking station. | To learn more about how to set up and configure the Dell C6522QT monitor with a Dell docking station. Refer to your System Requirements and Supported Configuration in the support site. |
| Light leak from the monitor | The monitor appears to have light leak from the edges in a dark room | This is normal behavior of the monitor. Dell consumer monitors are inspected at 150-lux ambient lighting (similar to typical office lighting). Dell UltraSharp and Gaming monitors are inspected with a tighter criteria of 70-lux ambient lighting (dimly lit room but not dark). |
| Color variation on the corners of the monitor | The monitor appears to have color variation on the corners of the screen | The optimal viewing position for the monitor is from the center of the screen. Dell C6522QT monitor uses a curved IPS panel, the corners of the screen may appear slight yellowish or pinkish, especially when viewing in dark room. This is normal IPS panel behavior and typically does not affect the overall viewing performance.
|
| No video when a Blu-Ray, DVD player or PS4 is connected to the monitor via HDMI. | The monitor does not display any video when an external Blu-ray, DVD player or PS4 is connected. | Dell C6522QT monitor is factory default set at HDMI EDID with 3 Block (Detailed Timing Descriptor) to support 3840 x 2160 @ 60 Hz. To display a resolution of 3840 x 1080 @ 60 Hz or lower, you need to switch the monitor HDMI EDID from 3 Block to 2 Block.
To display 3840 x 2160 resolution over HDMI again, you need to switch the monitor back to HDMI EDID 3 Block. Follow Steps 1 & 2, and Select Disable. |
| Horizontal stripes when watching online videos using Microsoft Movies and TV app, Microsoft Internet Explorer or Microsoft Edge. | Unwanted horizontal stripes appear on the video playback window when viewing online videos on YouTube using Microsoft Internet Explorer or Microsoft Edge browser. They are also seen while watching online videos using the Movies and TV app. |
|
| Troubleshooting USB Issues | ||
|---|---|---|
| Specific Symptoms | What User Experiences | Possible Solution |
| USB interface is not working. | USB peripherals are not working. |
|
| High-Speed USB 3.0 interface is slow. | High-Speed USB 3.0 peripherals working slowly or not working at all |
|
| Wireless USB peripherals stop working when a USB 3.0 device is plugged in. | Wireless USB peripherals responding slowly or only working as the distance between itself and its receiver decreases. |
|
| USB Type-C port does not supply power. | USB peripherals cannot be charged. |
|
| USB ports on the monitor do not work when the monitor is connected to a PC using USB Type-C. | If the monitor is powered-off and powered-on too quickly, the laptop will not recognize the system change. |
|
| Monitor does not wake up via the USB keyboard or mouse that is connected to the monitor. | In sleep mode, the monitor does not receive power to the USB 3.0 ports. | Wake up the laptop PC using the built-in keyboard or touchpad |
To learn more about how to view or download the User Guides and Manuals for your Dell product. Refer to the Dell knowledge-base article Manuals and Documentation for your Dell Product.
- Dell C6522QT – User’s Guide
- Dell C6522QT – Quick Setup Guide
- Dell C6522QT – Dell Display Manager User’s Guide
Frequently asked questions
Using Windows Display Settings
In Windows 10, Windows 8 or 8.1 and Windows 7:
- For Windows 8 and Windows 8.1 only, select the Desktop tile to switch to classic desktop view.
- Right-click on the desktop and click Screen Resolution.
- Click the dropdown list of the Screen Resolution and select 3840 x 2160 .
- Click OK
Using Nvidia Control Panel
To change the resolution using the Nvidia Control Panel:
- Right-click on the desktop and click Nvidia Control Panel.
- Click the + symbol next to Display on the left pane.
- Select Change Resolution under Display.
- In the dropdown menu on the right pane, select the resolution 3840 x 2160 .
- Click Apply.
Using AMD Catalyst Control Center
To change the resolution using the AMD Catalyst Control Center:
- Right-click on the desktop and click AMD Catalyst Control Center.
- Click the + symbol next to Display on the left pane.
- Select Change Resolution under Display.
- In the dropdown menu on the right pane, select the resolution 3840 x 2160 .
- Click Apply.
To reset the Dell C6522QT Monitor to factory defaults, refer to the Reset to Factory Settings section of this article.
The Dell C6522QT monitor has two built-in diagnostics that are available:
- Self-Test Feature Check - The self-test feature check on the Dell C6522QT monitor allows you to check whether the monitor is functioning properly.
- Built-In Self-Test - The Dell C6522QT monitor has a built-in self-test that helps you identify if the screen abnormality is with the monitor or the video card (GPU) on your computer. When you notice screen abnormalities like distortion, clarity, horizontal or vertical lines, color fade. It is always a good practice to isolate the monitor by running the Built-In Diagnostics.
To learn how to run a diagnostic test, refer to the Running Diagnostics on Dell C6522QT Monitor section of this Dell knowledge-base article.
The Troubleshooting section of this Dell knowledge-base article provides information about troubleshooting common issues with the Dell C6522QT monitor. The section has troubleshooting steps on how to resolve power issues, video issues, color or clarity issues, distortion issues, horizontal or vertical lines, brightness issues or pixel issues and so on.
To navigate the On-Screen Display (OSD) menu, use the buttons on the monitor. The monitor control buttons are usually on the right side, either on the side, front, or bottom of the monitor. To access the On-Screen Display (OSD) menu, press Button 5 on the monitor.
For more information about using the On-Screen Display (OSD) menu and different menu options. Refer to the Operating Your Monitor section in the User's Guide of your Dell C6522QT monitor.
.USB Type-C port on your Dell C6522QT supports USB Power Delivery, Data, and DisplayPort video signal. The USB Type-C port can be used for video and data signal, and supply power (90 W) to a compatible laptop PC using a single USB Type-C cable that is provided with the monitor.
If you are using a Dell laptop PC that supports charging via USB Type-C. It is recommended to update the BIOS and Video or Graphics card (GPU) driver. To learn how to download and update a device driver, refer to the Dell knowledge-base article: How do I download and install a device driver?
To learn about the supported orientation, refer to the Dell C6522QT Monitor Orientation section of this Dell knowledge-base article.