How to Enable G-Sync on Alienware Laptops
Summary: This article provides information about how to enable G-Sync on Alienware computers that have a discrete NVIDIA graphics card.
This article applies to
This article does not apply to
This article is not tied to any specific product.
Not all product versions are identified in this article.
Instructions
Affected Platforms:
- Alienware Laptops
G-Sync eliminates screen tearing and stutter by matching the monitor’s refresh rate to the frame rate produced by the GPU. On laptops that have a discrete NVIDIA graphics card, G-Sync only works when the external display is connected to a video port using the GPU and when the cable can carry enough bandwidth for the monitor’s maximum refresh rate. This guide shows you how to identify the correct port, choose the proper cable, and enable G-Sync in the NVIDIA Control Panel.
If G-Sync is disabled, users may experience:
- Visible screen tearing, stuttering, or uneven frame pacing during gameplay
- The G-Sync option is missing, disabled, or unavailable in the NVIDIA Control Panel.
There are several reasons G-sync may not be enabled:
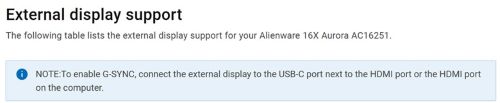
Wrong video port:
- Laptops often have iGPU linked ports (for example, some USB-C or HDMI ports) and dGPU linked ports (usually labeled USB-C or HDMI).
Quick Verification Checklist:
- Ensure that a discrete NVIDIA GPU appears in Task Manager or Device Manager.
- Using Task manager
- Press Ctrl + Shift + Esc to open Task Manager.
- Go to the Performance tab.
- Select GPU 0 (or GPU 1 if you have multiple cards).
- The GPU name and details are displayed in the upper right corner.

Or,
- Using Device Manager
- Press Windows + X and select Device Manager.
- Expand the Display adapters section (the name of your graphics card appears here (for example, NVIDIA GeForce RTX 3070)).
- Using Task manager
- Check Owner’s manual to find which ports provide GSYNC
- Connect the monitor
- Plug the chosen cable into the identified port on the laptop and into the matching input on the monitor.
- Set the monitor’s input source to UCB-C or HDMI, matching the cable you used.
- Enable G-Sync in the NVIDIA Control Panel
- Open NVIDIA Control Panel > Display > Set up G-Sync.
- Check Enable G-Sync and G-Sync Compatible.
- Choose Full screen mode (or both if you need windowed gaming).
- Click Apply.
- Confirm that G-Sync is active
- The G-Sync page should now show a green checkmark next to your monitor.
- Launch a game or the NVIDIA Pendulum Demo; the G-Sync logo appear in the upper right corner, indicating the technology is working.
- Optionally, the user can Restart laptop and the monitor once to ensure that the new routing is fully applied.
Affected Products
AlienwareArticle Properties
Article Number: 000383251
Article Type: How To
Last Modified: 24 Oct 2025
Version: 1
Find answers to your questions from other Dell users
Support Services
Check if your device is covered by Support Services.