NVP-vProxy: Use the nsrvproxy_flr Command for File Level Recovery from the NetWorker Server
Summary: How to use the nsrvproxy_flr command for File Level Recovery (FLR) from the NetWorker Server.
This article applies to
This article does not apply to
This article is not tied to any specific product.
Not all product versions are identified in this article.
Instructions
NetWorker VMware Protection (NVP) vProxy File Level Recovery (FLR) operations can be started from the NetWorker server command line. For this, you use the command
"VmMoref: "vm-146",
To install the FLR Agent on Linux virtual machines, use the root account or a user listed in the operating system’s local sudoers file. If you provide credentials for another user, the FLR Agent installation fails even if that user has root-level privileges.
Additional FLR limitations and requirements are documented in the NetWorker VMware Integration Guide, available through on Dell Support NetWorker Product page.
If the Save Set is a clone copy which is on a non-DD volume, you see a message in the output such as:


 The debugging data is in the output file which is called


nsrvproxy_flr like so:
nsrvproxy_flr [-s NetWorker_server] -c vCenter_server -m TargetVM_Moref -v TargetVMName -u TargetVM_User [-p TargetVM_Password] [-U TargetVM_Admin_User] [-P TargetVM_Admin_Password] (-S ssid[/cloneid] | -N ssname -t sstime) [-e BackupDeviceExportPath] [-irh -V]Example:
nsrvproxy_flr -c vCenter150.dell.com -m vm-162 -v testvm1 -u root -S 4221075620/1486389664
NOTE: The
nsrvproxy_flr command only initiates the FLR mount, it does not recover data from the FLR mountpoint to the Virtual Machine (VM). Once the mount has finished, data must be manually copied from the FLR mountpoint to another location on the VM.
Parameters Explained:
-m - This is a VMware identifier for the VM called a Managed Object Reference (MoReF) value. There are three ways that you can get this:
- Option 1: If you have the policy log file from when a backup was taken of this VM, you can find it in there, for example in:
C:\Program Files\EMC NetWorker\nsr\logs\policy\vProxy\NVP_wf
"VmMoref: "vm-146",
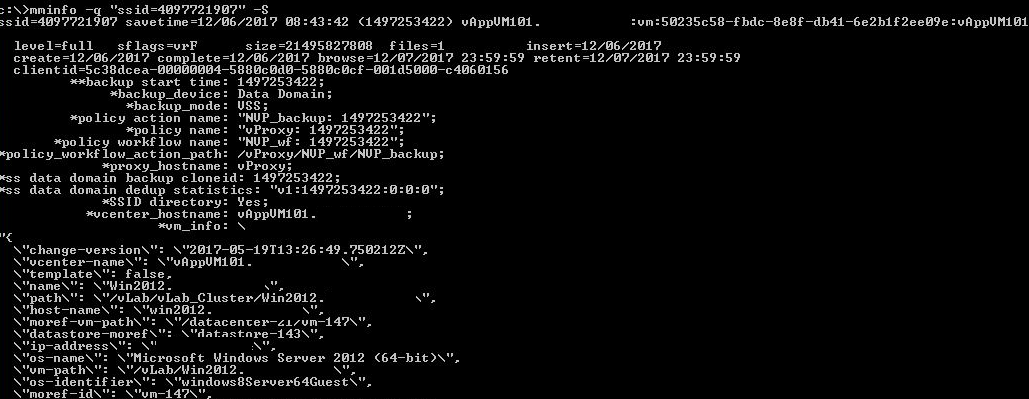
- Option 2: You can check the MorReF value in the Save Set ID (SSID) details, using:
mminfo -q ssid=SSID -S
- Option 3: Follow the instructions in this article to identify the MoReF value in the vCenter MOB: NetWorker: How To Collect MoReF (Managed Object Reference) Values for VMware Objects
-i - Authorizes guest FLR agent installation on the target VM.
-r - Authorizes guest FLR agent removal on the target VM.
-U and -P - Are used together if you must provide root (Linux) or administrator (Windows) credentials on the VM to install the FLR agent (only must be done once if you chose not to uninstall the FLR agent after use).
To install the FLR Agent on Linux virtual machines, use the root account or a user listed in the operating system’s local sudoers file. If you provide credentials for another user, the FLR Agent installation fails even if that user has root-level privileges.
- The sudo user/group must be configured for no password prompt
- The sudo user/group must be provided with the no requiretty option.
Additional FLR limitations and requirements are documented in the NetWorker VMware Integration Guide, available through on Dell Support NetWorker Product page.
If the Save Set is a clone copy which is on a non-DD volume, you see a message in the output such as:
nsrvproxy_flr: Requested clone 1486389664 of saveset 4221075620 was found on a non-DD volume.
Automatic recall to a Data Domain volume will be attempted.
Save Set resurrection may take a long time depending on the size of the VM and where the clone copy resides (such as Tape, CloudBoost, so on)
Usage Example 1 - FLR Success:
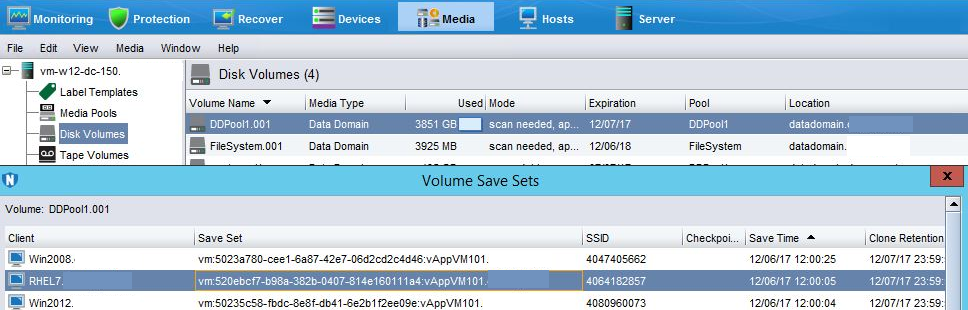
Step 1: On the NetWorker server, obtain the Save Set ID of the save set which you want to mount in order to do a file level recovery (FLR) operation. You can look for this information in the NMC or, as below, using the mminfo command:
Step 2: Use the Save Set ID to get the MoReF value, vCenter name, and Virtual Machine hostname from the output shown above.
Step 3: Run the nsrvproxy_flr command (passwords have been redacted).
Syntax:
nsrvproxy_flr -c vCenter_hostname -m TargetVM_MoReF -v TargetVM_Name -u TargetVM_User -p TargetVM_UserPassword -S SSID -i -U TargetVM_AdminUser -P TargetVM_AdminPass
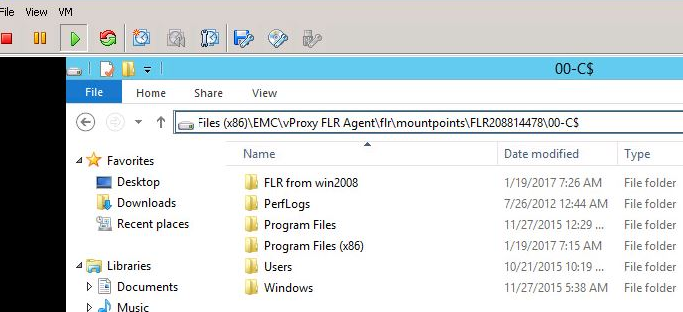
Step 4: On the target VM, you can see the mounting of the save set on the target Virtual Machine.
Step 5: If the command fails, add the -D9 debug option and redirect the output to a file to review the issue.
flroutput.log in the above example.
Usage Example 2 - FLR failure
Step 1: On the NetWorker server, obtain the Save Set ID of the save set which you want to mount in order to do a file level recovery (FLR) operation. You can look for this information in the NMC as below, or using the mminfo command:
Step 2: Use the Save Set ID to get the MoReF value, vCenter name, and Virtual Machine hostname from the mminfo command.
Step 3: Run the nsrvproxy_flr command (passwords have been redacted).
Step 4: Review the cause of the failure and fix it, before retrying the command.
Step 5: If logs do not show the cause, add -D9 before -c in the command to enable extra debugging.
Further logs are available:
On the Virtual Machine:
- Linux:
/opt/emc/vproxyra/logs/ - Windows:
C:\Program Files (x86)\EMC\vProxy FLR Agent\logs
On the NetWorker server:
- Windows:
C:\Program Files\EMC NetWorker\nsr\logs\adhoc - Linux:
/nsr/logs/adhoc
On the vProxy appliance:
- Active logs are found under:
/opt/emc/vproxy/runtime/logs/vflrd - Completed or failed logs are found under:
/opt/emc/vproxy/runtime/logs/recycle/vflrd/DATE
Additional Information
NetWorker VMware Protection (NVP)-vProxy: How to Enable Debug Logging
NVP vProxy: Troubleshooting Network Connectivity For Backup and Restore Operations
NVP vProxy: How to get the exact command syntax for running a VM recovery from CLI with debug
Affected Products
NetWorkerProducts
NetWorker, NetWorker SeriesArticle Properties
Article Number: 000013626
Article Type: How To
Last Modified: 19 Sept 2025
Version: 7
Find answers to your questions from other Dell users
Support Services
Check if your device is covered by Support Services.