Dell Unity: How to reimage a Dell Unity Storage Processor (User Correctable)
Summary: This article covers the steps required to reimage a Storage Processor of a Dell Unity array.
This article applies to
This article does not apply to
This article is not tied to any specific product.
Not all product versions are identified in this article.
Instructions
The process to reimage a Dell Unity Storage Processor can be started using the Command Line Interface (CLI) or its Graphical User Interface (GUI).
This task can be performed after validating that a software issue exists with the Storage Processor, such as software corruption.
## GUI:
# Step 1: Move the SP into Service Mode:
1. Prior to starting the reimage process, ensure that no issues with the Storage Processor are in place, such as internal component faults.
2. Within the Dell Unity GUI, go to Service > Service Tasks.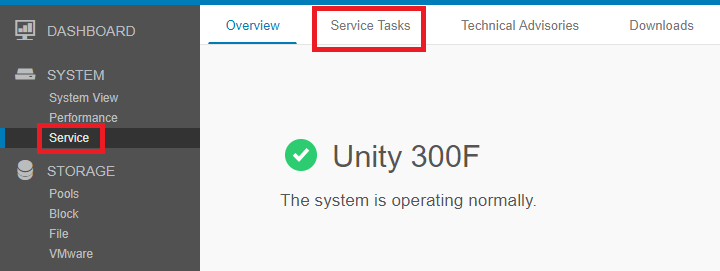
3. In the Service Tasks page, select the option "Enter Service Mode" under the Storage Processor that is intended to reimage.
4. Enter the credentials of the Service user and select OK.
5. The Storage Processor selected reboots to Service mode.
# Step 2: Start the Reimage Task:
1. After the Reboot of the Storage Processor into Service mode, go back to Service > Service Tasks again.
2. Within the Service Tasks page, select the option "Reimage" under the Storage Processor that is in Service Mode.
3. Press the Execute button while the option "Reimage" is selected and enter the credentials of the Service user once again.
4. The Reimage process initiates for the Storage Processor.
## CLI:
# Step 1: Move the SP Into Service Mode:
1. Open an SSH session to the array and login with the Service user credentials.
2. Once logged in as the Service user, ensure to be on the correct Storage Processor where the reimage tasks will be run.
3. Run the command svc_rescue_state -s to set the flag to boot into service mode.
4. Run the command svc_rescue_state -l to confirm the SP has the flag set.
5. Run the command svc_shutdown -r to restart the Storage Processor.
# Step 2: Reimage the Storage Processor:
1. After the Storage Processor boots back into Service Mode, ensure that the processor has the following banner:
*** WARNING *** This Storage Processor is in Service Mode *** WARNING ***
2. Alternatively the command svc_diag can also be used to verify the status of the Storage Processor.
3. Run the command svc_reimage to prepare the SP to run the process. Note that this task does not complete the reimage process until the Storage Processor is rebooted.
4. Run the command svc_rescue_state -l to confirm all the flags are cleared from the above commands preparation steps.
5. Run the command svc_rescue_state -c to clear the counters, if necessary, to prevent the Storage Processor from going back into Service Mode.
6. Reboot the Storage Processor by running the command svc_shutdown -r.
7. Wait for the reimage task to be completed. This should take around 20-30 minutes.
8. Run the svc_diag command to confirm the SP is back to normal online mode.
Additional Information
Reimaging an SP involves placing it in Service Mode.
When an SP is in service mode, it stops servicing I/O to hosts.
In physical deployments, all NAS servers on the SP failover to the other SP, if it is healthy. By default, when reimaging completes, the NAS servers failback to the SP. If the Failback Policy is disabled, all NAS servers on the SP will not failback automatically and remain on a single SP. Performance can degrade significantly when all NAS servers reside on a single SP. You can failback the NAS servers manually.
An example of the CLI method outputs is attached.
The file name is: Single-SP-reimage_KB_000022675.rtf
Affected Products
Dell EMC Unity HybridProducts
Dell Unity 300, Dell EMC Unity 300F, Dell EMC Unity 400, Dell EMC Unity 400F, Dell EMC Unity 500, Dell EMC Unity 500F, Dell EMC Unity 600, Dell EMC Unity 600F, Dell EMC Unity Family |Dell EMC Unity All Flash, Dell EMC Unity HybridArticle Properties
Article Number: 000022675
Article Type: How To
Last Modified: 14 Nov 2024
Version: 6
Find answers to your questions from other Dell users
Support Services
Check if your device is covered by Support Services.