Ubuntu Server: How to Configure a GPU Using Discrete Device Assignment (DDA) on an Ubuntu Virtual Machine
Summary: This article demonstrates how to configure a GPU using Discrete Device Assignment (DDA) on an Ubuntu Server version 18.04 virtual machine (VM) running in Hyper-V.
This article applies to
This article does not apply to
This article is not tied to any specific product.
Not all product versions are identified in this article.
Instructions
Objective
DDA can be used to pass an entire PCIe Device, in this case a GPU, into a VM. This allows high-performance access to the device and the ability to leverage its native drivers.
Environment in this Example
Server: PowerEdge R740xd running Windows Server 2019
GPU: NVIDIA Tesla P100
VM: 4 x vCPUs, 32 GB RAM running Ubuntu Server 18.04 LTS
Note: Dell Technologies recommends updating BIOS, firmware, drivers, and the operating system (OS) as part of your scheduled update cycle. These updates are intended to improve the reliability, stability, and security of your system.
Steps
-
Install Windows Server 2019 on the host and update the OS. Install the latest device drivers, such as chipset and GPU drivers.
-
Install the Hyper-V role.
-
Create a generation-2 VM. Disable Secure Boot in the VM's settings, then install Ubuntu Server 18.04 LTS on it.
-
Apply Ubuntu updates. To do so, run the following commands in the VM:
$ sudo apt-get update
$ sudo apt-get upgrade
-
Shut down the VM.
-
Open Device Manager on the host, expand Display adapters, and select the GPU that is going to be presented to the VM.
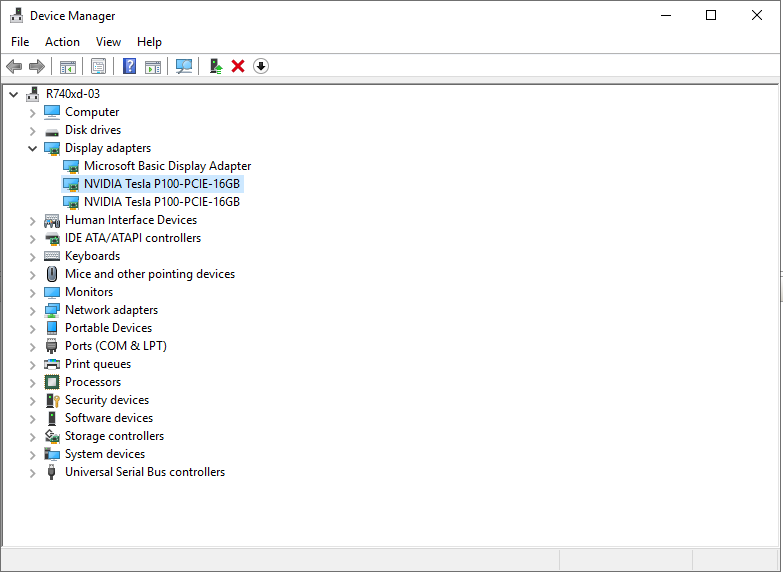
Figure 1: Device Manager with the GPU selected -
Right-click the GPU to be used in the VM and select Properties. In the Details tab, select Property from the Location paths dropdown list. Copy the value starting with PCIROOT to Notepad.
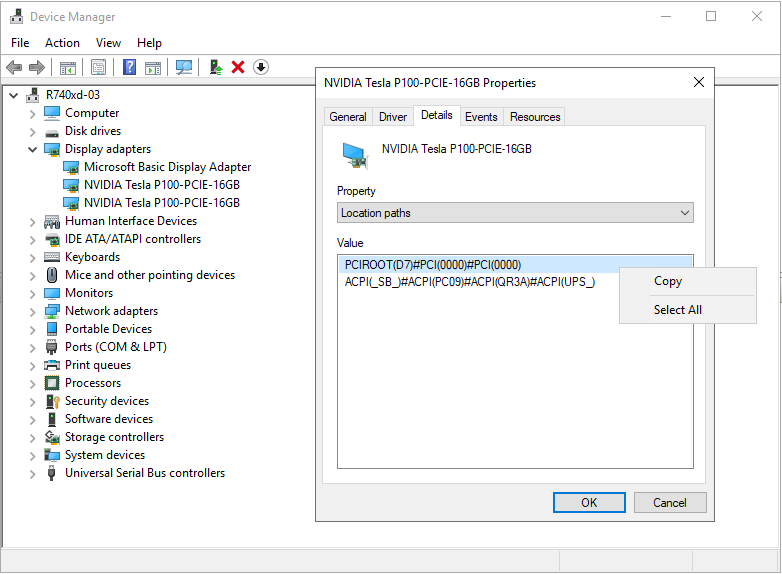
Figure 2: Device Manager Device Properties - Location paths -
Right-click the GPU in Device Manager and disable it.
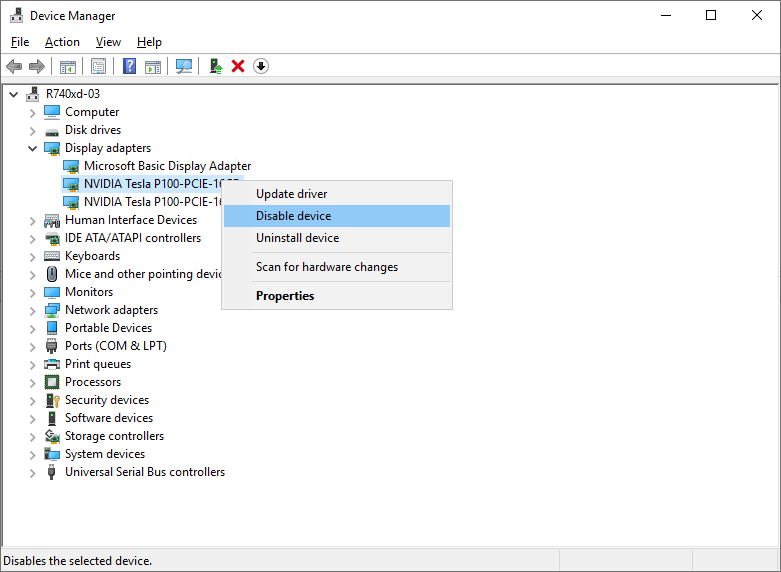
Figure 3: Disabling the GPU in Device Manager -
Configure the VM for DDA using PowerShell. Open PowerShell as Administrator and run the following commands:
# Configure the "Automatic Stop Action" of a VM to TurnOff. Set-VM -Name VMName -AutomaticStopAction TurnOff # Enable Write-Combining on the CPU. Set-VM -VMName VMName -GuestControlledCacheTypes $true # Configure the 32-bit MMIO space. Set-VM -VMName VMName -LowMemoryMappedIoSpace 128Mb # Configure greater than 32-bit MMIO space. Set-VM -VMName VMame -HighMemoryMappedIoSpace 18000Mb # Dismount the device. Dismount-VMHostAssignableDevice -force -LocationPath "step 7 location path goes here" # Assign the device to the VM. Add-VMAssignableDevice -VMName VMName -LocationPath "step 7 location path goes here" -
Start the VM.
-
Run the following commands within the VM to verify that it has identified the GPU:
$ lspci
$ sudo lshw -C Display
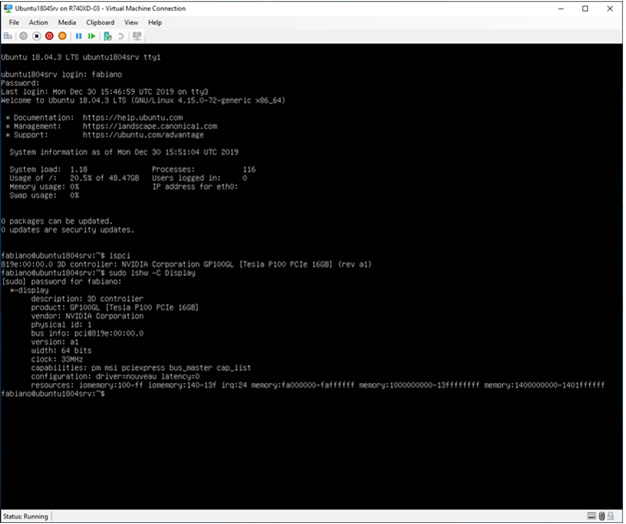
Figure 4: Output of thelspciandlshwcommands -
If the output of the
sudo lshw -C Displaycommand in step 11 indicates that the Nouveau driver is installed (see Configuration in Figure 4 above), it must be disabled. Nouveau is a free and open-source driver for NVIDIA video cards written by independent software engineers. This driver is installed by default, and it must be disabled in order to install the NVIDIA driver. Run the following commands to disable the Nouveau driver.# Create a file at /etc/modprobe.d/blacklist-nouveau.conf. $ sudo nano /etc/modprobe.d/blacklist-nouveau.conf # Add the following to the newly created file, then save the file. blacklist nouveau options nouveau modeset=0 # Regenerate the kernel initramfs, then reboot. $ sudo update-initramfs -u $ reboot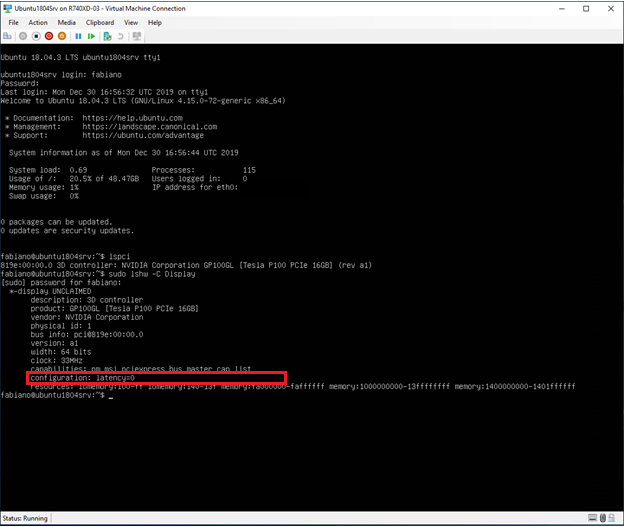
Figure 5: Output of thelspciandlshwcommands after the Nouveau driver has been disabled -
Download the NVIDIA Driver
, then install it on the Ubuntu VM.
# Run these commands after the file has been copied to the VM. $ sudo dpkg -i nvidia-driver-local-repo-ubuntu1804-440.33.01_1.0-1_amd64.deb $ sudo apt-key add /var/nvidia-driver-local-repo-440.33.01/7fa2af80.pub $ sudo apt-get update $ sudo apt-get install cuda-drivers {Install all the dependencies $ sudo reboot -
To verify that the driver is correctly installed, run the following commands:
$ lspci
$ sudo lshw -C Display
$ nvidia-smi
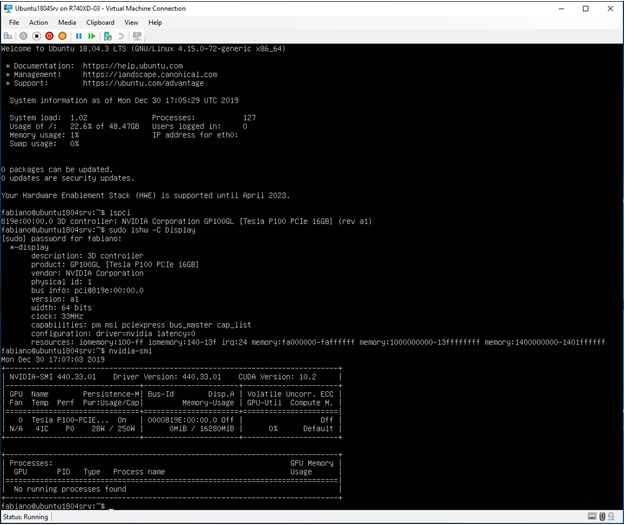
Figure 6: Output of thelspci,lshw, andnvidia-smicommands after the NVIDIA driver has been installed
Additional Information
How to Replace a GPU in the PowerEdge R760:
Duration: 00:03:10 (hh:mm:ss)
When available, closed caption (subtitles) language settings can be chosen using the CC icon on this video player.
Affected Products
Microsoft Windows Server 2019, Microsoft Windows Server 2022, PowerEdge R540, PowerEdge R550, PowerEdge R640, PowerEdge R6415, PowerEdge R650, PowerEdge R650xs, PowerEdge R6515, PowerEdge R6525, PowerEdge R740, PowerEdge R740XD, PowerEdge R740XD2
, PowerEdge R7415, PowerEdge R7425, PowerEdge R750, PowerEdge R750XA, PowerEdge R750xs, PowerEdge R7515, PowerEdge R7525, PowerEdge R840, PowerEdge R940, PowerEdge T640, PowerEdge XE2420, PowerEdge XE7100, PowerEdge XE7420, PowerEdge XE7440, PowerEdge XE8545, Ubuntu Server LTS
...
Article Properties
Article Number: 000106925
Article Type: How To
Last Modified: 18 Apr 2026
Version: 12
Find answers to your questions from other Dell users
Support Services
Check if your device is covered by Support Services.