PowerEdge: Come importare un certificato personalizzato e una chiave privata creati esternamente nell'iDRAC
Summary: Questo articolo spiega come creare e importare un certificato iDRAC.
This article applies to
This article does not apply to
This article is not tied to any specific product.
Not all product versions are identified in this article.
Instructions
Informazioni preliminari
A partire da iDRAC6, è stato possibile creare un certificato sfruttando l'infrastruttura a chiave pubblica (PKI) e importare certificati in iDRAC. Consente un maggiore controllo sul processo di creazione dei certificati e consente l'automazione di questi processi. Infine, questa procedura può essere utilizzata per creare e importare un certificato con caratteri jolly nell'iDRAC. Dal punto di vista della sicurezza, l'uso di caratteri jolly non è una best practice. Tuttavia, il processo utilizzato per creare qualsiasi certificato esterno può essere utilizzato anche per un certificato con caratteri jolly.
Sommario
- Creazione di certificati tramite OpenSSL
- Creazione di chiavi private e firma del certificato
- Caricamento del certificato in iDRAC
Per importare il certificato SSL, è necessaria una chiave privata e un certificato firmato per tale chiave. I certificati possono essere forniti da terze parti o generati automaticamente. Di seguito è riportato un esempio rudimentale del processo di creazione di certificati utilizzando OpenSSL in ambiente Windows:
Chiave privata OpenSSL e certificato da utilizzare come autorità di certificazione
L'installazione deve funzionare come una CA. Questo ci consente di emettere o firmare una richiesta di certificato. Ecco i passaggi:
- Creazione della chiave privata CA:
- È necessario fornire una password per la chiave privata. Questo è necessario in seguito, quindi ricordatelo.
bin>openssl.exe genrsa -aes256 -out keys/ca.key 2048

- Creazione del certificato CA sfruttando la chiave creata:
- Vengono richiesti dettagli sul certificato. Questi includono il nome comune e i dati sulla posizione. Il campo più importante qui è il nome comune. Questa operazione passa all'identità della CA e si riflette nel certificato. In genere, deve corrispondere al nome con cui si accede al sistema (ad esempio nome host DNS). Questo campo è evidenziato nella schermata riportata di seguito.
bin>openssl.exe req -config openssl.conf -new -x509 -days 3650 -key keys/ca.key -out certs/ca.cer

Ora che una chiave privata e un certificato sono disponibili per l'uso per una CA, è possibile creare una chiave privata e una CSR per iDRAC e quindi firmare questa richiesta utilizzando il certificato CA.
Creazione della chiave privata, della richiesta di firma del certificato e del certificato per i servizi web iDRAC
Per iDRAC, è necessario disporre di una chiave e di un certificato firmato da importare nei servizi web. Possiamo sfruttare OpenSSL per raggiungere questi obiettivi.
- Innanzitutto, è necessario creare una chiave privata e una richiesta di firma del certificato (CSR) che è possibile firmare utilizzando il certificato CA. La chiave e la CSR possono essere create nello stesso passaggio:
- È necessario compilare i dettagli del certificato. Il nome comune per questo certificato deve corrispondere al nome con cui si accede a iDRAC. In evidenza di seguito
- Inoltre, è necessario includere una passphrase per la chiave privata che viene creata. In evidenza di seguito
bin>openssl.exe req -new -config openssl.conf -newkey rsa:2048 -nodes -keyout idrac.key -out idrac.csr

- Successivamente, l'autorità di certificazione deve firmare il certificato creato.
bin>openssl.exe ca -policy policy_anything -config openssl.conf -cert certs/ca.cer -in requests/idrac_web.csr -keyfile keys/ca.key -days 365 -out certs/idrac_web.cer

- Ora abbiamo i componenti necessari da caricare su iDRAC. Il primo di questi è la chiave privata (
idrac_web.key) e il secondo di questi è il certificato firmato (idrac_web.cer).
Caricamento del certificato in iDRAC
Con una coppia di chiave privata e certificato, è possibile caricare la chiave e il certificato nell'iDRAC.
Nota: Per la procedura seguente, ho copiato la chiave privata e il certificato nella radice dell'unità C per facilitare l'accesso e ridurre la lunghezza dei comandi.
- Innanzitutto, è necessario caricare il certificato:
- Ho sfruttato il lavoro da remoto
racadmcomando con l'opzione interattiva
- Ho sfruttato il lavoro da remoto
racadm -r 10.14.177.107 -i sslkeyupload -t 1 -f C:\idrac_web.key

- Una volta caricata la chiave, è necessario eseguire l'upload del certificato. Il comando per questo è:
racadm -r 10.14.177.107 -i sslcertupload -t 1 -f c:\idrac_web.cer

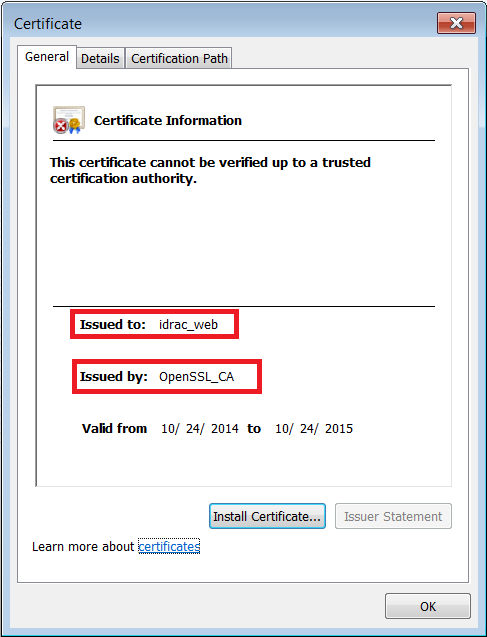
- Una volta ripristinata l'interfaccia web, è necessario verificare il certificato. Questa operazione può essere eseguita accedendo all'interfaccia web in qualsiasi browser e quindi controllando il certificato. Si dovrebbe vedere che il certificato riflette il nome comune configurato e viene emesso dal nome comune configurato nella CA:
Additional Information
Per i problemi relativi ai certificati iDRAC6, iDRAC7 e iDRAC8, consultare il seguente articolo:
IDRAC: iDRAC6, iDRAC7 o iDRAC8 - certificato del web server SSL predefinito scaduto
Affected Products
iDRAC6, iDRAC7, iDRAC8, iDRAC9, OEMR R210II, OEMR R210, OEMR R220, OEMR R230, OEMR R240, OEMR R250, OEMR XE R250, OEMR R260, OEMR XE R260, OEMR R310, OEMR R320, OEMR R330, OEMR R340, OEMR R350, OEMR XE R350, OEMR R360, OEMR XE R360, OEMR R410
, OEMR R420, OEMR R430, OEMR R440, PowerEdge XR2, OEMR R450, OEMR R510, OEMR R520, OEMR R530, OEMR R540, OEMR R550, OEMR R5500, OEMR R610, OEMR R620, OEMR R630, OEMR R640, OEMR XL R640, OEMR R6415, OEMR R650, OEMR R650xs, OEMR R6515, OEMR R6525, OEMR R660, OEMR XL R660, OEMR R660xs, OEMR R6615, OEMR R6625, OEMR R710, OEMR R720, OEMR R720xd, OEMR R730, OEMR R730xd, OEMR R740, OEMR XL R740, OEMR R740xd, OEMR XL R740xd, OEMR R740xd2, OEMR R7415, OEMR R7425, OEMR R750, OEMR R750xa, OEMR R750xs, OEMR R7515, OEMR R7525, OEMR R760, OEMR R760xa, OEMR R760XD2, OEMR XL R760, OEMR R760xs, OEMR R7615, OEMR R7625, OEMR R810, OEMR R820, OEMR R830, OEMR R840, OEMR R860, OEMR R910, OEMR R920, OEMR R930, OEMR R940, OEMR R940xa, OEMR R960, OEMR T130, OEMR T140, OEMR T150, OEMR T320, OEMR T330, OEMR T340, OEMR T350, OEMR T360, OEMR T420, OEMR T430, OEMR T440, OEMR T550, OEMR T560, OEMR T610, OEMR T620, OEMR T630, OEMR T640, OEMR XL T640, OEMR T710, OEMR XL R210, OEMR XL R210II, OEMR XL R220, OEMR XL R230, OEMR XL R240, OEMR XL R330, OEMR XL R340, OEMR XL R520, OEMR XL R610, OEMR V2 XL R610, OEMR XL R620, OEMR XL R630, OEMR XL R660xs, OEMR XL R6615, OEMR XL R6625, OEMR XL R710, OEMR XL V2 R710, OEMR XL R720, OEMR XL R720xd, OEMR XL R730, OEMR XL R730XD, OEMR XL R760xs, OEMR XL R7615, OEMR XL R7625, OEMR XR11, OEMR XR12, OEMR XR5610, OEMR XR7620, PowerEdge C4130, Poweredge C4140, PowerEdge c6320, PowerEdge c6320p, PowerEdge C6420, PowerEdge C6520, PowerEdge C6525, PowerEdge C6615, PowerEdge C6620, Poweredge FC430, Poweredge FC630, PowerEdge FC640, Poweredge FC830, PowerEdge HS5610, PowerEdge HS5620, PowerEdge M630, PowerEdge M630 (for PE VRTX), PowerEdge M640, PowerEdge M640 (for PE VRTX), PowerEdge M830, PowerEdge M830 (for PE VRTX), PowerEdge MX740C, PowerEdge MX750c, PowerEdge MX760c, PowerEdge MX840C, PowerEdge R230, PowerEdge R240, PowerEdge R250, PowerEdge R260, PowerEdge R330, PowerEdge R340, PowerEdge R350, PowerEdge R360, PowerEdge R430, PowerEdge R440, PowerEdge R450, PowerEdge R530, PowerEdge R530xd, PowerEdge R540, PowerEdge R550, PowerEdge R630, PowerEdge R640, PowerEdge R6415, PowerEdge R650, PowerEdge R650xs, PowerEdge R6515, PowerEdge R6525, PowerEdge R660, PowerEdge R660xs, PowerEdge R6615, PowerEdge R6625, PowerEdge R730, PowerEdge R730xd, PowerEdge R740, PowerEdge R740XD, PowerEdge R740XD2, PowerEdge R7415, PowerEdge R7425, PowerEdge R750, PowerEdge R750XA, PowerEdge R750xs, PowerEdge R7515, PowerEdge R7525, PowerEdge R760, PowerEdge R760XA, PowerEdge R760xd2, PowerEdge R760xs, PowerEdge R7615, PowerEdge R7625, PowerEdge R830, PowerEdge R840, PowerEdge R860, PowerEdge R930, PowerEdge R940, PowerEdge R940xa, PowerEdge R960, PowerEdge T130, PowerEdge T140, PowerEdge T150, PowerEdge T160, PowerEdge T330, PowerEdge T340, PowerEdge T350, PowerEdge T360, PowerEdge T430, PowerEdge T440, PowerEdge T550, PowerEdge T560, PowerEdge T630, PowerEdge T640, PowerEdge XE2420, PowerEdge XE7420, PowerEdge XE7440, PowerEdge XE8545, PowerEdge XE8640, PowerEdge XE9640, PowerEdge XE9680, PowerEdge XR11, PowerEdge XR12, PowerEdge XR5610, PowerEdge XR7620, PowerFlex appliance R650, PowerFlex appliance R6525, PowerFlex appliance R660, PowerFlex appliance R6625, Powerflex appliance R750, PowerFlex appliance R760, PowerFlex appliance R7625, PowerFlex custom node R650, PowerFlex custom node R6525, PowerFlex custom node R660, PowerFlex custom node R6625, PowerFlex custom node R750, PowerFlex custom node R760, PowerFlex custom node R7625, PowerFlex custom node R860, PowerFlex appliance R640, PowerFlex appliance R740XD, PowerFlex appliance R7525, PowerFlex appliance R840
...
Article Properties
Article Number: 000120158
Article Type: How To
Last Modified: 05 Feb 2025
Version: 7
Find answers to your questions from other Dell users
Support Services
Check if your device is covered by Support Services.