BIOSシリアル番号を表示するようにDell Security Management Serverを設定する方法
Summary: バックエンドのDell Security Management Serverで構成を変更して、ベースボード(マザーボード)のシリアル番号ではなく、BIOSのシリアル番号をエンドポイントのシリアル番号として表示することができます。
This article applies to
This article does not apply to
This article is not tied to any specific product.
Not all product versions are identified in this article.
Instructions
対象製品:
- Dell Security Management Server Enterprise
- Dell Security Management Server Virtual
影響を受けるバージョン:
- v10.2.11以降
エンドポイントにベースボード(マザーボード)シリアル番号がない環境では、コンソールに表示されるシリアル番号がエンドポイントにない場合があります。
Dell Security Management Server
- 編集
InventoryObjects.configファイルの<Security Management server Install Location>\Enterprise Edition\Core Server - 子要素を見つける
<property name="UseBiosSerialNumber" value="false"/> - 値を false から true に変更します。
注:この要素は 2 か所に一覧表示されており、両方を更新する必要があります。
- 親要素の下
<object name="DeviceInventoryQueueProcessor" singleton="false" type="Credant.Inventory.Processor.DeviceInventoryQueueProcessor, Credant.Inventory.Processor" > - そして再び親要素の下
<object name="AgentInventoryQueueProcessor" singleton="false" type="Credant.Inventory.Processor.AgentInventoryQueueProcessor, Credant.Inventory.Processor" >
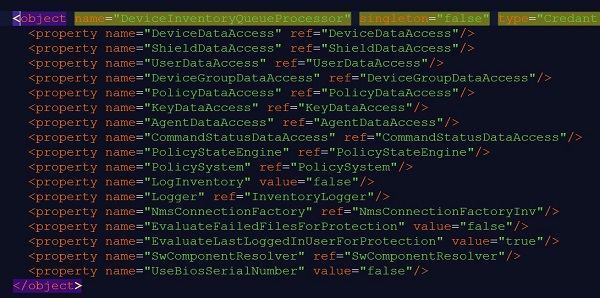
図1: (英語のみ)InventoryObjects.config 更新プログラム 1
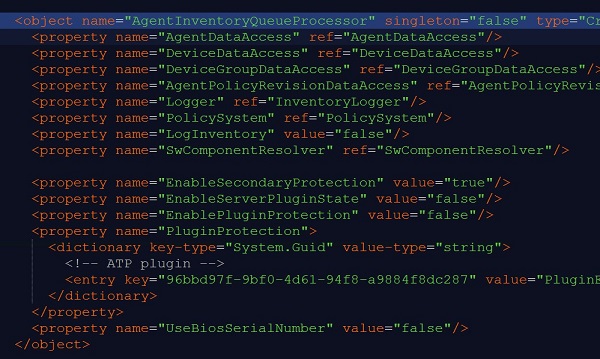
図2:(英語のみ)InventoryObjects.config の更新 2
- ファイルを保存し、Dell Core Serverサービスを再起動します。サービスの再起動の詳細については、「 Dell Security Management Serverでサービスを停止および開始する方法」を参照してください。

図3:(英語のみ)Dell Core Serverの再起動
Dell Security Management Server Virtual
- Dell Security Management Server Virtualアプライアンスにログインします。
- [Launch Shell]を選択します。

図4:(英語のみ)シェルの起動
- に切り替えます
dellsupportユーザーによる入力su dellsupportと入力してEnterを押します。
注:デフォルトのパスワードは
dellsupport」
- 次に、次のように入力して InventoryObjects.config ファイルを開きます。
sudo vi /opt/dell/server/inventory-server/InventoryObjects.configと入力してEnterを押します。

図5:(英語のみ)を参照してください。 sudo vi /opt/dell/server/inventory-server/InventoryObjects.config
- 次のリンクにアクセスする:
<property name="UseBiosSerialNumber" value="false"/> - Iを押してINSERTモードに入ります(これはVIテキストエディタウィンドウの左下に記載されています)。
- 値を true から false に変更します。
注:この要素は 2 か所に一覧表示されており、両方を更新する必要があります。
- 親要素の下
<object name="DeviceInventoryQueueProcessor" singleton="false" type="Credant.Inventory.Processor.DeviceInventoryQueueProcessor, Credant.Inventory.Processor" > - そして再び親要素の下
<object name="AgentInventoryQueueProcessor" singleton="false" type="Credant.Inventory.Processor.AgentInventoryQueueProcessor, Credant.Inventory.Processor" >

図6:(英語のみ)を参照してください。 <property name="UseBiosSerialNumber" value="false"/>
- ESCキーを押して、:と
wq次に 、ENTER を押して保存し、終了します。 - [切り替え]に戻る
delluserexitと入力してEnterを押します。 - 「exit」と入力し、もう一度Enterを押して、管理コンソールに戻ります。
- 次に、 Basic configurationStop > Applicationに移動してサービスを再起動します。
- サービスが停止したら、 Basic configurationStart > Applicationに移動してサービスを開始します。
サポートに問い合わせるには、「Dell Data Securityのインターナショナル サポート電話番号」を参照してください。
TechDirectにアクセスして、テクニカル サポート リクエストをオンラインで生成します。
さらに詳しい情報やリソースについては、「デル セキュリティ コミュニティー フォーラム」に参加してください。
Affected Products
Dell EncryptionArticle Properties
Article Number: 000129452
Article Type: How To
Last Modified: 07 May 2024
Version: 9
Find answers to your questions from other Dell users
Support Services
Check if your device is covered by Support Services.