Impostazioni del BIOS per consentire l'avvio PXE su determinati notebook Dell Latitude
Summary: Questo articolo rappresenta una guida per configurare le impostazioni del BIOS in modo da consentire l'avvio PXE su determinati notebook Dell Latitude.
This article applies to
This article does not apply to
This article is not tied to any specific product.
Not all product versions are identified in this article.
Symptoms
Come si accede al BIOS o a UEFI (noto anche come System Setup)?
Per accedere al BIOS o a UEFI su un computer Dell, premere più volte il tasto F2 nella schermata del logo Dell durante l'avvio.
Oppure, premere il tasto F12 più volte nella schermata del logo Dell durante l'avvio e selezionare BIOS Setup or System Setup dal menu.
Una volta visualizzata la schermata del BIOS, le seguenti impostazioni del BIOS dovrebbero essere attivate per l'avvio PXE sui notebook Latitude. Esistono diverse interfacce utente del BIOS disponibili sul notebook Latitude a seconda del modello utilizzato.
- Abilitare l'avvio PXE nel BIOS per Latitude 7x00 e 7x10
- Abilitare l'avvio PXE nel BIOS per Latitude 7x20 e 7x30
NOTA: Accertarsi di aver scaricato e installato l'aggiornamento del BIOS più recente disponibile per il notebook Latitude dal Supporto Dell | Driver e download del sito web nella categoria BIOS .
Cause
Non sono disponibili informazioni sulla causa.
Resolution
Abilitare l'avvio PXE nel BIOS per Latitude 7x10 e 7x00
- Accedere a General > Boot Sequence, quindi selezionare per abilitare Windows Boot Manager.

- Accedere a General > Advanced Boot Options, quindi selezionare Enable UEFI Network Stack in:

- Poiché questi modelli di notebook Latitude più recenti non dispongono di una connessione NIC, verificare di abilitare Enable USB Boot Support in System Configuration >USB Configuration (Figura 3):

- Verificare di abilitare Thunderbolt, Enable Thunderbolt Boot Support e Enable TBT (and PCIE behind TBT) Pre-boot Modules in System Configuration-Thunderbolt> Adapter Configuration, anche se non ci si connette a un dock Thunderbolt:

- A seconda di come è configurato il server PXE, potrebbe essere necessario disabilitare Secure Boot Enable in General-Secure> Boot-Secure> Boot Enable temporaneamente fino al completamento del deployment dell'immagine (Figura 5):

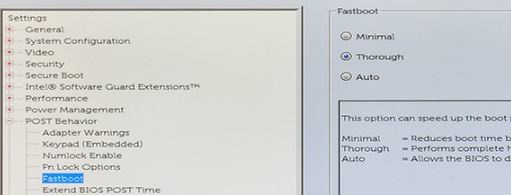
- In Post Behavior, Fastboot deve essere impostato su Thorough:
NOTA: I dock Dell che utilizzano driver Display-Link (ad esempio, serie D6000 e D3100) non consentono l'avvio PXE. I driver per questi dock non vengono caricati in un ambiente pre-Windows. Sebbene Dell sconsigli l'avvio PXE tramite una connessione dock, è possibile eseguire questa operazione utilizzando un dongle da USB Type-C a Ethernet (ad esempio Dell SKU# 470-ABND) per completare l'avvio PXE.
Abilitare l'avvio PXE nel BIOS per Latitude 7x20 e 7x30
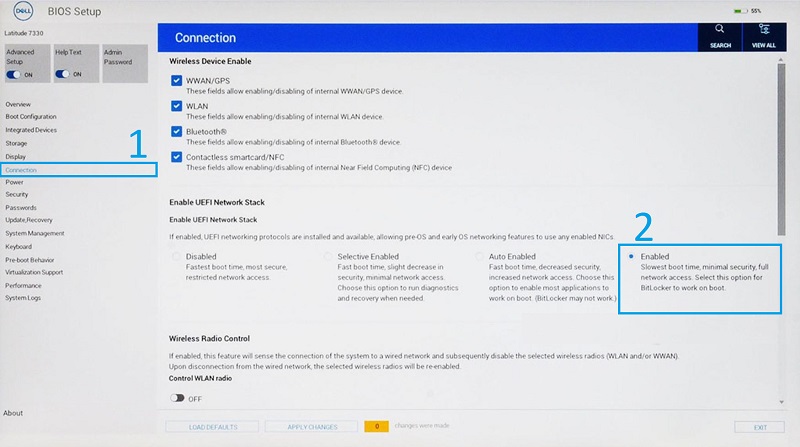
- Selezionare Connection, quindi assicurarsi che Enable UEFI Network Stack sia impostato su Enabled.
- Selezionare Integrated Devices.
- Scorrere verso il basso per visualizzare USB/Thunderbolt Configuration, quindi selezionare Enable USB Boot Support.
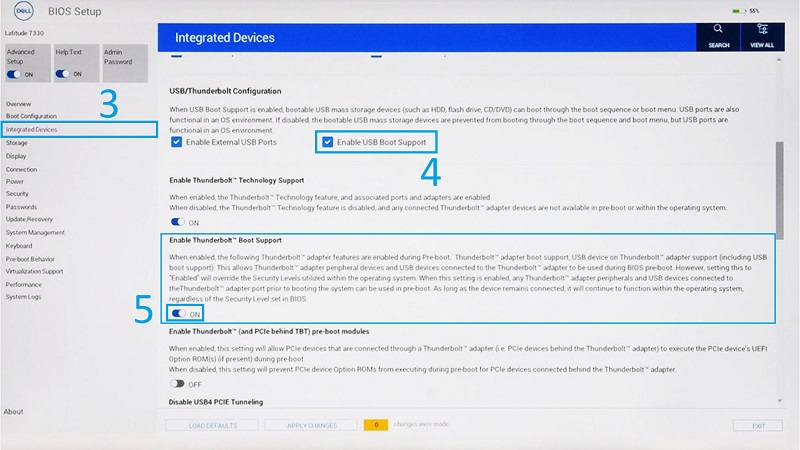
- Accertarsi che Enable Thunderbolt Boot Support sia impostato su ON.
- Cliccare su Apply Changes per salvare le modifiche.
Additional Information
Articoli consigliati
Di seguito sono riportati alcuni articoli consigliati correlati a questo argomento che potrebbero essere di interesse per l'utente.
- Perché il sistema non avvia Windows e visualizza errori DHCP e PXE?
- Come implementare l'avvio PXE da schede Ethernet USB-C e Thunderbolt
- Requisiti di avvio PXE del server DHCP per computer Dell XPS, OptiPlex, Latitude e Precision inviati dopo il 2019
- Impossibile avviare PXE con un dongle Dell da Type-C a Ethernet
Affected Products
Latitude 7200 2-in-1, Latitude 7210 2-in-1, Latitude 7300, Latitude 7310, Latitude 7320, Latitude 7320 Detachable, Latitude 7330, Latitude 7400 2-in-1, Latitude 7400, Latitude 7410, Latitude 7420, Latitude 7430, Latitude 7520, Latitude 7530Article Properties
Article Number: 000131551
Article Type: Solution
Last Modified: 22 May 2025
Version: 7
Find answers to your questions from other Dell users
Support Services
Check if your device is covered by Support Services.