How to Configure Ubuntu Linux After First Installed on your Dell Computer
Summary: This article takes you through how to configure and get the most out of your Dell PC after installing Linux Ubuntu as your main operating system.
Instructions
Table of Contents:
- First start up after the installation completes
- The System Utilities
- Default Applications
- Configuring Applications and Updates
- Online User Manual
First start up after the installation completes
After the installation has finished and your computer is restarted for the last time, you will get the login screen of Ubuntu coming up. The login screen shows your username, and you have to enter your password to get past it.
You can click the arrow or press the ENTER key to get onto the Ubuntu desktop.
The login screen supports multiple users, and you can customize the backgrounds for each user.
Once you have configured it, Ubuntu automatically picks up your current desktop wallpaper and set it as your log-in background.
Ubuntu’s login screen also lets you select different environments to log in.
The log-in screen also allows you to change your keyboard language. You can also change the volume and enable or disable the accessibility settings before you log in to your desktop.
It also shows the date, time, and the battery power for laptops.
You can shut down or restart your system from the log-in screen as well.
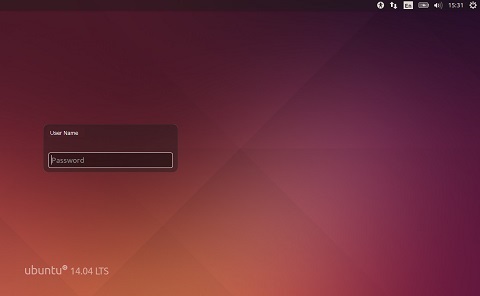
Ubuntu still uses Unity as the default desktop.
After logging in to Ubuntu, the initial view consists of the desktop background and two bars.
One along the top of the screen that is called the menu bar. The other is up and down the left side of your screen that is called the launcher.
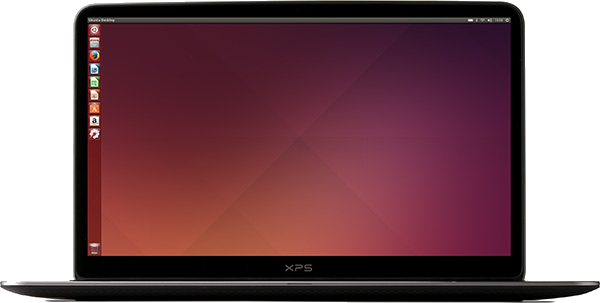
This menu incorporates common functions that are used in Ubuntu.
The icons on the far-right of the menu bar are called the indicator area.
Each installation of Ubuntu may contain slightly different types and quantities of icons depending on the type of hardware and the available peripherals.
The most common indicators are:
- Keyboard indicator allows you to select the keyboard layout you would like and change your keyboard preferences. This will only appear if more than one keyboard layout were selected during install.
- Messaging indicator incorporates all the social applications such as your instant messenger client, your email client, your micro blogging application.
- Network indicator allows you to manage your network connections and connect quickly to a wired or wireless network.
- Sound indicator lets you change the sound volume and access your music player and sound settings.
- Clock displays the current time and lets you access your calendar and date and time settings.
- User menu allows you to switch between different users and access your online and user accounts.
- Session indicator lets you access system settings, software updates, printers, and session options for locking your computer. You can also log out of your session, restart the computer, or shut it down completely.
Every application has a menu system where different actions can be performed in an application like File, Edit, View, so on.
The menu system for an application is appropriately called the application menu.
In Unity, the application menu is not on the title bar of the application as is commonly the case with other desktop configurations.
Instead it is located to the left area of the menu bar.
To show an application’s menu move your mouse to the menu bar. While your mouse is positioned on top, the active application’s menu options superimpose itself over the menu bar.
Moving your mouse away from the menu bar allows Ubuntu desktop’s menu bar to reappear.
The vertical bar of icons on the left side of the screen is called the Launcher. The Launcher provides access to applications, mounted devices, and the Trash.
All the running applications on your system place an icon in the Launcher while the application is running.
The first icon at the top of the Launcher is the Dash or Dash Home.
By default certain other applications appear on the Launcher.
"The Home Folder, Firefox, LibreOffice, the Ubuntu Software Center, the Amazon link, System Settings, any mounted devices, and the Trash."
Trash works like the recycle bin in Windows.
To run an application from the Launcher, click the application’s icon.
Running applications have one or more triangles on the left side of the icon which indicate the number of application windows open for this application.
The application in front is highlighted by a single white triangle on the right side of its icon.
You can also run an application through the Dash.
The System Utilities
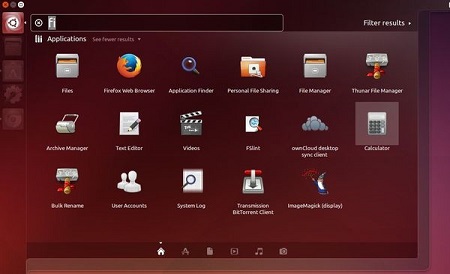
The Dash is a tool to help you access and find applications and files on your system, it allows you to search for information quickly.
Click the icon on the Launcher.
A window appears with a search bar on the top and a grouping of recently accessed applications, files, and downloads.
The Dash allows you to search your entire system for applications and files that are based on your search terms.
This is the default application for creating, opening, editing, and deleting files and folders.
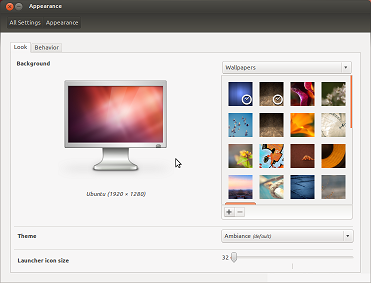
Under Background you can choose from different Wallpapers, see the Pictures Folder, and change the colors and Gradients.
When Wallpapers is selected, you see Ubuntu’s default selection of backgrounds. To change the background, simply click the figure you would like to use instead.
You are not limited to this selection though.
To use one of your own figures, click the + button and go to the image you would like to use.
Double-click that image and set the new background straight away.
This image will then be added to your list of available backgrounds.
You may need to add more than one display to your system.
Ubuntu supports the addition of multiple displays by default - its plug and play.
If your display is not detected when you connect it to the machine go to System Settings> Displays and click Detect Displays. This detects the display devices that are connected to the machine.
There are two modes for your display:
-
The first option is to spread your desktop across two or more monitors. Like Windows Extend Mode. This is the default option.
-
The second option is to mirror the desktop onto each of the displays. Like windows Cloned mode.
-
To enable this option, check the box beside Mirror displays and click Apply to save the settings.
-
You get an open notification asking if you want to keep the current setting or revert to the previous setting.
-
Click to keep the current setting.
-
You can connect and use your printer on Ubuntu by changing the printer properties.
You navigate to System Settings> Printing.
Opening Printing displays the Printing-local host window.
When you want to add a printer, you must make sure that it is switched on. Ensure it is plugged into your computer with a USB cable or connected to your network.
How to install Dell printer on Ubuntu 
Webcams are detected automatically by Ubuntu.
You can configure them in whatever application you use it with.
However if your having issues you can get more troubleshooting advice on the Ubuntu Wikipedia
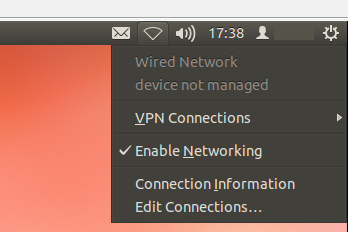
To connect to the Internet using Ubuntu, you must use the NetworkManager utility.
NetworkManager lets you turn network connections on or off. You can manage wired and wireless networks, and make other network connections such as dial-up, mobile broadband, and VPNs.
You can access NetworkManager by using its icon that is found in the bar menu.
This icons appearance changes depending on your current connection state.
Clicking this icon reveals a list of available network connections.
The current connection has the word disconnect underneath it.
You can click disconnect to manually disconnect from that network.
This menu also allows you to view technical details about your current connection or edit all connection settings.
Clear Enable Networking to disable all network connections.
Select Enable Networking to enable networking again.
This can be useful when you are required to turn off all wireless communications, like airplane mode on your phone.
You must configure this depending on your network settings.
Default Applications
- Firefox (Web Browser) is the default browser on Ubuntu, you can use it or pick something else like Chrome.
- Empathy (Chat Application) is the default Instant messaging application with support for Yahoo!, Facebook, AIM, and others, again you can pick something else.
- Eye of GNOME (Image Viewer) is the default photo application, again you can pick something else.
- Videos (Movie Player) is the default video application, as always you can pick something else like VLC. You will also need to install some video codecs to enable this to run most files.
- Rythmbox (Music Player) is the default music application, again you can pick another application. You will most likely need audio codecs to enable this to run most files.
- Brasero (CD/DVD Burner Application) is the default media burner application, you can choose another application to do this.
- LibreOffice (Office Suite) is the default office suite, Contains LibreOffice Writer, LibreOffice Calc, LibreOffice Impress and LibreOffice Draw. You can pick something like OpenOffice if you would prefer.
- Gedit (Text Editor) ships with syntax highlighting, auto indentation, spell checker, and various plugins.
- GNOME Terminal (Terminal Application) supports profiles, tabs, background transparency, font face, and size configuration.
- GNOME Screenshot (Screenshot Application) takes screenshots of your screen and supports multiple screens as well.
- Nautilus (File Manager) is called files now, it still has support for Samba network files. It can sort files and directories by date, type and name, in either list or normal size and has thumbnail previews. You can also mount and unmount hard disk drive partitions and flash drive from the file manager.
- Calculator has four modes, Basic, Advanced, Financial, and Programming.
- Games includes some defaults games such as Solitaire, Mines, or Mahjong.
Be aware that several applications are no longer included as standard on this build. The most common application is Email.
Configuring Applications and Updates
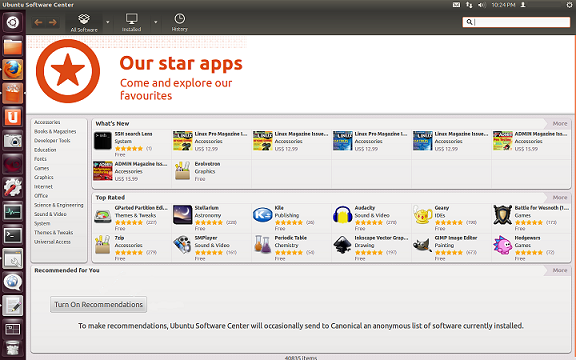
The quickest and easiest way to find and install new applications is through the Ubuntu Software Center.
Start the application from the Launcher or on the Dash.
The Ubuntu Software Center can be used to install applications available in the official Ubuntu repositories.
The Software Center window has four sections:
- A "list of categories" on the left
- A "banner" at the top
- A "Top Rated" panel at the bottom
- A "What’s New and Recommended For You" area on the right
Clicking a category takes you to a list of related applications.
For example, the Internet category contains the Firefox Web Browser.
The featured areas highlight what is new and highly rated.
Each area shows different application icons.
Click an icon to get more information.
Click the install button at the right on the selected package. You must enter your login details to proceed past this point. You get an in progress message, and then the install completes.
Click the remove button to the right of the package. Again you must enter your login details to proceed past this point.
You can add other sources of software to the center. Go to Edit then software sources and then setting your preferred repository.
Though Ubuntu has extensive software available, you may have to manually install a software package not available in the repositories.
If no package exists for the software, you must install it manually.
Before you choose to do so, make sure you trust the package and its maintainer.
Packages in Ubuntu have a .deb extension.
Double-clicking a package opens an overview page in the Ubuntu Software Center which gives you more information about that package.
In Ubuntu, you can specify the kinds of updates you want to install on your system.
This depends on your preferences around stability compare with having access to the latest developments.
You can update installed software by using the Software Updater application in Ubuntu.
- Important security updates
-
These updates are highly recommended to ensure that your system stays as secure as possible. These updates are enabled by default.
- Recommended updates
-
These updates are not as important in keeping your system secure. Recommended updates keep your software updated with the most recent issue fix's or minor updates that have been tested and approved. This option is also enabled by default.
- Pre-released updates
-
This option is for those who want the latest releases of applications. Even at the risk of installing an update that has not been tested, and could cause system problems. This option is not enabled by default.
- Unsupported updates
-
These are updates that have not been tested or reviewed yet. You can have issues that are caused by installing these updates. This option is not enabled by default.
Advanced users start looking into things like wine. Which is an application that allows windows software to be run on this system.
They look at further configuring the system using utilities like the Terminal.
These are things that we do not cover in this article. They require specialized knowledge of terminal syntax and how to use this code to enable certain actions.
If you are interested in this, you must go to the Ubuntu site. You can research further there or check out some of our other Ubuntu articles on the links below.
Online User Manual
If you have any further questions, the best resource for you is the user manual itself.
These manuals are located online for you to view or download.
I have included a link to the downloader page where you can select your particular version of Ubuntu Linux to download the correct manual.
Additional Information
Software support is by Canonical through the following methods:
Technical Support is provided by Dell: