Windows 10 Reports That You Are On a Temporary Profile
Summary: The following article provides information about an issue with Windows 10 reporting that you are signed in with a temporary profile on your Dell computer. It takes you through various methods to resolve this. ...
This article applies to
This article does not apply to
This article is not tied to any specific product.
Not all product versions are identified in this article.
Symptoms
Note: Microsoft will end support for Windows 10 on October 14, 2025. See our Microsoft Windows 10 End of Support Announcement for more information.
Have you been signed in with a temporary profile in Windows 10?
The following error messages can appear for various reasons in Windows 10 and keep you out of your user account:
You’ve been signed in with a temporary profile
We can't sign in to your account
Windows 10 keeps all your preferences and settings in a user profile. Your user profile is located in the folder C:\Users\(username). It includes all the account settings like the desktop background, your screen saver, File Explorer options, and any other options.
Note: Where you have been signed in with a temporary profile: You cannot access your files, and any files created while in this profile are deleted when you sign out.
Cause
The most common reason for this happening is some type of corruption. This can occur in any number of ways, anything from a bad update, to forcing the computer to turn off.
Note: Best practice recommends that you complete a full backup just in case there are any problems when you are working on your operating system. You always want to be able to recover to where you started.
Resolution
Solution Methods:
Note: If you are using Windows Hello, try logging in using the various methods available. Sometimes this issue has been because of a delay in your sign-on method.
The following methods have all been reported to resolve this issue at one time or another. Each method deals with resolving corrupted data of one type or another.
Note: To use some of the following methods, you may need either: Access to an existing Administrative account on your computer. To enable the integrated Administrator account. (You may have to contact your IT department if you work for a company that does not give you Administrator access privileges on your computer.)
However, you can use the following steps to enable the integrated Administrator account on your computer:
-
Open the Command Prompt or PowerShell application as an administrator, by right-clicking the start menu or by pressing the windows and X keys together and selecting the appropriate option from the menu that appears
-
Type in the following command and press the Enter key:
net user administrator /active:yes -
Once you restart your computer, you should now get a new account named Administrator. Log in to that account
Once you have finished the troubleshooting, that you have the option of removing this account from the login screen by using the following steps:
-
Open a Command Prompt/PowerShell window as before
-
Type in the following command and press the Enter key:
net user administrator /active:no
Use the Check Disk (CHKDSK) tool to look for any corruption and run a repair if at all possible.
The following article provides a guide to using this tool on your computer:
System File Check (SFC) compares your operating system files against the install cab file to check for any missing or corrupted files. It also attempts to replace any damaged or missing files it detects.
You can find a guide to take you through this scan on the following link:
Ensure that you have run the Windows Update tool and your computer is fully up to date with Microsoft's updates.
The following Microsoft guide takes you through any questions you might have about the Windows 10 update process:
You can follow these steps to refresh the location of your documents for the operating system:
-
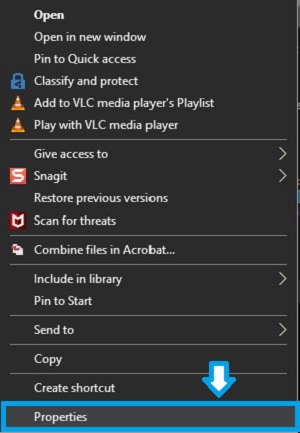
Open Windows Explorer and right-click your Documents folder

-
Select Properties and click the Location tab
-
Click Find Target
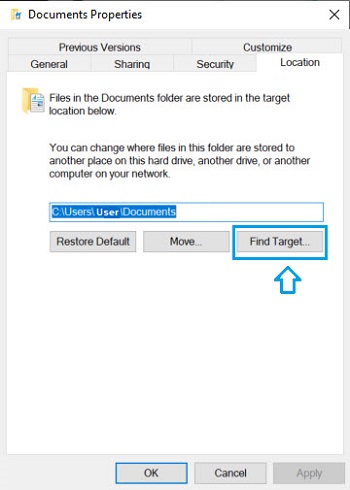
-
Another Windows Explorer window opens, click Copy Path from the menu at the top of the window
-
Paste the location into the field right above the buttons on the location tab (remove any extra characters like quotation marks) and click the Apply button
-
Restart your Computer.
To rule out your anti-virus, disable it through the next boot or remove it. You must reference your anti-virus manufacturer for the steps to do this.
If the issue persists through a reboot of the personal computer, then you can rule out the anti-virus.
Another method has been entering Safe Mode (any version) and rebooting your personal computer after using Safe Mode for a few minutes.
The following article takes you through the various methods of booting to Safe Mode in Windows 10:
How to boot into Safe Mode with Networking
Duration: 0:50
Closed captions: English only
Microsoft support has posted a potential solution to your situation. It is from a trusted source but Dell has validated it yet. If you choose to attempt this solution, Dell Technologies recommends that you back up your data before proceeding. Dell takes no responsibility for this fix as you run it at your own choice.
You can find out more on the following Microsoft support article:
Affected Products
Alienware, Inspiron, OptiPlex, Vostro, XPS, G Series, G Series, Alienware, Inspiron, Latitude, Vostro, XPS, Fixed Workstations, Mobile WorkstationsArticle Properties
Article Number: 000134012
Article Type: Solution
Last Modified: 14 Jul 2025
Version: 12
Find answers to your questions from other Dell users
Support Services
Check if your device is covered by Support Services.