PowerEdge: PERC Automating Consistency Checks using Open Manage Server Administrator Command Line
Summary: Automate storage consistency checks on PowerEdge RAID Controllers (PERC) using Open Manage Server Administrator (OMSA) Command Line in Windows OS.
This article applies to
This article does not apply to
This article is not tied to any specific product.
Not all product versions are identified in this article.
Instructions
Use Task Scheduler to automate consistency checks of PowerEdge RAID Controllers (PERC) on Windows Server 2008(R2) and 2012(R2) with Open Manage Server Administrator.). It is recommended to run the check at least once a month.
Automate PERC consistency checks on Windows Server 2008(R2) and 2012(R2) using Task Scheduler and Open Manage Server Administrator.
How To Schedule Consistency Checks.
For Windows servers with OMSA installed on it follow the below steps:
- Click Start, then All Programs, then Task Scheduler. If you are on server 2008 or 2008r2 click Start, then All Programs, then Administrative Tools, then Task Scheduler.
- On the right-hand side of the window, click Create Task.
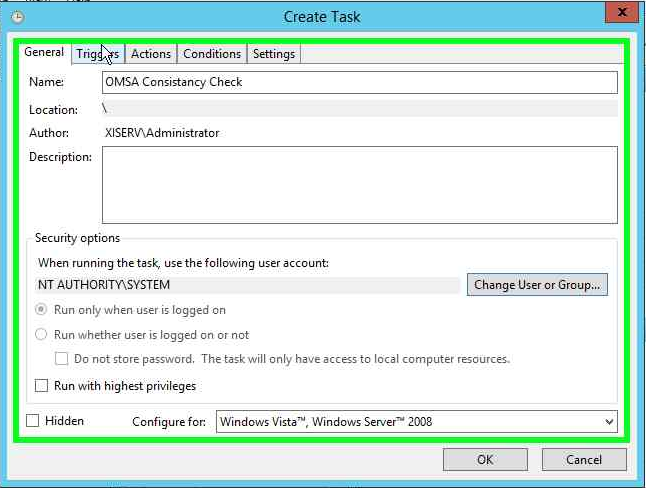
- In the created task window under General:
- Give your new task a name (such as: OMSA Consistency Check)
- When running the task, use the following user account: Click Change User or Group.
- In the new window type System then, click Check Names then OK.
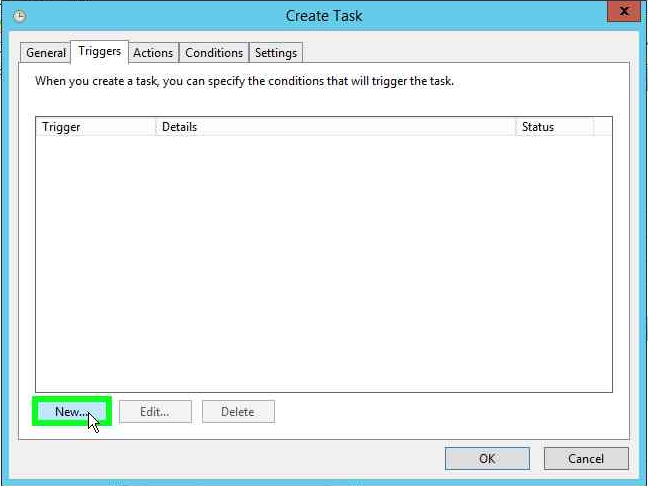
- Click Triggers then New:
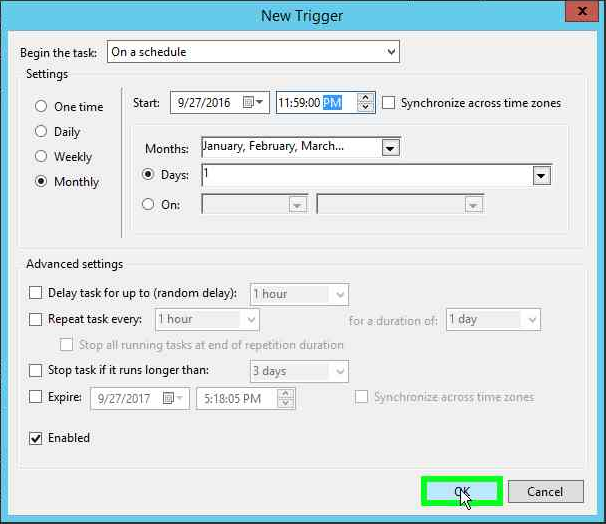
- Make sure it says Begin the task On a schedule
- On the left-hand side of the New Trigger window click Monthly
- The drop-down menu for Months: Click <Select all months>
- In Days: Pick a day that works for your maintenance window or otherwise a day that works for you in our example the first is picked
- Leave the start date alone but set the time for something in your window in our example 11:59:00 pm
- Make sure Enabled is checked then click ok.
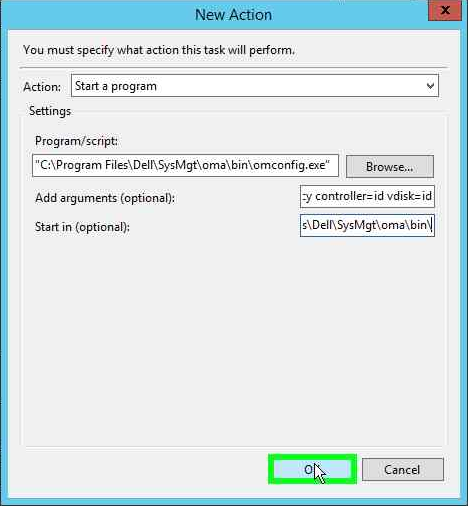
- Under Actions click new:
- Click browse and browse to your install of OMSA command line by default that is:
C:\Program Files\dell\SysMgt\oma\bin\omconfig.exe - In the box for Add arguments (optional): Add the following:
storage vdisk action=checkconsistency controller=x vdisk=y(where x and y are your controller and virtual disk) - In the box for Start in (optional): Copies paste the path from program/script to this box leaving off omconfig.exe you should have
C:\Program Files\dell\SysMgt\oma\bin\in that box now - Click OK
- Click browse and browse to your install of OMSA command line by default that is:
- Click OK
- Repeat as needed for other virtual disks if you try to do them all at once it severely degrades the server's performance
For Linux servers with OMSA installed on it, follow the below steps:
- Open terminal as root
- Open your cron file for editing with crontab –e
- Add the following line to your crontab file:
0 0 30 * * /opt/dell/srvadmin/bin/omconfig storage vdisk action=checkconsistency controller=x vdisk=y > /var/log/omccheck.log(where x and y are your controller and virtual disk) - Save and then close the file
Note: To verify it has been added type
crontab –l
Example with figures:
-
Open Task Scheduler

-
Click Create Task.

-
Name the task and change it to run under System (here: NT AUTHORITHY\SYSTEM)
-
Click the Triggers tab then click New
-
Change to Monthly under Months: Click <Select all months> under Days: Click 1 to have it start the first of every month then click OK.
-
Click Actions then click New.

-
Click Browse then browse to:
C:\Program Files\Dell\SysMgt\oma\bin\omconfig.exe- Add the following to the arguments:
storage vdisk action=chceckconsistency controller=0 vdisk=0 - Add the following to start in:
C:\Program Files\Dell\SysMgt\oma\bin - Click OK.
- Add the following to the arguments:
-
Click OK again.

Affected Products
OpenManage Server Administrator, PowerEdge XR2, Poweredge C4140, PowerEdge C6400, PowerEdge C6420, PowerEdge C6520, PowerEdge C6525, PowerEdge C6600, PowerEdge C6615, PowerEdge C6620, PowerEdge FC640, PowerEdge HS5610, PowerEdge HS5620
, PowerEdge M640, PowerEdge M640 (for PE VRTX), PowerEdge MX5016s, PowerEdge MX7000, PowerEdge MX740C, PowerEdge MX750c, PowerEdge MX760c, PowerEdge MX840C, PowerEdge R240, PowerEdge R250, PowerEdge R260, PowerEdge R340, PowerEdge R350, PowerEdge R360, PowerEdge R440, PowerEdge R450, PowerEdge R470, PowerEdge R540, PowerEdge R550, PowerEdge R640, PowerEdge R6415, PowerEdge R650, PowerEdge R650xs, PowerEdge R6515, PowerEdge R6525, PowerEdge R660, PowerEdge R660xs, PowerEdge R6615, PowerEdge R6625, PowerEdge R670, PowerEdge R740, PowerEdge R740XD, PowerEdge R740XD2, PowerEdge R7415, PowerEdge R7425, PowerEdge R750, PowerEdge R750XA, PowerEdge R750xs, PowerEdge R7515, PowerEdge R7525, PowerEdge R760, PowerEdge R760XA, PowerEdge R760xd2, PowerEdge R760xs, PowerEdge R7615, PowerEdge R7625, PowerEdge R770, PowerEdge R7715, PowerEdge R7725, PowerEdge R840, PowerEdge R860, PowerEdge R940, PowerEdge R940xa, PowerEdge R960, PowerEdge T130, PowerEdge T140, PowerEdge T150, PowerEdge T160, PowerEdge T30, PowerEdge T330, PowerEdge T340, PowerEdge T350, PowerEdge T360, PowerEdge T40, PowerEdge T430, PowerEdge T440, PowerEdge T550, PowerEdge T560, PowerEdge T630, PowerEdge T640, PowerEdge XR11, PowerEdge XR12, PowerEdge XR4000r, PowerEdge XR4000w, PowerEdge XR4000z, PowerEdge XR4510c, PowerEdge XR4520c, PowerEdge XR5610, PowerEdge XR7620, PowerEdge XR8000r, PowerEdge XR8610t, PowerEdge XR8620t
...
Article Properties
Article Number: 000134488
Article Type: How To
Last Modified: 02 Jul 2026
Version: 9
Find answers to your questions from other Dell users
Support Services
Check if your device is covered by Support Services.