Live Security Professional Removal Guide
Summary: The following article provides information about how to uninstall/remove Live Security Professional from your Dell computer. Most of the steps are not covered under your warranty and are carried out at your own risk. ...
This article applies to
This article does not apply to
This article is not tied to any specific product.
Not all product versions are identified in this article.
Symptoms
Table of Contents:
- A description of what Live Security Professional is and the support possible under the warranty
- Removal Instructions
- Associated Live Security Pro Files
- Associated Live Security Pro Registry Information
- Prevent Re-Infection
A description of what Live Security Professional is and the support possible under the warranty
Live Security Professional is a rogue anti-spyware program that gives out false scan results and stops your applications from running.
This infection usually gets on your computer through hacked websites or by exploiting vulnerable points in either Windows or your applications.
It automatically starts up whenever you log in into Windows. It runs a scan of your computer and reports that numerous infections were detected. This should be ignored as it is a false report.
If you attempt to remove the reported infections using the program, it advises that you must pay for the program before you can carry on. Again, this should be ignored. The program has been reported as scareware and all reports are fake, designed to encourage you to purchase the software to resolve the issue.
Note: As always, the decision to use this information is at the end user’s risk as malware removal is not a pro-support entitlement. This information is provided AS IS.
The surest way to resolve this issue is to either perform a factory restore or a clean Operating system install on your computer. Taking you through this reinstall is covered under your pro support warranty. You can also find articles taking you through this for your particular operating system and situation on the links pages below.

The infection attempts to block any applications from running on your computer. The infection reports that they are a threat when it is trying to protect itself from detection and removal by security software. It tries to scare you into thinking that your computer is about to fail so you are more willing to pay it. The alert messaging would look like.
Live Security Professional
Live Security Professional has blocked cmd.exe! Threat detected!
Ignore these alerts. Live Security Professional was created with the sole purpose of getting you to purchase the program. Do not purchase this program. If you have already paid them, contact your credit card company and cancel the charges. Inform them that the program is a computer infection and is trying to extort money and capture your card details.
Cause
Removal Instructions
Note: You should print this guide as you are unlikely to have access to this webpage on the infected computer.
We have to start by starting up in Safe Mode with Networking. Follow the appropriate guide for your version of Windows:
Windows Advanced Options Menu
Please select an option:

      Safe Mode
      Safe Mode with Networking
      Safe Mode with Command Prompt

      Enable Boot Logging
      Enable VGA Mode
      Last Known Good Configuration (your most recent settings that worked)
      Directory Services Restore Mode (Windows domain controllers only)
      Debugging Mode
      Disable automatic restart on system failure

      Start Windows Normally
      Reboot

Use the up and down arrow keys to move the highlight to your choice.
Navigate using the cursor/arrow keys on your keyboard and select Safe Mode with Networking on-screen and press the Enter key on your keyboard.
Windows boots into safe mode with networking and prompts you to log in as a user. Log in as the user that is infected with the malware.
Before starting any downloads or scans, end the processes that belong to the malware. In this case, I am using RKill as it is a program I am familiar with. You can use another program, but the steps below are for RKill. You can download RKill to your desktop from the following link. (BleepingComputer developed RKill as Freeware and it can be very useful.)
You may want to pre-download both the RKill and iexplore.exe as some Malware recognizes RKill and attempts to stop it running. Save them to your desktop from removable media.
Double-click on the RKill or iExplore.exe icon to automatically stop any processes associated with the Live Security Professional and other Rogue programs. It may take a while for it to end them. When it is finished the black window closes. If you get any error messaging that RKill is an infection, ignore it. If any of these warnings close RKill, then it is best to leave the messaging on-screen and run RKill again. If you do not close the messaging, it cannot run again. Do not reboot your computer after running RKill as the malware is tied to your computers startup.
Note: If you are having problems running RKill, then renaming the RKill icon usually tricks the Malware.
I have used Malwarebytes Anti-Malware for the following steps. As before, this is the program I am most familiar with. You can use any program you are comfortable with that does the same job. Malwarebytes is a Freeware program.
Once downloaded, close all programs and Windows on your computer. (Including this browser.)
Double-click on the icon on your desktop to start the installation of Malwarebytes onto your computer.
Follow the setup prompts. Do not change any default settings. When the program finishes its installation, ensure that you leave both the Update Malwarebytes Anti-Malware and Launch Malwarebytes Anti-Malware checked. Then click on the Finish button. Ignore it if MalwareBytes asks you to reboot.
Malwarebytes starts up, and you see an on-screen message saying that you should update the program before performing a scan. The program automatically updates itself after the install. Select the OK button to close that box and you are at the main program window.
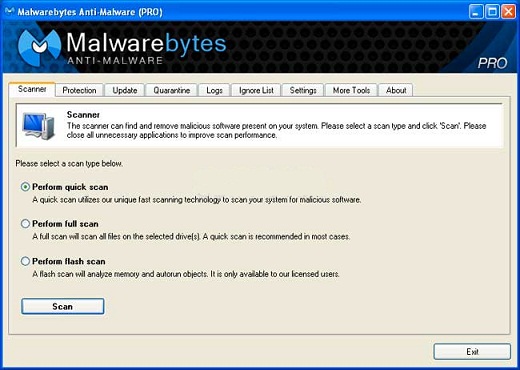
On the Scanner tab, ensure that the Perform full scan option is selected and click on the Scan button to start scanning your computer.
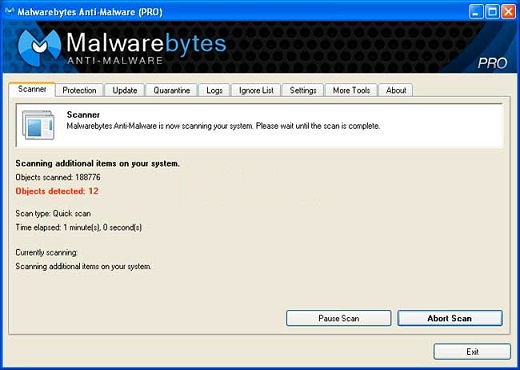
The program starts scanning your computer for malware. This process can take quite a while.
When the scan is complete, a finished message box appears.
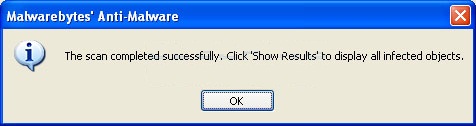
Click on the OK button to close the message box and go to the removal process.
You return to the main Scanner screen. Click on the Show Results button.
A window showing all the malware that the program found appears.
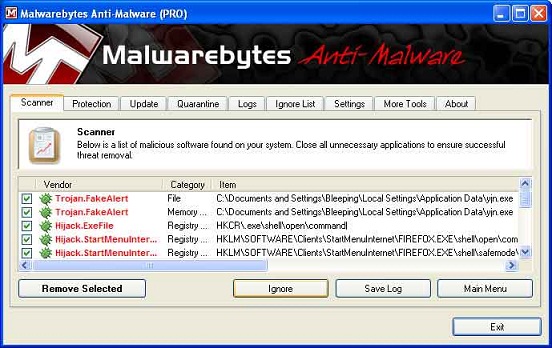
Click on the Remove Selected button to remove all the listed malware. All the files and registry keys are deleted and it adds them to the programs quarantine. While removing the files, Malwarebytes may require a reboot to remove some of them. If it displays a message stating that it must reboot, allow it to do so. Once your computer has rebooted and you are logged in, go to the rest of the steps.
When Malwarebytes has finished removing the malware, it opens the scan log and display it in Notepad. Review the log and then close the Notepad window. You can now exit the Malwarebytes program.
Resolution
Associated Live Security Pro Files
Associated Live Security Professional Files
- %AllUsersProfile%Appliucation Data<random>.txt
- %AllUsersProfile%Application Data<random>.js
- %AllUsersProfile%Application Data<random>.pad
- %AllUsersProfile%Application Data<random>.dat
- %AllUsersProfile%Application Data undll32.exe
- %AllUsersProfile%Application Datasdaksda.txt
- %Temp% ratra.lnk
- %StartMenu%ProgramsStartup egmonstd.lnk
File Location Notes
- %TEMP%:
-
Shows the Windows Temp folder, by default this is C:WindowsTemp for Windows 95/98/ME or C:DOCUMENTS AND SETTINGS<Current User>LOCAL SETTINGSTemp for Windows 2000/XP, and C:USERS<Current User>AppDataLocalTemp in Windows Vista/7 and 8
- %AllUsersProfile%:
-
Shows the All Users profile folder, by default this is C:Documents and SettingsAll Users for Windows 2000/XP and C:ProgramData in Windows Vista/7 and 8
- %StartMenu%:
-
Shows the Windows Start Menu for Windows 95/98/ME it directs to C:windowsstart menu, for Windows 2000/NT/XP/Vista and 2003 it directs to C:Documents and Settings<Current User>Start Menu, and for Windows vista/7 and 8 it is C:Users<Current User>AppDataRoamingMicrosoftWindowsStart Menu
Note: This is a self-help guide. Dell only supports using our reinstall software to recover your computer to the way it shipped from us. Use of this guide is strictly at your own risk and Dell strongly recommends you do not edit your registry yourself.
Associated Live Security Pro Registry Information
Associated Live Security Professional Windows Registry Information
- HKEY_CURRENT_USERSoftwareLive Security Professional
- HKEY_CURRENT_USERSoftwareMicrosoftWindowsCurrentVersionRun "ctmon32.exe" = "C:DOCUME~1ALLUSE~1APPLIC~1 undll32.exe C:DOCUME~1ALLUSE~1APPLIC~1<random>.dat,XFG00"
Prevent Re-Infection
To minimize the risk of a repeat infection, ensure that you have a real-time anti-virus program running on your computer and see that it stays updated. If you do not want to spend money on a paid service, then you can install one of the available free programs.
In addition to installing traditional anti-virus software, you might consider reading the guide below for some basic rules for being safe online.
Always double check any online accounts such as online banking, webmail, email, and social networking sites. Look for suspicious activity and change your passwords, you cannot tell what information the malware might have passed on.
If you have an automatic backup for your files, you should run virus scans on the backup. You must confirm that it did not back up the infection as well. If virus scans are not possible, such as with online backups, you should delete your old backups and save new versions.
Keep your software current. Ensure that you update then frequently. If you receive any messages about this and are not sure of their validity, then always contact the company in question to clarify it.
 Get general information and guidance to secure your system/data on our Security and anti-virus page.
Affected Products
Fixed WorkstationsArticle Properties
Article Number: 000137955
Article Type: Solution
Last Modified: 27 Mar 2025
Version: 7
Find answers to your questions from other Dell users
Support Services
Check if your device is covered by Support Services.