NVP vProxy: How to collect detailed VM/vProxy configuration information from the vCenter MOB
Summary: How to collect and compare VMware resource information in NetWorker with the VMware Managed Object Browser (MOB) using VMware MoRef values.
This article applies to
This article does not apply to
This article is not tied to any specific product.
Not all product versions are identified in this article.
Instructions
Getting the Managed Object Reference (MOREF) Values from NetWorker:
Use one of the following options to get a Virtual Machine's (VM) MoRef from NetWorker:
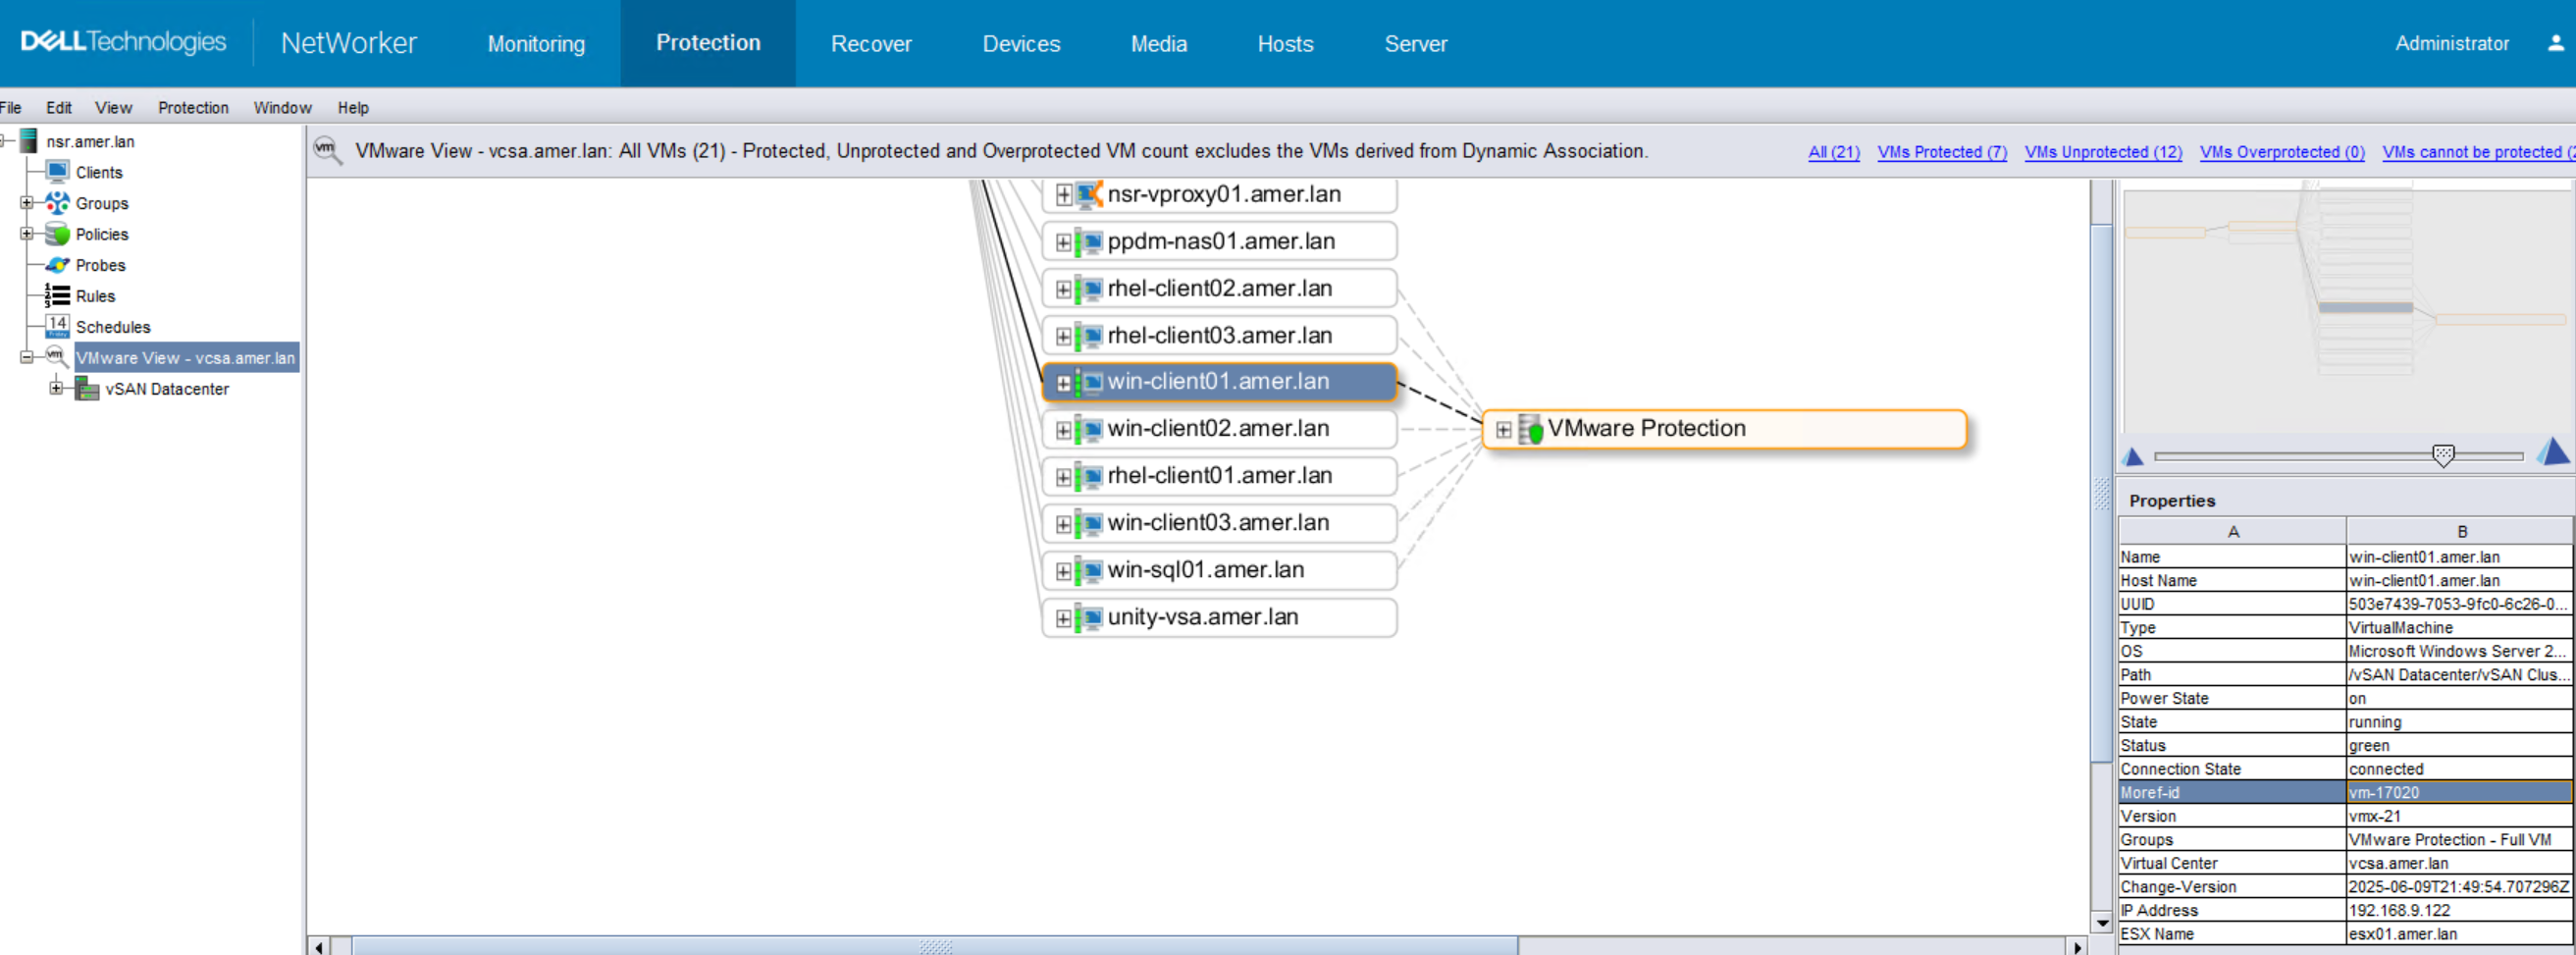
- From the NetWorker Management Console (NMC), go to Protection -> VMware View. Select the VM from the map and review the Properties window.
- Open an Administrator command prompt, or root shell on the NetWorker server.
- Use
mminfoto get the Save Set ID (SSID) of a VM:mminfo -kot -q vmname=VM_NAME - Use
mminfoto get the Save Set details of a specific SSID:mminfo -S -q ssid=SSID
- Use
Example:
[root@nsr ~]# mminfo -kot -q vmname=win-client01.amer.lan
 volume        type   vm_name         date     time         size ssid      fl backup_size
...
VMBackupPool.002 Data Domain win-client01.amer.lan 06/09/2025 09:00:14 PM 94 GB 2991031199 cr 94 GB
[root@nsr ~]# mminfo -S -q ssid=2991031199
ssid=2991031199 savetime=06/09/2025 09:00:14 PM (1749517214) vcsa.amer.lan:vm:503e7439-7053-9fc0-6c26-02f5f021b289:vcsa.amer.lan
  level=full   sflags=vrF      size=96731556148  files=1          insert=06/09/2025
  create=06/09/2025 complete=06/09/2025 browse=06/16/2025 09:00:10 PM retent=06/16/2025 11:59:59 PM
  clientid=2593064e-00000004-67dc833c-67dc8c60-00085000-ade5be56
         **backup start time: 1749517214;
              *backup_device: Data Domain;
                *backup_mode: VSS;
         *occupiedvmdiskutil: 23046045696;
         *policy action name: "backup: 1749517210";
                *policy name: "VMware Protection: 1749517210";
       *policy workflow name: "Full VM: 1749517210";
*policy_workflow_action_path: /VMware Protection/Full VM/backup;
             *proxy_hostname: nsr-vproxy01.amer.lan;
*ss data domain backup cloneid: 1749517210;
*ss data domain dedup statistics: "v1:1749517210:96715763235:64534899:60674229";
             *SSID directory: Yes;
            *totalvmdiskutil: 95818870784;
           *vcenter_hostname: vcsa.amer.lan;
            *vm_backup_level: incr;
                    *vm_info: \
"{
  \"name\": \"win-client01.amer.lan\",
  \"host-name\": \"win-client01.amer.lan\",
  \"ip-address\": \"192.168.9.122\",
  \"template\": false,
  \"moref-id\": \"vm-17020\",
  \"vcenter-name\": \"vcsa.amer.lan\",
  \"path\": \"/vSAN Datacenter/vSAN Cluster/win-client01.amer.lan\",
  \"moref-path\": \"/datacenter-3/domain-c8/vm-17020\",
  \"vm-path\": \"/vSAN Datacenter/VM Clients/win-client01.amer.lan\",
  \"moref-vm-path\": \"/datacenter-3/group-v4003/vm-17020\",
  \"datastore\": \"vsanDatastore\",
  \"datastore-moref\": \"datastore-12\",
  \"os-identifier\": \"windows2019srvNext_64Guest\",
  \"os-name\": \"Microsoft Windows Server 2022 (64-bit)\",
  \"version\": \"vmx-21\",
  \"change-version\": \"2025-06-09T21:49:54.707296Z\",
  \"esxi-moref\": \"host-11\",
  \"esxi-name\": \"esx01.amer.lan\",
  \"datacenter\": \"datacenter-3\",
  \"compute-resource\": \"\",
  \"cluster-compute-resource\": \"domain-c8\",
  \"networks\": [
    \"VM Management Network\"
  ],
  \"disks\": [
    {
      \"display-name\": \"Hard disk 1\",
      \"datastore\": \"vsanDatastore\",
      \"datastore-moref\": \"datastore-12\",
      \"disk-key\": 2000,
      \"size-kb\": 94371840,
      \"thin\": true,
      \"disk_mode\": \"persistent\",
      \"disk_stats\": {
        \"Statistics\": {
          \"ProvisionedBytes\": 96636764160,
          \"UsedBytes\": 96362102784,
          \"ChangedBytes\": 1156644864,
          \"SecondsTaken\": 170
        },
        \"DDStatistics\": {
          \"PreClientCompBytes\": 722581890,
          \"PostClientCompBytes\": 261896497,
          \"TotalSegments\": 125251,
          \"RedundantSegments\": 41876
        },
        \"BaseFileName\": \"[vsanDatastore] 29418466-1a94-0c50-d384-0050560662\
dd/win-client01.amer.lan.vmdk\"
      }
    }
  ]
}";
                    *vm_name: win-client01.amer.lan;
                    *vm_uuid: 503e7439-7053-9fc0-6c26-02f5f021b289;
                       group: VMware Protection - Full VM;
            saveset features: CLIENT_SAVETIME;
  Clone #1: cloneid=1749517210  time=06/09/2025 09:00:10 PM    retent=06/16/2025  flags=
    frag@         0 volid=4259088639 file/rec=       0/0     rn=0 last=06/09/2025
- Open an Administrator command prompt or root shell on the NetWorker server.
- Use the
nsrvimcommand to generate XML reports of the vCenter inventory:nsrvim -d --names VCENTER_NAME
- Use the
This command generates three XML files. On Windows hosts, the files are generated in the directory from which the nsrvim command was run. On Linux hosts, the files are generated under /nsr/cores/nsrvim. The VCENTER_NAME.xml contains the VMware environment details:

Reviewing VM Details from the vCenter MOB:
The vCenter MOB is accessible from a web browser (for example: https://vcenter-name/mob). You are prompted to enter a vSphere management user (for example administrator@vsphere.local)
Once authenticated, the browser shows the main MOB screen; however, you can navigate directly to certain details directly if you have the VM's moref-id.
VM General Info:
https://vcenter-name/mob/?moid=moref-id&doPath=guest

VM Disk Information:
https://vcenter-name/mob/?moid=moref-id&doPath=guest.disk

https://vcenter-name/mob/?moid=moref-id&doPath=layout.disk

VM Network Information:
NOTE: The VM must be powered on to use this endpoint:
https://vcenter-name/mob/?moid=moref-id&doPath=guest.net

Additional Information
Affected Products
NetWorkerProducts
NetWorkerArticle Properties
Article Number: 000156443
Article Type: How To
Last Modified: 10 Jun 2025
Version: 6
Find answers to your questions from other Dell users
Support Services
Check if your device is covered by Support Services.