VPLEX: Configure Custom-Signed Web Host Certificates for VPLEX Using Default VPN Certificates
Summary: This article provides a walk-through on how to configure custom-signed web host certificates with VPLEX Local and Metro configurations. It is aimed towards end-users whom are looking to use their own web host certificate rather than the default self-signed web host certificates. In addition to importing the custom web host certificate, this article also provides steps for renewing the other certificates; VPN Host certificate, and Certificate Authority (CA) certificate, which are used for establishing a VPN tunnel which is used for internal communications between the management-servers or Cluster-Witness (if installed and applicable). ...
This article applies to
This article does not apply to
This article is not tied to any specific product.
Not all product versions are identified in this article.
Instructions
This article walks through the steps to generate a Certificate Signing Request (CSR) and a private host key file from the VPLEX management-server. Afterwards the CSR file is then sent to a Certificate Authority vendor for review and validation and then later returned back as signed certificate (typically in CRT, CER, or PEM format) along with a CA certificate (generally an intermediate or root CA certificate) from the Certificate Authority vendor which did the signing of the CSR file.
Using the signed certificate, private host key, and the CA certificate it is then possible to import these into the VPLEX for configuring the web host certificates. If you have a Metro Config, this procedure must be run on each VPLEX management-server separately so that unique web host certificates can be generated for each cluster.
Section-A: Generate the "Certificate Signing Request" (CSR) and host private key file.
- In order to generate the required CSR and private host key files, you must log in to the shell of VPLEX and use the openssl req command from the Linux prompt to generate the two required files. See below examples for using the openssl req command on different GeoSynchrony code levels. See the notes below these examples for more information about how you should construct this command.
Important notes for consideration:
- SubjectAlternativeName (SAN) is a newer requirement that is enforced in modern browsers such as Google Chrome (since version 58) which deprecated the previous requirement to check certificates for CommonName (CN). In order for the certificate to properly confirm which server it is validating, this is a mandatory field that must be provided. To specify what domain or IP address the certificate is validated for, you must specify this in the subjectAltName details in the command above. You can state additional DNS or IP entries which uses commas to separate.
- If DNS name is being used, you must specify a valid FQDN. As per described by per RFC5890 - Section 2.3.1 - LDH Label
, the DNS label is described as an "LDH label" where it uses consists of ASCII letters, digits, and hyphen with the further restriction that hyphen cannot appear at the beginning or end of the string. Like all DNS labels, its total length must not exceed 63 octets. If DNS name is not being used, you can remove this portion from the subjectAltName parameter.
- The openssl req command that is used to generate the CSR file which includes the required SAN information differs depending on the GeoSynchrony code version that is being used. The reasoning for this is because GeoSynchrony 6.2 SP1 and higher uses openssl library version 1.1.1 and all previous code levels before this (GeoSynchrony 6.2 Patch 7 and below) all use openssl library version 0.9.8. Ensure you are using the correct syntax depending on the code level. Using the syntax for older code levels (6.2 P7 and below) still works for the newer code levels (6.2 SP1 and above).
- The filenames shown in this article are only examples to help in the following of this KB-Article. The filenames that you use and are provided back to may be different than what is shown in this article.
Example using openssl req command on GeoSynchrony 6.2 SP1 and higher code levels (code levels >= 6.2.1.X):
service@ManagementServer:~> openssl req -new -newkey rsa:2048 -nodes -keyout VPlexWebHost1234.key -out VPlexWebHost1234.csr -addext "subjectAltName = DNS:vplex1234.example.vplexlab.com,IP:XXX.XXX.XXX.XXX"
Generating a RSA private key
..........................................................+++++
...........................................................................................................+++++
writing new private key to 'VPlexWebHost1234.key'
-----
You are about to be asked to enter information that will be incorporated
into your certificate request.
What you are about to enter is what is called a Distinguished Name or a DN.
There are quite a few fields but you can leave some blank
For some fields there will be a default value,
If you enter '.', the field will be left blank.
-----
Country Name (2 letter code) [AU]: US
State or Province Name (full name) [Some-State]: MA
Locality Name (eg, city) []: Hopkinton
Organization Name (eg, company) [Internet Widgits Pty Ltd]: Dell EMC
Organizational Unit Name (eg, section) []: VPlexMetroNode Support
Common Name (eg, YOUR name) []: VPLEX Lab 1234
Email Address []: dell@dell.com

Please enter the following 'extra' attributes
to be sent with your certificate request
A challenge password []:
An optional company name []:
Example using openssl req command on GeoSynchrony 6.2 Patch 7 and lower code levels (code level <= 6.2.0.7):
service@ManagementServer:~> openssl req -new -newkey rsa:2048 -nodes -keyout VPlexWebHost1234.key -out VPlexWebHost1234.csr -config <(cat /etc/ssl/openssl.cnf <(printf "[SAN]\nsubjectAltName=DNS:vplex1234.example.vplexlab.com,IP:XXX.XXX.XXX.XXX"))
Generating a RSA private key
..........................................................+++++
...........................................................................................................+++++
writing new private key to 'VPlexWebHost1234.key'
-----
You are about to be asked to enter information that will be incorporated
into your certificate request.
What you are about to enter is what is called a Distinguished Name or a DN.
There are quite a few fields but you can leave some blank
For some fields there will be a default value,
If you enter '.', the field will be left blank.
-----
Country Name (2 letter code) [AU]: US
State or Province Name (full name) [Some-State]: MA
Locality Name (eg, city) []: Hopkinton
Organization Name (eg, company) [Internet Widgits Pty Ltd]: Dell EMC
Organizational Unit Name (eg, section) []: VPlexMetroNode Support
Common Name (eg, YOUR name) []: VPLEX Lab 1234
Email Address []: dell@dell.com

Please enter the following 'extra' attributes
to be sent with your certificate request
A challenge password []:
An optional company name []:
- Once the command in step 1 finishes, run the ' ll ' command to list out the new certificate files created. You should have two new files created, the CSR file (certificate signing request) and a key file (the private key which that used by VPLEX to create the CSR). Then you must submit only the CSR file, to your issuer or vendor so that it can be signed and returned as a signed certificate file. The "key" file does not have to be sent to the vendor as its purpose is only to be used to validate the signed certificate file against the vendor web signed certificate file.
Example output showing the two new files that were generated:
service@ManagementServer:~> ll
-rw-r----- 1 service users 1037 Dec  8 02:31 VPlexWebHost1234.csr
-rw-r----- 1 service users 1679 Dec  8 02:31 VPlexWebHost1234.key
- After the vendor signs the CSR file (generated by the VPLEX command in step 1) the vendor should provide you with a newly generated signed certificate file (generally in CRT, CER, or PEM format) and the CA certificate that was used to sign the CSR (CSRs are signed by an intermediate CA certificate, which is a certificate signed by a root CA certificate).
You should have the following files:
- VPlexWebHost.csr: the Certificate Signing Request generated by the VPLEX using the openssl request command in Section-A: Step 1.
- VPlexWebHost.key: the private key generated by the VPLEX using the openssl request command in Section-A: Step 1.
- VPlexWebHostSigned.cer: the signed certificate which has been provided from the issuer/vendor based on the information provided in the VPlexWebHost.csr. This is the signed web host certificate for the VPLEX issued and signed by your issuer/vendor. The issuer/vendor will have signed this using an intermediate or root CA certificate and is described in more detail below.
- vendorCA.cer: the certificate which the issuer/vendor used to sign the CSR (VPlexWebHost.csr) so that we could obtain the signed web host certificate (VPlexWebHostSigned.cer). Often times the file vendorCA.cer is an intermediate CA (a certificate which is not the root CA certificate, but another subsidiary certificate that was issued/signed from the root CA certificate). If the vendor signed the CSR using the intermediate CA then they may have provided you with two files to the user instead of one (an intermediate certificate and a root CA certificate). You may need to combine both the intermediate and root CA certificate into a single file.
Example of how to combine the intermediateCA and rootCA into a single file by using cat command: service@ManagementServer:/> cat vendorIntermediateCA.cer vendorRootCA.cer > vendorIntermediateRootCA.cer
Example of files we have uploaded to VPLEX at this point:
service@ManagementServer:/> ll
total 32
-rw-r----- 1 service users 4517 Aug 28 16:44 vendorIntermediateCA.cer
-rw-r----- 1 service users 2172 Aug 28 16:40 vendorIntermediateRootCA.cer
-rw-r----- 1 service users 2345 Aug 28 16:40 vendorRootCA.cer
-rw-r----- 1 service users 2366 Aug 28 16:39 VPlexWebHost1234Signed.cer
-rw-r----- 1 service users 1147 Aug 28 16:31 VPlexWebHost1234.csr
-rw-r----- 1 service users 1704 Aug 28 16:30 VPlexWebHost1234.key
- Additionally, if the vendor certificate was signed from a Windows system, it may be possible that the certificate may not be in the proper UNIX format and may include extra carriage returns. In order to correct this, run through the following steps below:
- Use command
dos2unixto convert this file into UNIX format.
Example of the "dos2unix" command use:
service@ManagementServer:/> dos2unix VPlexWebHost1234Signed.cer
dos2unix: converting file VPlexWebHostSigned.cer to UNIX format ...
service@ManagementServer:/>
- Open the VPlexWebHostSigned.cer file with the vi editor and add a newline at the end of the last line at the bottom of the file.
service@ManagementServer:/> vi VPlexWebHost1234Signed.cer
- Enter into INSERT MODE within the vi editor by pressing the <i> key. Then proceed to navigate to the bottom of the file and go to the end of the last line and press <Enter>.
- Then press the <Delete> key in the newline to ensure that nothing is there in the last empty line.
- Next you need to save and quit from vi editor, first press the <Esc> key, this will exit you out of the INSERT MODE for the vi editor.
- Then type :wq! and press the <Enter> key and this will write to the file and then quit/exit vi and this will put you back at the Linux shell prompt.
- Once these steps are done, run 'cat VPlexWebHostSigned.cer' to view the updated cert file.
Example of using the "cat" command to view the "VPlexWebHostSigned.cer" file and see that the last lines in output should look similar to this example:
<truncated the top of the file for simpler viewing>
C+QxKjNf0F26s8sGOXSoGldqXUCGaX3fj2faZH4T3RAQrJcWiKr9CSYvgQuYW+ns
Jyj10fKKESIoVv1rGQiu=
-----END CERTIFICATE-----
- Additionally, if the signed certificate that was returned from the CA vendor has EKU (Extended Key Usage) parameters in the signed certificate file, then this will need to be correctly reflected for its use-case otherwise the browser may reject the certificate. Considering that not all signed certificates may not contain EKU information, this isn't exactly a required parameter to exist within the certificate, however, for certificates which do contain EKU use-case information, it should state that the signed host certificate can be used for "SSL/TLS Client Web Authorization and/or SSL/TLS Server Web Authentication". For more information on how to verify/validate if EKU settings are being defined/listed in the signed certificate please see Section-B Validating the Certificate Chain using Openssl Commands.
Reference:
https://docs.openssl.org/master/man5/x509v3_config/#key-usage
Section-B: Validating the Certificate Chain Using Openssl Commands
Please see the section titled: Additional Information Regarding Certificates and Troubleshooting Tips below for how to validate the certificates.
Section-C: Importing and Configuration of the New Custom-Signed Web Host Certificates
Before we can import/configure the new custom-signed web host certificate and recreate the VPN security certificates, we must first delete all existing certificates including CA, host, and web host on the VPLEX management server. Prior to deleting all existing certificates, we must stop the VPN first for Metro Configs (skip if Local Config).
- In VPlexcli on both clusters (Skip if Local Config)
vpn stop
- In VPlexcli on both clusters (Also required for Local Configs):
security delete-ca-certificate
security delete-host-certificate
security delete-host-certificate -o webServerHostCertFile.pem -f webServerHostkeyFile.pem
security delete-ca-certificate -o webStrongswanCert.pem
NOTE:
If you are an advanced user and feel comfortable with running a single Linux remove command to remove all the existing certificate files, instead of running the four security delete VPLEXCLI commands as shown above, you can instead remove the existing certificate files by entering into the Linux prompt and running the command rm -f /etc/ipsec.d/*/*pem* to delete all the certificate files at once. Afterwards you can run the command ll /etc/ipsec.d/*/*pem* to verify that there are no longer any existing certificate files.
Example of removing existing certificates using single command:
## List out existing certificates
service@ManagementServer:~/> ll /etc/ipsec.d/*/*pem*
-rw-r----- 1 service groupSvc 1684 Aug 28 02:20 /etc/ipsec.d/cacerts/strongswanCert.pem
-rw-r----- 1 service groupSvc 4517 Aug 28 02:20 /etc/ipsec.d/cacerts/webStrongswanCert.pem
-rw-r--r-- 1 service groupSvc 4633 Aug 28 17:07 /etc/ipsec.d/certs/cwsHostCert.pem
-rw-r----- 1 service groupSvc 4665 Aug 28 02:20 /etc/ipsec.d/certs/hostCert.pem
-rw-r----- 1 service groupSvc 2366 Aug 28 02:20 /etc/ipsec.d/certs/webServerHostCertFile.pem
-rw-r--r-- 1 service groupSvc 1854 Aug 28 17:07 /etc/ipsec.d/private/cwsHostKey.pem
-rw-r----- 1 service groupSvc 1854 Aug 28 02:20 /etc/ipsec.d/private/hostKey.pem
-rw-r----- 1 service groupSvc 1854 Aug 28 02:20 /etc/ipsec.d/private/strongswanKey.pem
-rw-r----- 1 service groupSvc 1704 Aug 28 02:20 /etc/ipsec.d/private/webServerHostkeyFile.pem

## Removing the existing certificates
service@ManagementServer:~/> rm -f /etc/ipsec.d/*/*pem*

## List out existing certificates again (which should state that file or directory does not exist)
service@ManagementServer:~/> ll /etc/ipsec.d/*/*pem*
ls: cannot access '/etc/ipsec.d/*/*pem*': No such file or directory
- From the VPlexcli, run the following command to import the issuer/vendor custom-signed web host certificate into the VPLEX system. Ensure that you are also including the directory path for each file where they are located. When prompted for the passphrase use the same passphrase for all prompts. The default passphrase used for self-signed certificates is strongswan.
security configure-certificates -w <VPLEX_WEB_CERT_SIGNED> -k <VPLEX_PRIVATE_KEY> -p <VENDOR_CA_CERT>
Example output for configuring custom-certificates on Cluster-1:
VPlexcli:/> security configure-certificates -w /home/service/lab_vs6_c1.cer -k /home/service/lab_vs6_c1.key -p /home/service/ca-chain.cert.pem

host cert and key certificate import paths were not provided.
Default self-signed host certificates will be generated.

Failed to verify the provided CA certificate for import, status: 2, error: C = US, ST = MA, O = Dell EMC, OU = VPlexMetroNode Support,
CN = Dell EMC VPlexMetroNode Support Labs Intermediate CA, emailAddress = vpmnls@dell.com
error 20 at 0 depth lookup: unable to get local issuer certificate
error /tmp/vendorCaRootDir/strongswanCert1: verification failed

Warning: Invalid /home/service/ca-chain.cert.pem CA certificate provided. Continuing without adding CA information in local ssl certifiacte
database
CA Certificate /home/service/ca-chain.cert.pem successfully imported

Host Certificate /home/service/lab_vs6_c1.cer successfully imported

Host Key /home/service/lab_vs6_c1.key successfully imported


Please create a passphrase (at least 8 characters) for the Certificate Authority Key.  Make a note of this passphrase as you will need it to
configure a second cluster of a VPLEX Metro or Geo.
 Certificate Authority passphrase:

Re-enter the passphrase for the Certificate Authority Key:
New CA certificate /etc/ipsec.d/cacerts/strongswanCert.pem created

New CA key /etc/ipsec.d/private/strongswanKey.pem created


Please create a passphrase (at least 8 characters) for the Local Host Certificate Keys to be used to configure the VPN.  Make a note of this
passphrase asyou will need it later.
Host Certificate passphrase:

Re-enter:
New Host certificate request /etc/ipsec.d/reqs/hostCertReq.pem created

New Host certificate /etc/ipsec.d/certs/hostCert.pem created and signed by the CA Certificate /etc/ipsec.d/cacerts/strongswanCert.pem

addWebapp(/ui,/opt/emc/VPlex/tomcat/webapps/ui)
addWebapp(/apidoc,/opt/emc/VPlex/tomcat/webapps/apidoc)
addWebapp(/cimom,/opt/emc/VPlex/tomcat/webapps/cimom)
addWebapp(/,/opt/emc/VPlex/tomcat/webapps/ROOT)
addWebapp(/WebHelp,/opt/emc/VPlex/tomcat/webapps/WebHelp)
addWebapp(/vplex,/opt/emc/VPlex/tomcat/webapps/vplex)
SSL protocols enabled for Server: TLSv1.2,TLSv1.3,SSLv2Hello
SSL protocols enabled for Client: TLSv1.2,TLSv1.3
https keystore: /var/log/VPlex/cli/.keystore
started web server on ports {'http': 49880, 'https': 49881}

Configuration of certificates on local cluster completed successfully.
Now, proceed with configuration of certificates on remote cluster.

VPlexcli:/>
Example out for configuring custom-certificates on Cluster-2:
VPlexcli:/> security configure-certificates -w /home/service/lab_vs6_c2.cer -k /home/service/lab_vs6_c2.key -p /home/service/ca-chain.cert.pem

host cert and key certificate import paths were not provided.
Default self-signed host certificates will be generated.

Please enter the IP address of the VPLEX cluster on which the original CA was created: 10.241.164.160

Failed to verify the provided CA certificate for import, status: 2, error: C = US, ST = MA, O = Dell EMC, OU = VPlexMetroNode Support,
CN = Dell EMC VPlexMetroNode Support Labs Intermediate CA, emailAddress = vpmnls@dell.com
error 20 at 0 depth lookup: unable to get local issuer certificate
error /tmp/vendorCaRootDir/strongswanCert1: verification failed

Warning: Invalid /etc/ipsec.d/cacerts/webStrongswanCert.pem CA certificate provided. Continuing without adding CA information in local ssl
certifiacte database
Host Certificate /home/service/lab_vs6_c2.cer successfully imported

Host Key /home/service/lab_vs6_c2.key successfully imported


The passphrase of CA is verified.
New Host certificate request /etc/ipsec.d/reqs/hostCertReq.pem created

New Host certificate /etc/ipsec.d/certs/hostCert.pem created and signed by the CA Certificate /etc/ipsec.d/cacerts/strongswanCert.pem

addWebapp(/ui,/opt/emc/VPlex/tomcat/webapps/ui)
addWebapp(/apidoc,/opt/emc/VPlex/tomcat/webapps/apidoc)
addWebapp(/cimom,/opt/emc/VPlex/tomcat/webapps/cimom)
addWebapp(/,/opt/emc/VPlex/tomcat/webapps/ROOT)
addWebapp(/WebHelp,/opt/emc/VPlex/tomcat/webapps/WebHelp)
addWebapp(/vplex,/opt/emc/VPlex/tomcat/webapps/vplex)
SSL protocols enabled for Server: TLSv1.2,TLSv1.3,SSLv2Hello
SSL protocols enabled for Client: TLSv1.2,TLSv1.3
https keystore: /var/log/VPlex/cli/.keystore
started web server on ports {'http': 49880, 'https': 49881}

Configuration of certificates on local cluster completed successfully.
Now, proceed with configuring IPsec on both clusters.

VPlexcli:/>
NOTE:
- If you run this command and receive an error about certificates already existing, then re-try the commands in Step 2 of this section to delete the existing certificates.
- If this is a VPLEX Local configuration, then this concludes the entire procedure and you are finished. You do not need to complete Section-D and Section-E for configuring the IPsec/VPN Tunnel.
- If this is a VPLEX Metro configuration, then you must follow the same steps again from Section-A, Section-B, and Section-C again for configuring the web host certificates on the peer remote cluster before you can proceed to Section-D and Section-E for configuring the IPsec/VPN Tunnel.
Section-D: Reconfiguring the IPsec/VPN Tunnel Between Both Cluster's Management Servers (applicable only to Metro Configs, skip if Local Config)
Once the custom-signed web host certificates have been imported and configured on both VPLEX clusters (cluster-1 and cluster-2) you will also need to re-configure the VPN Host Certificate and CA certificates that are used for establishing the private VPN tunnel that is used for internal communications between each cluster's management-server. Without configuring these certificates you may observe communication errors where the clusters cannot talk to each other through the private IP addresses and if Cluster-Witness is installed, it may not work.
NOTE: This section should only be performed on VPLEX Metro Configs. Skip this section if this is a VPLEX Local Config.
- Run the below command to re-configure the IPsec / VPN Tunnel for VPLEX starting with cluster-1 first, then cluster-2:
security ipsec-configure -i <IP_ADDRESS_OF_REMOTE_MANAGEMENT_SERVER>
Example output for configuring IPsec on Cluster-1:
VPlexcli:/> security ipsec-configure -i xxx.xxx.xxx.xxx

Enter the passphrase for the host certificate that was created on this server (at least 8 characters) :

Re-enter the passphrase for the Certificate Key:
IPSec configuration completed successfully

VPlexcli:/>
Example output for configuring IPsec on Cluster-2:
VPlexcli:/> security ipsec-configure -i xxx.xxx.xxx.xxx

Enter the passphrase for the host certificate that was created on this server (at least 8 characters) :

Re-enter the passphrase for the Certificate Key:
IPSec configuration completed successfully

VPlexcli:/>
- Run the VPlexcli command
vpn status on each clusterto ensure that the VPN is up and running. If it is not running, then run the VPlexcli commandvpn startto start the VPN/IPSec services.
Confirm the following is seen from vpn status output under the section "Verifying VPN status between the management servers":
- The status of IPsec is UP
- The remote management server IP address is reachable
- The remote gateway IP address is reachable
Example output:
VPlexcli:/> vpn status
Verifying the VPN status between the management servers...
IPSEC is not UP
Remote Management Server at IP Address xxx.xxx.xxx.xxx is not reachable

Verifying the VPN status between the management server and the cluster witness server...
IPSEC is not UP
Cluster Witness Server at IP Address 128.221.254.3 is not reachable

VPlexcli:/> vpn start
VPN has been started.

VPlexcli:/> vpn status
Verifying the VPN status between the management servers...
IPSEC is UP
Remote Management Server at IP Address xxx.xxx.xxx.xxx is reachable
Remote Internal Gateway addresses are reachable

Verifying the VPN status between the management server and the cluster witness server...
IPSEC is not UP
Cluster Witness Server at IP Address 128.221.254.3 is reachable
Section-E: Reconfiguring the IPsec/VPN Tunnel for Cluster-Witness (applicable only to Metro Configs which have Cluster-Witness installed, skip if Local Config)
Once the IPsec/VPN tunnel has been established for the clusters, you will also need to do the same for Cluster-Witness in order for the management-servers to be able to communicate to Cluster-Witness and vice versa. Without configuring these certificates on Cluster-Witness you may observe communication errors where the clusters cannot communicate to/from Cluster-Witness and it may fail to provide guidance during a site outage. If Cluster-Witness is not installed, please skip this step.
NOTE: This section should only be performed on VPLEX Metro Configs in which Cluster-Witness has been installed/configured. Skip this section if this is a VPLEX Local Config and/or Witness is not installed.
- To find the public IP address of Cluster-Witness, run the following VPlexcli command
ll cluster-witnesswhich should show these details.
Example output:
VPlexcli:/> ll /cluster-witness/

/cluster-witness:
Attributes:
Name                Value
------------------  -------------
admin-state         unknown
private-ip-address  128.221.254.3
public-ip-address   xxx.xxx.xxx.xxx <<< Cluster-Witness public IP
- SSH to the public IP address of Cluster-Witness. You should not be prompted for a password.
Example output:
  service@ManagementServer:~> ssh xxx.xxx.xxx.xxx
  Warning: Permanently added 'xxx.xxx.xxx.xxx' (ECDSA) to the list of known hosts.
  Last login: Wed Aug 28 15:33:14 2016 from xxx.xxx.xxx.xxx
  service@cluster-witness:~>
- While still logged into the Cluster-Witness, check the hostkey passphrase that is currently configured. The Cluster-Witness hostkey passphrase may be different than the management-servers.
Check the existing passphrase by using the cat command:cat /etc/ipsec.secrets
Example output:
service@cluster-witness:~> cat /etc/ipsec.secrets
#
# ipsec.secrets
#
# This file holds the RSA private keys or the PSK preshared secrets for
# the IKE/IPsec authentication. See the ipsec.secrets(5) manual page.
#
: RSA hostKey.pem "strongswan"
Note: Keep note of this passphrase value within the quotes as you will need it when running step 5 of this section.
- While still logged into the Cluster-Witness, remove the existing certificate files by running the command
rm /etc/ipsec.d/*/*pem*from the Linux prompt to delete all the certificate files at once. Afterwards you can run the commandll /etc/ipsec.d/*/*pem*to verify that there are no longer any existing certificate files.
Example of removing existing certificates using single command:
## list the existing certificates
service@cluster-witness:~> ll /etc/ipsec.d/*/*pem
-rw-r--r-- 1 service users 1684 Aug 27 17:59 /etc/ipsec.d/cacerts/strongswanCert.pem
-rw-r--r-- 1 service users 4633 Aug 27 17:59 /etc/ipsec.d/certs/hostCert.pem
-rw-r--r-- 1 service users 1854 Aug 27 17:59 /etc/ipsec.d/private/hostKey.pem

## remove the existing certificate files
service@cluster-witness:~> rm /etc/ipsec.d/*/*pem

## list the existing certificates (this should indicate that files do not exist)
service@cluster-witness:~/> ll /etc/ipsec.d/*/*pem*
ls: cannot access '/etc/ipsec.d/*/*pem*': No such file or directory
- Log out of the Cluster-Witness by typing exit and then run the following VPlexcli command on both clusters (cluster-1 first and then cluster-2 afterwards):
Run on cluster-1 first until completion:VPlexcli:/> configuration cw-vpn-configure -i <CLUSTER_WITNESS_PUBLIC_IP> --force
Afterwards run on cluster-2 until completion:VPlexcli:/> configuration cw-vpn-configure -i <CLUSTER_WITNESS_PUBLIC_IP> --force
NOTE: Make sure to be aware of the prompts for passphrases. You will be asked for the management-server passphrase as well as the cluster-witness passphrase. These may be different. Entering incorrect values may lead to VPN not establishing.
Example output from running on cluster-1:
VPlexcli:/> configuration cw-vpn-configure -i xxx.xxx.xxx.xxx
The IP Management network for the Cluster Witness Server must use physically separate networking equipment from the inter-cluster networks
used by the VPLEX clusters.

CAUTION: Failure to meet this requirement makes the VPLEX Witness solution ineffective and reduces the resiliency of the VPLEX system.

Have you read and do you acknowledge that the network requirements have been met? (Y/N):                                         y

Enter the passphrase to create the Cluster Witness Server Host Certificate Key (at least 8 characters):

Re-enter the passphrase for the Certificate Key:
New Host certificate request /etc/ipsec.d/reqs/cwsHostCertReq.pem created

New Host certificate /etc/ipsec.d/certs/cwsHostCert.pem created and signed by the CA Certificate /etc/ipsec.d/cacerts/strongswanCert.pem


Please enter the IP address of the remote cluster management server that will be included in the 3-way VPN setup: xxx.xxx.xxx.xxx
Verifying the VPN status between the management servers...
IPSEC is UP
Remote Management Server at IP Address xxx.xxx.xxx.xxx is reachable
Remote Internal Gateway addresses are reachable

Verifying the VPN status between the management server and the cluster witness server...
IPSEC is not UP
Cluster Witness Server at IP Address 128.221.254.3 is not reachable

Verifying the VPN status between the management server and the cluster witness server...
IPSEC is not UP
Cluster Witness Server at IP Address 128.221.254.3 is not reachable

Verifying the VPN status between the management server and the cluster witness server...
IPSEC is UP
Cluster Witness Server at IP Address 128.221.254.3 is reachable

Verifying the VPN status between the management servers...
IPSEC is UP
Remote Management Server at IP Address xxx.xxx.xxx.xxx is reachable
Remote Internal Gateway addresses are reachable

Cluster Witness Server credentials updated successfully

VPlexcli:/>
Example output from running on cluster-2:
VPlexcli:/> configuration cw-vpn-configure -i xxx.xxx.xxx.xxx
The IP Management network for the Cluster Witness Server must use physically separate networking equipment from the inter-cluster networks
used by the VPLEX clusters.

CAUTION: Failure to meet this requirement makes the VPLEX Witness solution ineffective and reduces the resiliency of the VPLEX system.

Have you read and do you acknowledge that the network requirements have been met? (Y/N):                                         y

Enter the passphrase to create the Cluster Witness Server Host Certificate Key (at least 8 characters):

Re-enter the passphrase for the Certificate Key:
New Host certificate request /etc/ipsec.d/reqs/cwsHostCertReq.pem created

New Host certificate /etc/ipsec.d/certs/cwsHostCert.pem created and signed by the CA Certificate /etc/ipsec.d/cacerts/strongswanCert.pem


Please enter the IP address of the remote cluster management server that will be included in the 3-way VPN setup: xxx.xxx.xxx.xxx
Verifying the VPN status between the management servers...
IPSEC is UP
Remote Management Server at IP Address xxx.xxx.xxx.xxx is reachable
Remote Internal Gateway addresses are reachable

Verifying the VPN status between the management server and the cluster witness server...
IPSEC is not UP
Cluster Witness Server at IP Address 128.221.254.3 is not reachable

Verifying the VPN status between the management server and the cluster witness server...
IPSEC is not UP
Cluster Witness Server at IP Address 128.221.254.3 is not reachable

Verifying the VPN status between the management server and the cluster witness server...
IPSEC is UP
Cluster Witness Server at IP Address 128.221.254.3 is reachable

Verifying the VPN status between the management servers...
IPSEC is UP
Remote Management Server at IP Address xxx.xxx.xxx.xxx is reachable
Remote Internal Gateway addresses are reachable

Cluster Witness Server credentials updated successfully

VPlexcli:/>
- Run the VPlexcli command vpn status on both clusters and confirm the VPN is fully established. Confirm the following is seen for both sections "between the management servers" and "between management server and the cluster witness server":
- The status of IPsec is UP
- The remote management server IP address is reachable
- The remote gateway IP address is reachable
- Cluster-Witness is reachable
Example output:
VPlexcli:/> vpn status
Verifying the VPN status between the management servers...
IPSEC is UP
Remote Management Server at IP Address xxx.xxx.xxx.xxx is reachable
Remote Internal Gateway addresses are reachable

Verifying the VPN status between the management server and the cluster witness server...
IPSEC is UP
Cluster Witness Server at IP Address 128.221.254.3 is reachable
- Run the VPlexcli command
ll cluster-witnessto confirm that the context exists on both clusters. If the Cluster-WItness context does not exist, you must run VPlexcli commandcluster-witness configurefirst in order to populate the context.
Example output:
VPlexcli:/> ll cluster-witness
ls:  No context found for 'cluster-witness'

VPlexcli:/> cluster-witness enable

VPlexcli:/> ll cluster-witness

/cluster-witness:

Attributes:
Name                Value
------------------  -------------
admin-state         enabled
private-ip-address  128.221.254.3
public-ip-address   xxx.xxx.xxx.xxx


Contexts:
Name        Description
----------  --------------------------
components  Cluster Witness Components
- If Cluster-Witness is disabled you must enable it by using VPlexcli command
cluster-witness enableand then you can re-run theVPlexclicommandll cluster-witnessagain to check the state.
Example output:
VPlexcli:/> ll cluster-witness

/cluster-witness:

Attributes:
Name                Value
------------------  -------------
admin-state         disabled
private-ip-address  128.221.254.3
public-ip-address   xxx.xxx.xxx.xxx


Contexts:
Name        Description
----------  --------------------------
components  Cluster Witness Components

VPlexcli:/> cluster-witness enable
VPlexcli:/> ll cluster-witness

/cluster-witness:

Attributes:
Name                Value
------------------  -------------
admin-state         enabled
private-ip-address  128.221.254.3
public-ip-address   xxx.xxx.xxx.xxx


Contexts:
Name        Description
----------  --------------------------
components  Cluster Witness Components
- If the VPN is still not established after following these steps above, please contact Customer Support and mention this article number.
Additional Information
Additional Information Regarding Certificates and Troubleshooting Tips
How to Validate the Certificate Chain Using Openssl Commands:
All certificates will contain an "issuer" and a "subject." The "issuer" of the certificate should be the Certificate Authority (CA) which issues and signs the certificate. The "subject" of the certificate is the entity (typically a website or organization) for which the certificate is issued. In summary, the issuer validates and signs the certificate while the subject contains information that identifies authenticity of the entity. Together, the issuer and subject help establish a secure and trusted connection for the end-user.
Example:
For the following examples, suppose we have a root CA file called "vendor_rootCA.cer" which has signed an intermediate certificate called "vendor_intermediate.cer" and that these two files were provided back from the vendor and were combined into a single file called "vendor_cacert.cer" which was used to sign the CSR called "VPlexWebHostServer.csr" from the VPLEX in order to receive back the certificate called "vendor_signed.cer" which we are attempting to use on the VPLEX.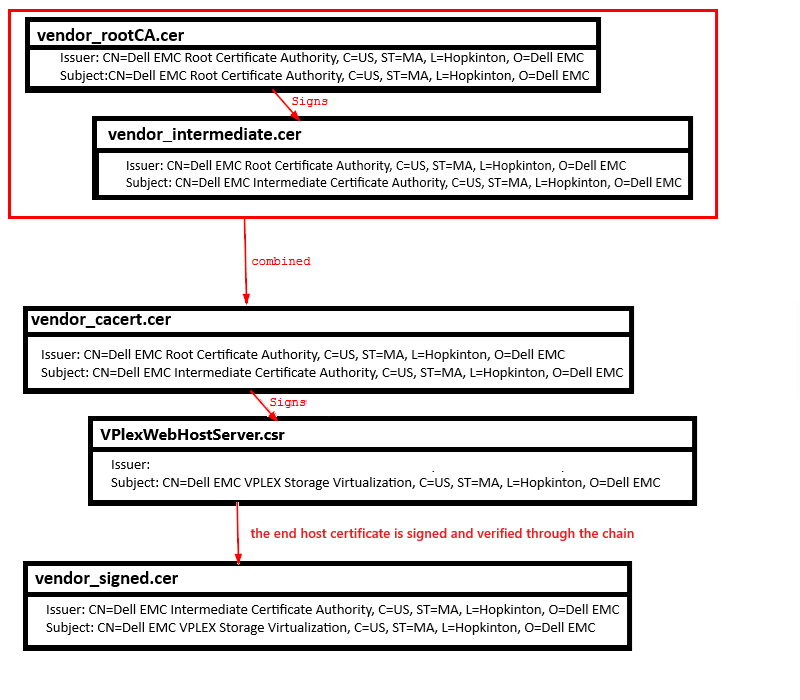
Using the openssl x509 command to verify the certificate issuer and subject details:
The Linux command openssl x509 can be used to verify the certificate details such as "issuer" and "subject" in the following manner:
openssl x509 -noout -text -in <CERTIFICATE_NAME> | grep "Issuer\|Subject:"
Where:
-noout flag requests for "no output: and instructs openssl to not output the certificate information by default. This can be useful in cases where you only want to perform a specific action without displaying the certificate details.
-text flag is used to display the human-readable text representation of the X.509 certificate. This includes the certificates subject, issuer, validity period, etc.
-in flag is used to input the certificate that we are providing for openssl to read and provide details about.
<CERTIFICATE_NAME> is the actual certificate filename that we are inspecting, whether that be the signed certificate, the intermediateCA, or the rootCA.
Example:
service@ManagementServer:~> openssl x509 -noout -text -in vendor_signed.cer | grep "Issuer\|Subject:"
        Issuer: CN=Dell EMC Intermediate Certificate Authority, C=US, ST=MA, L=Hopkinton, O=Dell EMC
        Subject: CN=Dell EMC VPLEX Storage Virtualization, C=US, ST=MA, L=Hopkinton, O=Dell EMC

service@ManagementServer:~> openssl x509 -noout -text -in vendor_intermediateCA.cer | grep "Issuer\|Subject:"
        Issuer: CN=Dell EMC Root Certificate Authority, C=US, ST=MA, L=Hopkinton, O=Dell EMC
        Subject: CN=Dell EMC Intermediate Certificate Authority, C=US, ST=MA, L=Hopkinton, O=Dell EMC

service@ManagementServer:~> openssl x509 -noout -text -in vendor_rootCA.cer | grep "Issuer\|Subject:"
        Issuer: CN=Dell EMC Root Certificate Authority, C=US, ST=MA, L=Hopkinton, O=Dell EMC
        Subject: CN=Dell EMC Root Certificate Authority, C=US, ST=MA, L=Hopkinton, O=Dell EMC
When we look at the issuer of the vendor_signed.cer we can see that it has its own subject, but that its issuer is the IntermediateCA which signed it. When we look at the same for the vendor_intermediate.cer we can see that it has its own subject, but that its issuer is the rootCA which signed it. Lastly, when we look at the subject and issuer of the vendor_rootCA.cer we see that it contains the same information for both issuer and subject, which means that this certificate has signed itself. By comparing issuer and subject each certificate, we can navigate through the trust-chain.
Using the openssl verify command to verify the trust chain between two certificates:
The Linux command openssl verify can be used to validate the trust-chain between two certificates in the following manner:
openssl verify -CAfile <CA_FILE> <CERT_TO_COMPARE>
Where:
-CAfile flag is used to input the CA file that we are using for comparison. This should be the certificate file that was used for signing.
<CA_FILE> is the actual filename of the CA that we are inputting for openssl to use.
<CERT_TO_COMPARE> is the actual filename of the certificate that we are checking against the CAfile.
When we are comparing the vendor_signed.cer with the vendor_rootCA.cer
service@ManagementServer:~> openssl verify -CAfile vendor_rootCA.cer vendor_signed.cer
node.crt: /CN=Dell EMC VPLEX Storage Virtualization/C=US/ST=MA/L=Hopkinton/O=Dell EMC
error 20 at 0 depth lookup: unable to get local issuer certificate
This failure "error 20 at 0 depth" means that CA was unable to be verified with the provided chain. Since vendor_signed.cer was signed by the vendor_cacert.cer and not vendor_rootCA.cer, it fails to authenticate the chain successfully.
When we are comparing the vendor_signed.cer with the vendor_intermediateCA.cer
service@ManagementServer:~> openssl verify -CAfile vendor_intermediate.cer vendor_signed.cer
node.crt: /CN=Dell EMC Intermediate CA/C=US/ST=MA/L=Hopkinton/O=Dell EMC
error 2 at 1 depth lookup: unable to get issuer certificate
This failure "error 2 at 1 depth" means that vendor_signed.cer was able to verify with the vendor_intermediate.cer file, however, vendor_intermedate.cer was unable to be verified with its issuer, vendor_rootCA.cer (the root certificate).
When we are comparing the vendor_signed.cer with the vendor_cacert.cer
service@ManagementServer:~> openssl verify -CAfile vendor_cacert.cer vendor_signed.cer
node.crt: OK
This OK means that the trust-chain was able to be verified successfully all the way through. This means that vendor_signed.cer was able to verify with the intermediate certificate (vendor_intermediate.cer) and also that the intermediate content information was able to verify with the rootCA (vendor_rootCA.cer). The reasoning behind this is because the file vendor_cacert.cer contains both intermediate and rootCA certificate.
For more information regarding the different types of errors that can be seen using "openssl verify" command, please see the man page using the link below.
https://www.openssl.org/docs/man1.0.2/man1/openssl-verify.html#DIAGNOSTICS
How to Verify and Validate the EKU (Extended Key Usage) Parameters/Settings Are Present and Correct:
Information regarding certificates can be viewed using the same Linux command that has been used in the above sections for verifying subject/issuer for a certificate, except that we will not be greping for that information but reading the entire certificate file instead. If the certificate contains the lines "X509v3 Extended Key Usage:", then this means that EKU is being used and should reflect one of the appropriate use cases.
service@management-server> openssl x509 -noout -text -in VPlexWebHost1234Signed.cer
Certificate:
    Data:
        Version: 3 (0x2)
        Serial Number:
            1e:00:00:00:bf:17:c5:d0:c9:57:dd:0e:f5:00:01:00:00:00:be
        Signature Algorithm: sha256WithRSAEncryption
        Issuer: CN=Dell EMC Intermediate Certificate Authority, C=US, ST=MA, L=Hopkinton, O=Dell EMC
        Validity
            Not Before: Dec  8 02:31:26 2025 GMT
            Not After : Dec  8 02:11:26 2026 GMT
        Subject: C = US, ST = MA, L = Hopkinton, O = Dell EMC, OU = VPlexMetroNode Support, CN = VPLEX Lab 1234, emailAddress = dell@dell.com
        Subject Public Key Info:
            Public Key Algorithm: rsaEncryption
                RSA Public-Key: (2048 bit)
                Modulus:
                    00:c5:36:03:23:cf:74:fa:72:b1:62:93:26:79:05:
                    2d:42:ce:d5:f7:42:5f:73:0d:02:75:dc:76:34:ab:
                    06:02:eb:54:21:dc:a4:85:1f:c5:9f:d1:8a:92:b2:
                    a2:f6:80:25:36:00:04:d1:6f:d9:9f:cf:be:a7:3d:
                    92:1a:79:21:2a:8e:6e:36:a9:fd:4d:53:72:84:b2:
                    93:12:d1:93:3d:44:94:65:94:66:5b:8a:d1:ec:11:
                    8a:2e:dc:22:6d:a0:a6:f2:f6:8a:09:7a:b1:88:30:
                    4c:d0:16:e1:c3:d5:6c:be:26:90:cf:3e:0c:06:1c:
                    b6:41:74:57:8e:51:c2:d1:aa:23:b7:0f:6e:42:d3:
                    ee:2c:8c:56:1b:e1:97:44:01:73:4c:2a:4f:01:15:
                    24:83:26:92:5b:9f:41:b7:58:ac:10:9d:d8:b9:6b:
                    f6:46:9a:59:5e:45:2b:4a:f9:d9:eb:75:3e:8d:ef:
                    d1:c3:91:60:93:3d:9f:d6:7a:81:5f:29:d9:a4:74:
                    5a:a3:20:49:5f:e5:b5:28:c1:1c:8d:37:79:3e:fe:
                    4d:53:93:6e:99:bc:58:30:96:20:4a:3c:c4:4e:20:
                    ee:f7:81:50:b2:17:3a:0a:dc:cc:5e:81:7c:ba:fa:
                    f2:9c:2b:d5:1c:49:e8:7c:96:ce:7f:11:14:3a:60:
                    db:e9
                Exponent: 65537 (0x10001)
        X509v3 extensions:
            X509v3 Subject Alternative Name:
                DNS:vplex1234.example.vplexlab.com, IP Address:xxx.xxx.xxx.xxx
            X509v3 Subject Key Identifier:
                EA:E9:49:EF:3C:7A:A3:AA:6C:06:CF:88:3F:ED:81:67:14:BE:F8:BC
            X509v3 Authority Key Identifier:
                keyid:0C:84:18:CB:13:D0:EF:73:5D:81:2B:06:67:04:05:25:2B:DE:BC:14
            X509v3 Key Usage:
                Digital Signature, Key Encipherment
            1.3.6.1.4.1.311.21.7:
                0/.'+.....7.....8...M...........T.g.......L..d..I
            X509v3 Extended Key Usage:
                TLS Web Server Authentication, TLS Web Client Authentication
As per the official man page docs for openssl command, the EKU should indicate for what purpose the certificate public key can be used for. In our particular case here, this signed web host server certificate should contain clientAuth or SSL/TLS WWW Client Authentication and possibly serverAuth SSL/TLS WWW Server Authentication
Extended Key Usage
This extension consists of a list of values indicating purposes for which the certificate public key can be used. Each value can be either a short text name or an OID. The following text names, and their intended meaning, are known:
Value                  Meaning according to RFC 5280 etc.
-----                  ----------------------------------
serverAuth             SSL/TLS WWW Server Authentication
clientAuth             SSL/TLS WWW Client Authentication
codeSigning            Code Signing
emailProtection        E-mail Protection (S/MIME)
timeStamping           Trusted Timestamping
OCSPSigning            OCSP Signing
ipsecIKE               ipsec Internet Key Exchange
msCodeInd              Microsoft Individual Code Signing (authenticode)
msCodeCom              Microsoft Commercial Code Signing (authenticode)
msCTLSign              Microsoft Trust List Signing
msEFS                  Microsoft Encrypted File System
Videos
Affected Products
VPLEX SeriesProducts
VPLEX SeriesArticle Properties
Article Number: 000157813
Article Type: How To
Last Modified: 28 Oct 2025
Version: 5
Find answers to your questions from other Dell users
Support Services
Check if your device is covered by Support Services.