How to Enable Secure Boot on Dell Devices for Windows 11
Summary: Learn how to enable Secure Boot and boot in secure mode on your Dell device. This guide covers UEFI secure boot, how to check if secure boot is enabled in the BIOS, and how to turn on secure boot for Windows 10 and 11. ...
This article applies to
This article does not apply to
This article is not tied to any specific product.
Not all product versions are identified in this article.
Instructions
What is Secure Boot?
Secure Boot protects the boot process against security attacks from malicious code like malware and ransomware. Secure Boot is firmware-dependent and requires that the computer BIOS is set to UEFI mode.
How To Enable Secure Boot
Duration: 01:55
When available, closed caption (subtitles) language settings can be chosen using the Settings or CC icon on this video player.
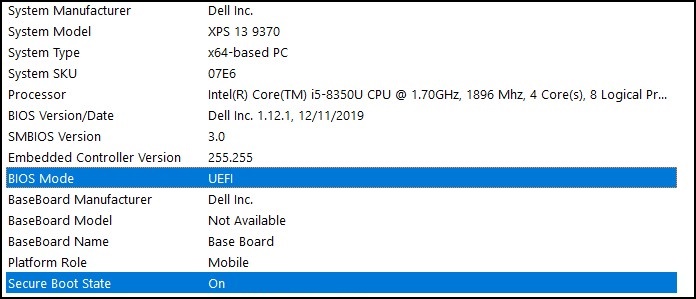
How to Verify that Secure Boot is Enabled.
- Click the Windows Button to the bottom left of the screen or press the Windows Key.
- In the Search Bar, type:
msinfo32 - Press Enter.
- When the System Information opens, and System Summary should be selected by default.
- On the right side of this screen, look for BIOS Mode and Secure Boot State.
- If Secure Boot is enabled, the BIOS Mode shows "UEFI," and Secure Boot state shows "On."
If the BIOS Mode shows "Legacy" in the Boot setting in the computer BIOS, it must be switched from Legacy to UEFI mode.
Verify that your computer was tested for the upgrade to Windows 11 before you continue as older computers may not meet the Windows 11 system requirements.
Dell computers tested for upgrade to Windows 11
Note: Switching the Boot Mode from Legacy to UEFI makes the current Windows installation unbootable and requires the reinstallation of Windows. Ensure to backup your personal data before you proceed with this action.
Note: Dell BIOS Screens may vary by computer model. Below is a general example of how to switch to UEFI mode and Enabling Secure Boot.
Switching from Legacy to UEFI Mode
- Boot your computer.
- Tap the F2 key when the Dell logo appears to enter the BIOS.
- Once you enter the BIOS, look for the Boot or Boot Sequence option.
- A Boot List option should be shown.
- Change the option from Legacy to UEFI.
- Select Apply or Save and Exit, depending on your computer.
Enabling Secure Boot
- Boot your computer.
- Tap the F2 key when the Dell logo appears to enter the BIOS.
- Once you enter the BIOS, look for the Secure Boot option.
- Change Secure Boot to Enabled.
- Select Apply or Save and Exit, depending on your computer.
The computer will restart and boot back to the Windows desktop.
For more information about the BIOS, review the System Manual for your computer under Support Resources.
Affected Products
Alienware, Dell All-in-One, Dell Pro All-in-One, Dell Pro Max Micro, Dell Pro Max Slim, Dell Pro Max Tower, Dell Pro Micro, Dell Pro Slim, Dell Pro Tower, Dell Slim, Dell Tower, Inspiron, OptiPlex, Vostro, XPS, G Series, G Series, Alienware
, Dell Plus, Dell Pro, Dell Pro Max, Dell Pro Plus, Dell Pro Premium, Inspiron, Latitude, Dell Pro Rugged, Vostro, XPS, Fixed Workstations, Mobile Workstations, Dell Pro Max Micro XE FCM2250, Dell Pro Max Slim XE FCS1250, Dell Pro Max Tower T2 XE FCT2250, Dell Pro Max 16 XE MC16250, Dell Pro Micro Plus XE QBM1250, Dell Pro Slim Plus XE5 QBS1250, Dell Pro Tower Plus XE5 QBT1250
...
Article Properties
Article Number: 000190116
Article Type: How To
Last Modified: 30 May 2025
Version: 10
Find answers to your questions from other Dell users
Support Services
Check if your device is covered by Support Services.