Multiple Deployed Instances of Dell Security Management Server Virtual May Receive the Same IP Address
Summary: Deploying multiple v10.2.14 to 11.1.1 Dell Security Management Server instances that obtain an IP address with DHCP results in duplicate IP addresses being assigned.
This article applies to
This article does not apply to
This article is not tied to any specific product.
Not all product versions are identified in this article.
Symptoms
Affected Product:
- Dell Security Management Server
Affected Versions:
- v10.2.14 to 11.1.1
Affected Operating System:
- Ubuntu 18.04
The same IP address is assigned to each instance, when deploying multiple instances of Dell Security Management Server Virtual with a single OVA version, within a single DHCP domain.
Cause
This issue is the result of the Dell Security Management Server Virtual upgrade to Ubuntu 18.04 and the change to network management using Netplan. By default, Netplan sends a randomly generated machine ID instead of the device’s MAC address when requesting an IP address from the DHCP server. This machine ID is already set in the Device Management Server Virtual OVA. This results in a nonunique machine ID when multiple Dell Security Management Server devices are deployed.
Resolution
To avoid this issue, update the Machine ID using the following steps.
- Before changing the Dell Security Management Server Virtual device, take a backup and offload it from the server or take a snapshot of the VM.
Note: For more information about creating and offloading a backup, reference How to Backup and Restore Dell Security Management Server Virtual / Dell Data Protection Virtual Edition.
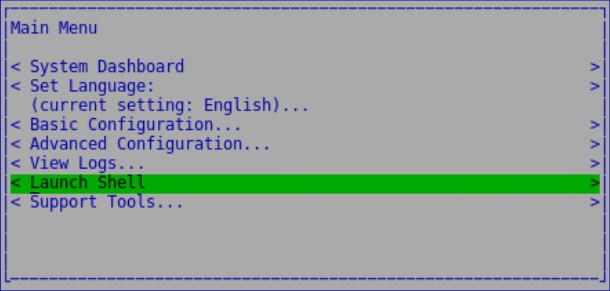
- From the Dell Security Management Server Virtual Console Main Menu, select Launch Shell and then press Enter.
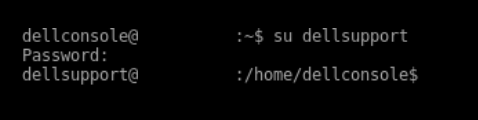
- Type
su dellsupportand then press Enter.

- Type the password for
dellsupportand then press Enter.
 Note:
Note:- The default credentials for Dell Security Management Server Virtual are:
- Username:
dellsupport - Password:
dellsupport
- Username:
- An administrator can change the default password within the product’s virtual appliance menu.
- The default credentials for Dell Security Management Server Virtual are:
- Type the command
cat /etc/machine-idand then press Enter to check the current machine ID.

- Type the command
sudo rm /etc/machine-idand then press Enter to remove the current machine ID.

- Type the command
sudo systemd-machine-id-setupand then press Enter to generate a new machine ID.

- Type the command
sudo netplan applyand then press Enter to apply the new machine ID.

- Type the command
cat /etc/machine-idand then press Enter to validate the new machine ID.

To contact support, reference Dell Data Security International Support Phone Numbers.
Go to TechDirect to generate a technical support request online.
For additional insights and resources, join the Dell Security Community Forum.
Affected Products
Dell EncryptionArticle Properties
Article Number: 000191828
Article Type: Solution
Last Modified: 19 Sep 2024
Version: 6
Find answers to your questions from other Dell users
Support Services
Check if your device is covered by Support Services.