Setup PXE Boot on OptiPlex 3000 Thin Client Efficiently
Summary: Configure PXE booting on your OptiPlex 3000 Thin Client using this BIOS setup guide. Enable PXE boot over IPv4 and IPv6 networks efficiently and streamline your boot process.
This article applies to
This article does not apply to
This article is not tied to any specific product.
Not all product versions are identified in this article.
Instructions
Affected Platforms:
- OptiPlex 3000 Thin Client
The OptiPlex 3000 Thin Client supports PXE booting over IPv4 or IPv6 networks but some BIOS setting changes are required to make this possible. The following settings are relevant to enabling the PXE boot process.
- Press F2 on the Dell logo to access the BIOS.
- Enter the Admin password to allow editing.
- Go to Connection settings
- Select the
EnabledwithPXEoption

Figure 1: (English Only) Select the Connection menu option and EnabledwithPXE
- Save these setting changes.
- Go to the Boot Configuration settings.
- Move the
ONBOARDNIC (IPV4/IPV6)to the top of the Boot Sequence.
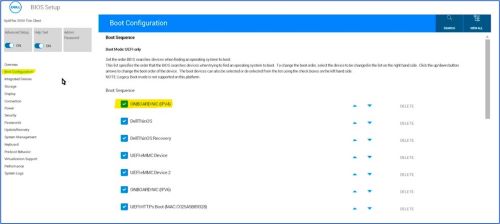
Figure 2: (English Only) Move ONBOARDNIC (IPV4/IPV6) to top of Boot Sequence
- Go to the Security settings
- Select Always Except Internal HDD&PXE (scroll to the bottom of the section)
- Save the BIOS changes and reboot.

Figure 3: On the Security screen, select Always Except internal hdd&PXE
The device will attempt to PXE boot on the next boot.
Note: The OptiPlex 3000 Thin Client only supports UEFI boot mode.
Affected Products
OptiPlex 3000 Thin ClientArticle Properties
Article Number: 000224674
Article Type: How To
Last Modified: 10 Jun 2024
Version: 2
Find answers to your questions from other Dell users
Support Services
Check if your device is covered by Support Services.