Data Domain: How to configure, update and reset SupportAssist/ESE
Summary: Dell Support can access the customer's system (if remote support access is enabled)
This article applies to
This article does not apply to
This article is not tied to any specific product.
Not all product versions are identified in this article.
Instructions
Configure SupportAssist/ESE.
Configure SupportAssist as a support channel to transfer telemetry files securely and to receive remote assistance from the Dell Support team.
Prerequisites
Data Domain serial number or software instance number of Dell APEX Protection Storage for generating the access key.
How to Configure SupportAssist for Dell Data Domain | Secure Telemetry & Remote Support
Duration: 00:05:55 (hh:mm:ss)
When available, closed caption (subtitles) language settings can be chosen using the CC icon on this video player.
You can also watch this video on YouTube.
About this task
Perform the following steps to configure SupportAssist.
Steps
-
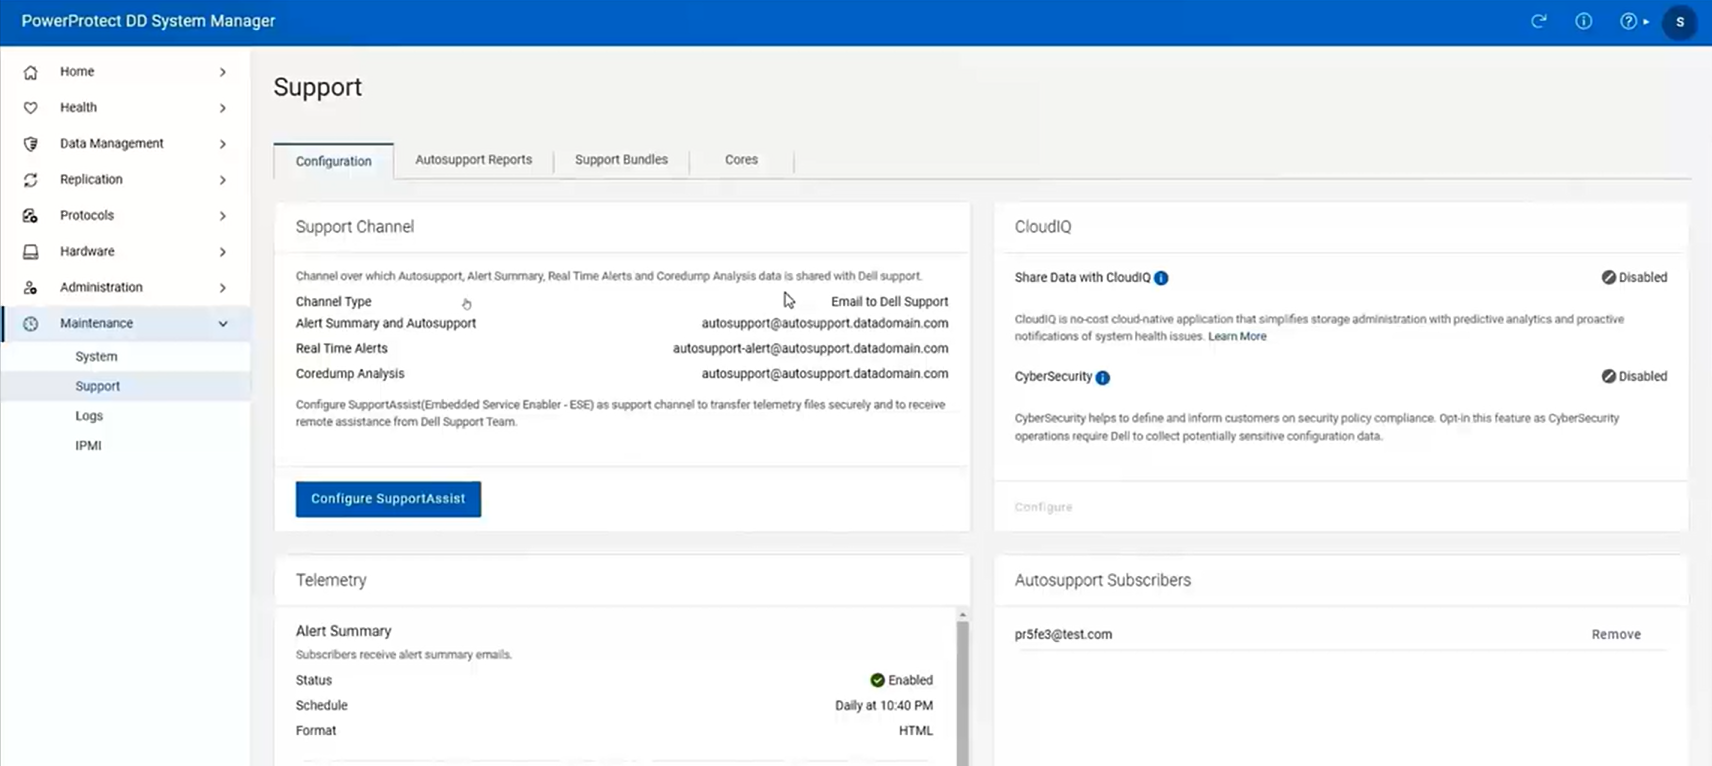
Select Maintenance > Support > Configuration.
-
In the Support Channel pane, click Configure SupportAssist. The Configure SupportAssist dialog is displayed.
-
In the License Agreement pane, review the license agreement and select the Accept checkbox and click Next. The Connection Type pane is displayed.
-
In the Connection Type pane, you can select one of the connection types.
Connect Directly: This connection connects the DD system directly to the Dell server.
Connect using Gateway Server: This connection connects the DD system to Dell Support using SupportAssist gateway server. Ensure that the Gateway server uses the HTTPS protocol.
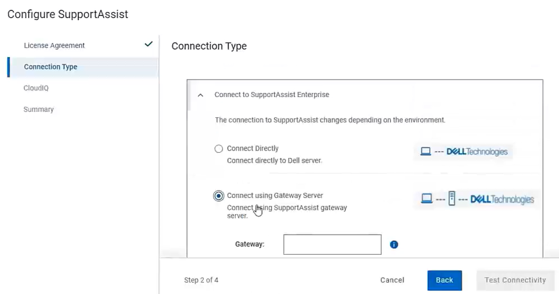
Perform the following steps to set up the gateway server:
- In the Gateway field, enter the server IP address or fully qualified domain name and port number.
- Click Test Connectivity. The server connection is tested for connectivity, and a success message is displayed. You can add up to five gateway servers.
-
After selecting the connection type, select the Remote Support checkbox in case you require remote support assistance for troubleshooting.
-
Click Next.
-
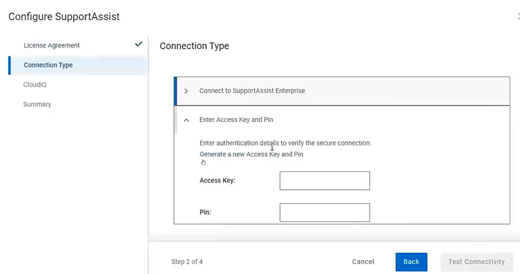
In the Enter Access Key and Pin pane, click Generate a new Access Key and Pin. The Dell Access Key Portal home page is displayed.
Perform the following steps to generate the access key and pin:
-
In the Model drop-down list, select SERIALNUMBER for DD system, and for initial registration of Dell APEX Protection Storage select SOFTWAREINSTANCE.
NOTE: During re-registration of Dell APEX Protection Storage, for Model use SERIALNUMBER, and enter the instance software-id generated during the initial registration as the serial number. -
Enter the corresponding details in the next text field. For example, if you select Model as SERIALNUMBER, the next field is Serial No. where you must enter the serial number.
-
Click Submit.
-
Click Generate New Access Key.
-
In the Enter PIN field, enter a 4-digit PIN. Record the PIN for later use.
-
Click Generate New Access Key. The access key and serial number are displayed.
Perform the following steps in the Enter Access Key and Pin pane:
-
In the Access Key field, enter the generated access key.
-
In the Pin field, enter the pin.
-
Click Next. The CloudIQ pane is displayed.
NOTE: If hardreset is performed on Dell APEX Protect Storage version 8.2 or up, then during registration while generating the access key, you must useconnectemc.iswidvalue present in the system as serial number for the system.
Use the sameconnectemc.iswidvalue if the upgrade to SupportAssist fails. The CloudIQ pane is displayed. -
In the Share Data with CloudIQ field, click Enable.
-
In the CyberSecurity field, click Enable.
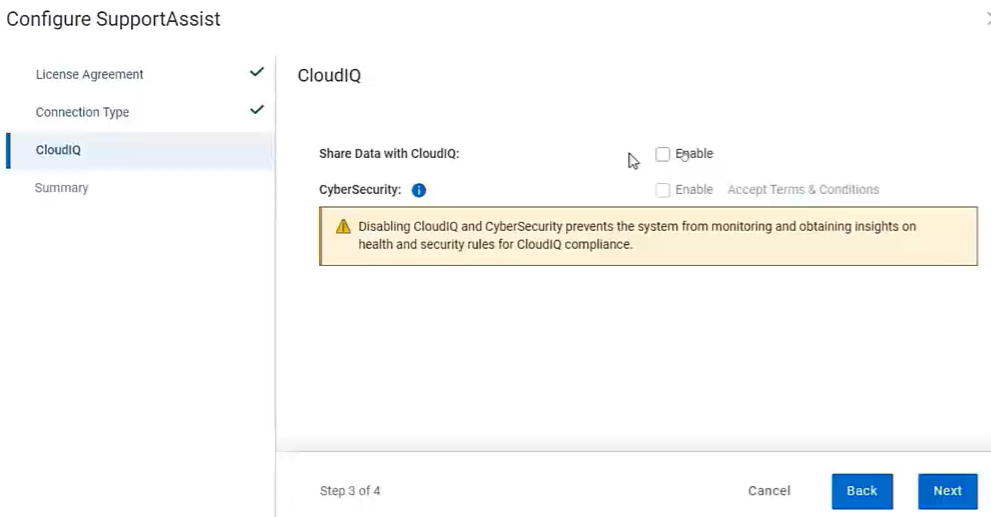 NOTE: You must enable CloudIQ before enabling Cyber-Security. The CyberSecurity Agreement dialog box is displayed.
 -
Review the Cyber-Security agreement and click Accept. Click Next. Then the Summary pane is displayed.
-
Review the configuration details in the summary pane and click Finish. The configuration is successfully completed, and the details are displayed in the Support Channel pane.
Edit or Update the configuration
This section describes the steps to edit the SupportAssist configuration.
About this task
Perform the following steps to modify the connection type for the SupportAssist.
Steps
-
Select Maintenance > Support > Configuration.
-
In the Support Channel pane, click Edit. The Update SupportAssist Configuration dialog box is displayed.
-
In the Connection Type page, edit the connection type. See Configuring connection type for more information.
-
Click Finish. The configuration update is successfully completed, and the details are displayed in the Support Channel pane. Click Next. The Summary page is displayed.
Reset the configuration.
This section describes the steps to reset the support channel configuration.
About this task
Perform the following steps to reset the support channel configuration from SupportAssist to email, and to disable CloudIQ (if configured).
Steps
-
Select Maintenance > Support > Configuration.
-
In the Support Channel pane, click Reset. The Reset Support Channel dialog box is displayed.
-
Click Reset. The Channel Type is reset to Email to Dell Support, and the details are displayed in the Support Channel pane.
Affected Products
Data DomainArticle Properties
Article Number: 000242147
Article Type: How To
Last Modified: 01 Dec 2025
Version: 7
Find answers to your questions from other Dell users
Support Services
Check if your device is covered by Support Services.