Fix Wired, Wireless, and Bluetooth Mouse Not Working Issues
Summary: This article provides advanced troubleshooting steps for Dell and Alienware wired USB, wireless, and Bluetooth mouse issues. Topics include resolving cursor and scroll wheel problems, diagnosing mouse button failures, cleaning your mouse, fixing issues after waking from sleep, recovering a disappeared cursor, isolating USB device conflicts, and running hardware diagnostics. ...
Instructions
BEFORE YOU BEGIN
Prerequisite: Before proceeding with these advanced steps, ensure that you have completed the steps on these pages first:
- Mouse Not Working: USB, Bluetooth, or Wireless Mice
- Mouse Setup Guide: Connect USB, Wireless, and Bluetooth Mouse
Mouse Type Reference
Use the table below to confirm your mouse type before following the mouse-specific steps in this article.
|
Wired USB Mouse |
Wireless Mouse |
Bluetooth Mouse |
|
Connects using a USB cable |
Uses a USB receiver/dongle |
Pairs by Bluetooth radio |
|
No battery required |
Requires AA/AAA battery or integrated rechargeable. |
Requires AA/AAA battery or integrated rechargeable. |
|
No pairing required |
Plug-and-play with USB receiver |
Requires Bluetooth pairing. |
Resolving Cursor and Scroll Wheel Issues
Step 1: Isolate USB Device Conflicts (All Mouse Types)
Conflicts with other connected USB devices can cause the cursor to stop responding or behave erratically. Use the steps below to identify the conflicting device.
- Save all open data and close all programs.
- Shut down the computer completely. Do not use Sleep or Restart.
- Disconnect all nonessential USB devices, including:
- Speakers
- Printers
- Scanners
- USB flash drives and external storage
- External keyboard (if you have a laptop with an integrated keyboard)
- Any other USB peripherals except the mouse being tested
- Turn on the computer and test the cursor movement.
- If the cursor works correctly: reconnect one device at a time, restarting after each, and retest until the cursor problem returns. The last device reconnected is the likely cause.
- If the cursor still does not work: proceed to Step 2.
Step 2: Run Hardware-Level Diagnostics
Option 1: Run a SupportAssist Online Hardware-Level Diagnostics
- Browse to the Dell Support page.
- You are given several options to identify your computer.
Either:
- Select your computer under when it is listed.
- Enter the Service Tag, Dell EMC Product ID, or Model, and then touch or click the Search button, and select your computer or external webcam from the list.
- Select detect this PC automatically (if SupportAssist is not installed you are prompted to do so).
- Select Browse all products: Then select the type of device that you have, the brand name, and then the product model.
NOTE: For more information, refer to the Dell Knowledge Base article, How to Determine the Model Number of Your Dell Computer.
- Select the Diagnostics tab > select Visit Advanced Troubleshooting (you have to scroll to find it) > select Full list of components > select the checkbox next to Mouse under Other Devices > select Continue > select Run Hardware Scan.
- You are asked to perform several tests that determines the functionality of your mouse.
- After performing the test select Done of all the test passed or Fail if one of the test did not work. Your results and repair options are shown.
Option 2: Run the Pre-Boot Hardware-Level Diagnostics (ePSA)
- Restart the computer and press the F12 key once a second when you see the Dell logo.
- Select the Diagnostics tab. The quick test runs and provides results.
- Select ADVANCED TEST > clear the checkbox next to Select all > select the checkbox next to USB DEVICES and Through mode, select RUN TEST, the test is run and the results are shown.
NOTE: When the test fails, record the error code and validation code exactly as shown. Go to Dell SupportAssist Pre-Boot System Performance Check and submit the error for guided repair options.
If no error code is reported, it is likely that the operating system or installed software is preventing the mouse from working. Proceed to Step 3:
Step 3: Use a Restore Point or Reset Windows the Operating System
If hardware diagnostics confirm that the mouse is detected but it still does not work correctly, use a Restore Point to a previous working state or Reset Windows.
Use a System Restore Point
A System Restore point can undo recent changes that may prevent the mouse from working correctly. To access the System Restore point application, perform the following steps:
- Access the Windows Recovery Environment (WinRE) (instructions are located at bottom of the article).
- Select Troubleshoot > Advanced Options > System Restore (Figure 1).
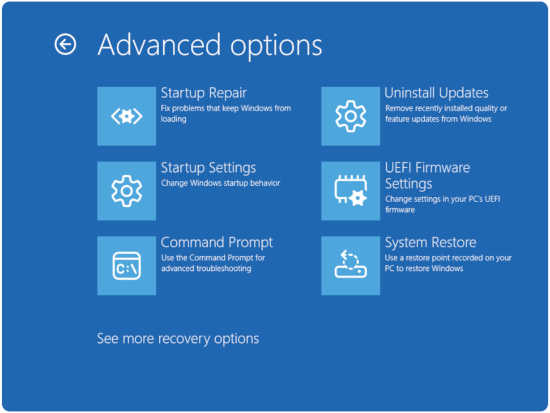
Figure 1: Advanced options - Click Next.
- Select a restore point from before the boot problems started.
NOTE: If no restore points are available, look for the section that most closely matches your issue. If the problem persists, see the Dell Knowledge Base article Factory Reset, Restore, or Reinstall Microsoft Windows on a Dell computer.
- Follow the wizard to complete the restoration
- Test the mouse after the restore completes.
Resolving Mouse Button Issues
If one or more mouse buttons are not clicking, are stuck, or do not respond, use the advanced steps below after completing the basic troubleshooting on the Support Library pages listed above.
Step 1: Check for Physical Obstructions
A physical obstruction is the most common cause of an unresponsive mouse button. Most mouse buttons produce an audible click when pressed fully.
- Visually inspect all buttons for debris, dust, or damage that may prevent them from pressing down fully.
- Gently press each button fully and listen for a click sound.
- If a button feels sticky or does not spring back, clean around the button gap using a can of compressed air.
- If the button is visibly damaged or broken, the mouse requires hardware replacement. Contact Dell Support.
Step 2: Use the Connect Button (Wireless Mice Only)
If the mouse buttons stopped working after the receiver was reinserted, this step may resolve the issue.
- Confirm that you are using the USB receiver that came with the mouse. Using a receiver from a different mouse may cause compatibility issues.
- Locate the Connect button on the USB receiver (usually a small button on the receiver body).
- Locate the Connect button on the underside of the mouse.
- Press the Connect button on the receiver first, then press the Connect button on the mouse within 10 seconds.
- Wait a few seconds for the connection to reestablish, then test the mouse buttons.
Step 3: Update Bluetooth Driver (Bluetooth Mice Only)
Outdated or corrupted Bluetooth drivers can cause mouse buttons to stop responding, even when the cursor still moves.
See Dell Knowledge Base article How to Download and Install Bluetooth Driver for Windows 11 and Windows 10 for instructions.
For complete Bluetooth troubleshooting guidance, see Dell Knowledge Base article Bluetooth Troubleshooting and Usage Guide
Adjusting Pointer Speed
Windows 11:
The pointer speed can be adjusted by right-clicking Start > Settings > Bluetooth & devices > Mouse.
Windows 10:
- Select the Search box on the taskbar and type
main.cpl. - Select main.cpl from the list of results.
- Select the Pointer Options tab.
- Under Select a Pointer Speed, move the slider to the wanted speed.
- Select OK to apply the change.
How to Clean Your Mouse
Dust, oil, and debris on the optical sensor or scroll wheel can cause tracking errors, erratic cursor movement, and scroll wheel failures. Clean the mouse regularly to maintain optimal performance.
MATERIALS NEEDED:
Use isopropyl alcohol (70% or higher) on a cotton swab or lint-free cloth.
Cleaning the Optical Sensor Lens
Wired USB Mouse
- Turn off the computer and unplug the mouse from the USB port.
- Turn the mouse over on its back and locate the optical sensor lens on the bottom.
- If debris is visible, use a can of compressed air to blow it away.
- If the lens has a smudge or residue, lightly clean it with a cotton swab dampened with isopropyl alcohol.
- Allow the lens to dry completely before reconnecting the mouse.
Wireless or Bluetooth Mouse
- Turn off the mouse using the power switch on the underside.
- Remove the batteries (refer to your mouse’s user guide if needed: Manuals.
- Turn the mouse over on its back and locate the optical sensor lens on the bottom.
- If debris is visible, use a can of compressed air to blow it away.
- If the lens has a smudge or residue, lightly clean it with a cotton swab dampened with isopropyl alcohol.
- Allow the lens to dry completely before reinserting the batteries and turning the mouse on.
Cleaning the Scroll Wheel
Wired USB Mouse
- Turn off the computer and unplug the mouse from the USB port.
- Inspect the circumference of the scroll wheel for oily buildup or debris.
- If debris is present, use a can of compressed air to blow it out from around the wheel.
- Wipe the outer surface of the wheel with a cotton swab dampened with isopropyl alcohol to remove oily residue.
- Allow the wheel to dry fully before reconnecting and using the mouse.
Wireless or Bluetooth Mouse
- Turn off the mouse using the power switch on the underside.
- Remove the batteries (refer to your mouse’s user guide if needed: Manuals.
- Inspect the circumference of the scroll wheel for oily buildup or debris.
- If debris is present, use a can of compressed air to blow it out from around the wheel.
- Wipe the outer surface of the wheel with a cotton swab dampened with isopropyl alcohol.
- Allow the wheel to dry fully before reinserting the batteries and turning the mouse on.
Choosing the Right Mouse Surface
An optical mouse determines movement by detecting reflections from the surface below it. A uniform or highly reflective surface (such as glass or a blank white sheet) makes it difficult for the sensor to detect movement. For best results:
- Use a mouse pad with a texture or printed pattern.
- Avoid using the mouse on glass, mirror-like, or monochromatic surfaces.
- If no mouse pad is available, a dark-colored, matte surface such as a laptop cover works well.
Resolving Mouse Issues After Waking from Sleep
If the mouse stops working after the computer resumes from Sleep or Hibernate mode, outdated BIOS firmware or missing Windows updates are common causes. Complete the steps below after performing the basic reseating steps on the Support Library page.
Step 1: Update the BIOS
An outdated BIOS can cause USB and Bluetooth devices to fail to reinitialize after sleep. Updating the BIOS resolves this for many Dell computers.
For complete BIOS update instructions, see Dell Knowledge Base article Dell BIOS and UEFI Update Download and Installation Guide.
Step 2: Install All Pending Windows Updates
Microsoft releases updates that improve hardware driver compatibility and wake-from-sleep behavior. Ensure that all Windows updates are installed.
- Right-clicking Start > Settings > Windows Update.
- Select Check for updates.
- Download and install all available updates, including optional driver updates.
- Restart the computer when prompted.
- Test the mouse after waking from sleep.
Step 3: Adjust Wired and Wireless USB Mouse Power Management (Advanced)
Windows may turn off USB ports to save power during sleep, preventing the mouse from waking properly.
- Open Device Manager (right-click Start > Device Manager)
- Expand Human Interface Devices
- One at a time, right-click each USB Input Device and select Properties
- Navigate to the Power Management tab (if available).
- Clear Allow the computer to turn off this device to save power
- Click OK to save changes
- After changing all the USB Input Device listings, restart the computer and test the mouse after waking from sleep.
Resolving a Disappeared or Missing Cursor
If the mouse cursor disappears entirely from the screen but the mouse hardware appears functional, a corrupted driver is the most likely cause. All steps below use keyboard shortcuts to navigate Windows without a visible cursor.
Step 1: Run SupportAssist to Detect and Repair Issues
- Press the Windows key to open the Start menu.
- Type
SupportAssistand press Enter to open the app. - Press the Tab key repeatedly until Update Software is highlighted (this requires pressing the Tab key several times), and then press Enter.
- Press the Tab key repeatedly until Start is highlighted (this requires pressing the Tab key several times).
- Press the Enter key to start the scan. SupportAssist checks for updated drivers automatically.
- Press the Tab key repeatedly until View updates is highlighted (this requires pressing the Tab key several times), and then press Enter.
- Press the Tab key repeatedly until Install is highlighted (this requires pressing the Tab key several times), and then press Enter.
- Follow any on-screen prompts using Tab and Enter to navigate (after installation you may be given the option to return Back to home).
- Press the Windows key to open the Start menu.
- Press the Tab key repeatedly until the Power Icon is highlighted (this requires pressing the Tab key several times), and then press Enter.
NOTE: While pressing the Tab key, the Power icon may be skipped. Highlight the username instead, then use the right arrow key to move to highlight the Power icon.
- Using the up and down arrows, highlight Restart, and then press Enter.
- After the computer restarts test the cursor.
Step 2: Uninstall and Reinstall the Mouse Driver Using the Keyboard
If SupportAssist does not resolve the issue, manually uninstall the mouse driver using Device Manager. Windows reinstalls the driver automatically on the next startup.
- Press and hold the Windows key, and press the q key, then type
device manager. - Use the Up and Down arrow keys to select Device Manager (Control Panel), then press Enter.
- Press Tab to highlight the device list.
- Use the Down arrow to navigate to Mice and other pointing devices, then press the Right arrow to expand it.
- Use the Down arrow to select the first entry (for example, HID-compliant mouse or Dell Touchpad).
- Press and hold the Shift key, and press the F10 to open the context menu. On some laptops, press Shift + Fn + F10.
- Use the Down arrow to select Uninstall device and press Enter.
- Confirm by pressing Enter when the Uninstall button is highlighted.
- Repeat steps 5–8 for each remaining entry under Mice and other pointing devices.
- Press the Windows key to open the Start menu.
- Press the Tab key repeatedly until the Power Icon is highlighted (this requires pressing the Tab key several times), and then press Enter.
NOTE: While pressing the Tab key, the Power icon may be skipped. Highlight the username instead, then use the right arrow key to move to highlight the Power icon.
- Using the Up and Down arrow keys, highlight Restart, and then press Enter. Restarting allows Windows to detect the mouse and reinstall the driver automatically.
- After the computer restarts test the cursor.
How to access the Windows Recovery Environment (WinRE)
- Starting with the computer off. Press the Power button on the computer and immediately start pressing the F12 key once a second to access the System Boot menu.
- Select SupportAssist OS Recovery to boot to SupportAssist OS Recovery.
- In SupportAssist OS Recovery, click the 3 dots
 at the upper right side of the OS Recovery Home screen and this provides a dropdown menu.
 - Select Windows recovery.
- The computer reboots into the Windows Recovery Environment (WinRE).
Additional Information
Fix USB Devices not Working in Windows 11
Duration: 06:14
When available, closed caption (subtitles) language settings can be chosen using the Settings or CC icon on this video player.
How to Connect Bluetooth Device to your PC in Windows 11
Duration: 02:09
When available, closed caption (subtitles) language settings can be chosen using the Settings or CC icon on this video player.
How to Run the Bluetooth Troubleshooter
Duration: 0:33
When available, closed caption (subtitles) language settings can be chosen using the Settings or CC icon on this video player.
Other Resources:
Mouse Setup Guide: Connect USB, Wireless, and Bluetooth Mouse (Dell Support Library)
Bluetooth Troubleshooting and Usage Guide
Guide for Pairing and Troubleshooting Dell Bluetooth Keyboards and Mouse
How to Download and Install Dell Drivers and Firmware
Factory Reset, Restore, or Reinstall Microsoft Windows on a Dell computer
Dell BIOS and UEFI Update Download and Installation Guide