How to Update the TPM Firmware When You Get the Error Message "The update image is not for this system"
概要: This article is a guide to a couple of different methods to complete a Trusted Protocol Module (TPM) firmware update on a Dell personal computer if you get the following error message - "The update image is not for this system." ...
この記事は次に適用されます:
この記事は次には適用されません:
この記事は、特定の製品に関連付けられていません。
すべての製品パージョンがこの記事に記載されているわけではありません。
手順
The following article takes you through a couple of different methods of installing a Trusted Protocol Module (TPM) firmware update when you get an error message stating "The update Image is not for this system."
Table of Contents:
- Updating the TPM gives the error message "The Update Image is not for this system"
- Steps to complete the update if you see this error
Updating the TPM gives the error message "The Update Image is not for this system"
When updating the TPM firmware, you may see the following error message.
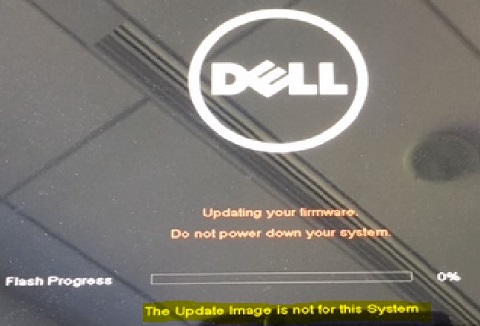
(Figure 1: Error Message "This Update Image is not for this System.")
Note: For an example of why you would must update the Firmware you can check out the following recent article:
Check out the following section for a couple of methods of resolving this error.
Steps to complete the update if you see this error
Note: Best Practice on seeing this error is to double check where you have sourced the TPM firmware update from, before following any of the steps below.
This error is due to the TPM Flash being denied access to read the TPM ROM. Ensure that you clear or force clear the TPM.
Note: Ensure that the BIOS is not password protected before continuing.
Method 1 - How to disable TPM Auto Provisioning in Windows
-
Boot to Windows
-
Launch the PowerShell Command window in Administrator mode
-
for windows 10 - open the Start Menu and type PowerShell
-
Search brings up the PowerShell desktop app, right click this and select "Run as Administrator"
-
-
At the Powershell command prompt, perform the command:
Disable-TpmAutoProvisioning
-
Confirm the following result: - AutoProvisioning: Disabled
-
Reboot the system, enter the BIOS Setup by rapidly pressing the F2 key at the Dell Splash screen.
-
Navigate to Security > TPM 1.2/2.0 Security
-
Click the Clear checkbox and select Yes at the prompt to clear the TPM settings. (You can skip it if the item is unavailable)
-
Click Exit to save changes
-
Reboot your system into Windows
-
Confirm that the TPM is not owned. This stops the TPM from being automatically provisioned by Windows
-
When the TPM update is finished, launch the PowerShell command in Administrator mode to re-enable the auto provisioning
-
At the Powershell command prompt, perform the command:
Enable-TpmAutoProvisioning
-
Confirm the following result: - AutoProvisioning: Enabled
Method 2 - Running the Update directly from the Boot Menu
Note: You can run the BIOS update utility from the DOS environment if the BIOS is in UEFI Boot Mode (This is useful for those Non-Windows users)
-
Locate the TPM firmware file for your system on the Dell Support site and download it
-
Copy the TPM firmware file to bootable DOS media (Most often a USB flash drive)
-
Power on the system, then go to the BIOS Setup by rapidly pressing the F2 key and navigate to General > Boot Sequence > Boot List Option
-
Change UEFI to Legacy in the Boot List Option section
-
Click Apply, then Exit to save your changes and reboot the system
-
Press rapidly at the F12 key when the Dell Splash screen appears during startup, and then select your DOS bootable media option (that is USB Storage Device) from the onscreen menu and boot the system to a DOS prompt
-
Run the TPM firmware update file by typing the firmware file name, in the folder where the executable is located on your DOS bootable media
-
When the TPM firmware update is finished, the system reboots in order for the update to take effect
-
Go into the BIOS Setup again by rapidly pressing the F2 key during the system startup and navigate to General > Boot Sequence > Boot List Option
-
Change Legacy back to UEFI in the Boot List Option section
-
Click Apply, then Exit to save your change and reboot system into your operating system
If at this point you are still unable to update your TPM or you cannot remove the BIOS password, then you should contact Technical Support for further help.
対象製品
Alienware, Dell All-in-One, Dell Pro All-in-One, Dell Pro Max Micro, Dell Pro Max Slim, Dell Pro Max Tower, Dell Pro Micro, Dell Pro Slim, Dell Pro Tower, Dell Slim, Dell Tower, Inspiron, OptiPlex, Vostro, XPS, G Series, G Series, Alienware
, Dell Plus, Dell Pro, Dell Pro Max, Dell Pro Plus, Dell Pro Premium, Inspiron, Latitude, Dell Pro Rugged, Vostro, XPS, Fixed Workstations, Mobile Workstations, Dell Pro Max Micro XE FCM2250, Dell Pro Max Slim XE FCS1250, Dell Pro Max Tower T2 XE FCT2250, Dell Pro Micro Plus XE QBM1250, Dell Pro Slim Plus XE5 QBS1250, Dell Pro Tower Plus XE5 QBT1250
...
文書のプロパティ
文書番号: 000138425
文書の種類: How To
最終更新: 09 5月 2025
バージョン: 6
質問に対する他のDellユーザーからの回答を見つける
サポート サービス
お使いのデバイスがサポート サービスの対象かどうかを確認してください。