How to Set up Dual Monitors or Multiple Monitors in Windows
Summary: Learn how to set up dual or multiple monitors in Windows, adjust dual screen settings, and configure up dual or multiple monitors for better productivity, in Windows 11 and Windows 10.
This article applies to
This article does not apply to
This article is not tied to any specific product.
Not all product versions are identified in this article.
Instructions
When you connect dual or multiple monitors to your Dell computer, Windows automatically detects the monitor and displays your computer desktop screen. You can then choose how you want your desktop screen to appear and customize the display settings such as display style, screen resolution, color depth, and more in Windows 11 and Windows 10.
Are you trying one of the following multiple monitor setups? Find information to learn how to set up multiple monitors with your laptop or desktop computer.
- Dual monitors, dual screen, or two monitor setup
- Triple monitors or three monitor setup
- Quad monitors or four monitor setup
NOTE: To learn how to setup a Dell monitor, see the documentation of the monitor for step-by-step instructions. For non-Dell monitors, see the documentation of the monitor available on the device manufacturers website.
Learn How to Connect a Monitor to a Dell Computer.
Here is A Guide to External Ports and Connectors on a Dell Computer.
Most desktop computers have video ports to connect to at least two external monitors. Most laptops have at least one video port, and some laptops may have a second video port.
NOTE:
- Before you begin, see the documentation of your computer and your monitor to determine what video connections they have in common, such as VGA, HDMI, Mini DisplayPort or DisplayPort (DP) (Figure 1), and whether your monitor supports DisplayPort Multi-Stream Transport (MST).
- Knowing if your monitors support MST tells you if the monitor supports daisy chain using DisplayPort cables or if you must use two different kinds of video cables.
- When you know what connections they have in common and whether your monitor supports DisplayPort Multi-Stream Transport (MST), you must acquire the needed cables to be able to connect the monitors to the computer.
- Find Manuals and Documentation for your Dell Product.

Figure 1: Video Ports
| Numbers reference the image above | |
 |
VGA Connector |
 |
HDMI Connector |
 |
Mini DisplayPort Connector |
 |
DisplayPort Connector |
- For optimum performance, it is recommended that you install the latest drivers on your computer.
NOTE: SupportAssist helps download the latest drivers for your Dell computer. To learn more, go to the SupportAssist page.
- Ensure that your computer has the latest updates for Windows. Go to the Windows Update
website to be sure that your computer is fully updated.
- Depending on your monitors and their features, you have two options, as outlined previously.
- When your monitor supports DisplayPort Multi-Stream Transport (MST), perform the following steps.
- Using the correct cable to connect to your computer to the DisplayPort In to the first monitor (Figures 2 and 3).
- Using another cable, connect the DisplayPort Out connection on the first monitor to the DisplayPort In connection on the second monitor (Figures 2 and 3).
NOTE: To daisy chain more than two monitors, follow a similar sequence: The first monitor connects to the second, the second monitor connects to the third, and so on.
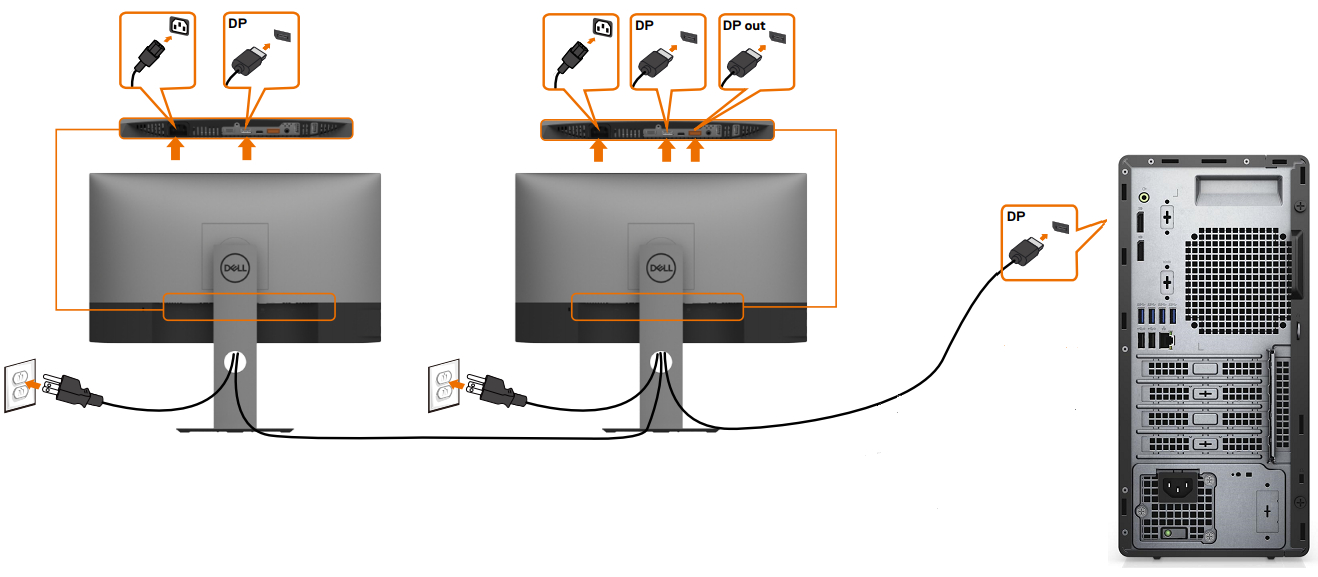
Figure 2: Connecting Multiple Monitors Using DisplayPort Video Cables to a Desktop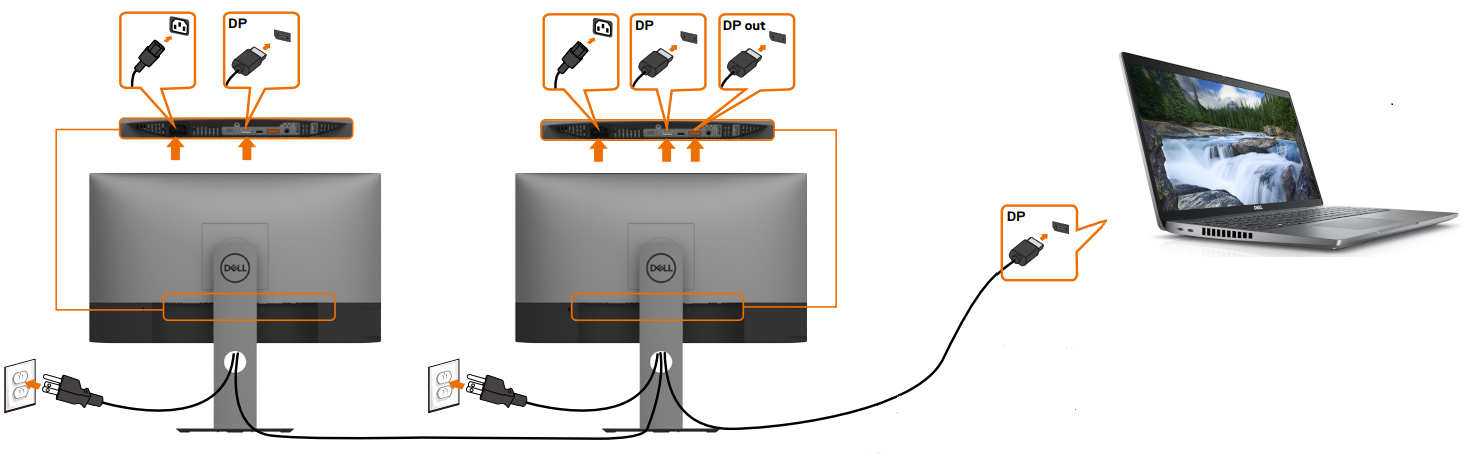
Figure 3: Connecting Multiple Monitors Using DisplayPort Video Cables to a Laptop - Using the On-Screen Display (OSD) menu on your monitor, set the MST to On (Figure 4).

Figure 4: On-Screen Display (OSD) Example (English Only)NOTE: To learn more, see the documentation of the Dell monitor. - Ensure that the last monitor in the chain has MST set to Off.
- When your monitor does not support DisplayPort Multi-Stream Transport (MST), perform the following steps:
- Connect a video cable from your computer to the first monitor (Figures 5 and 6).
- Connect a video cable from your computer to the second monitor (Figures 5 and 6).
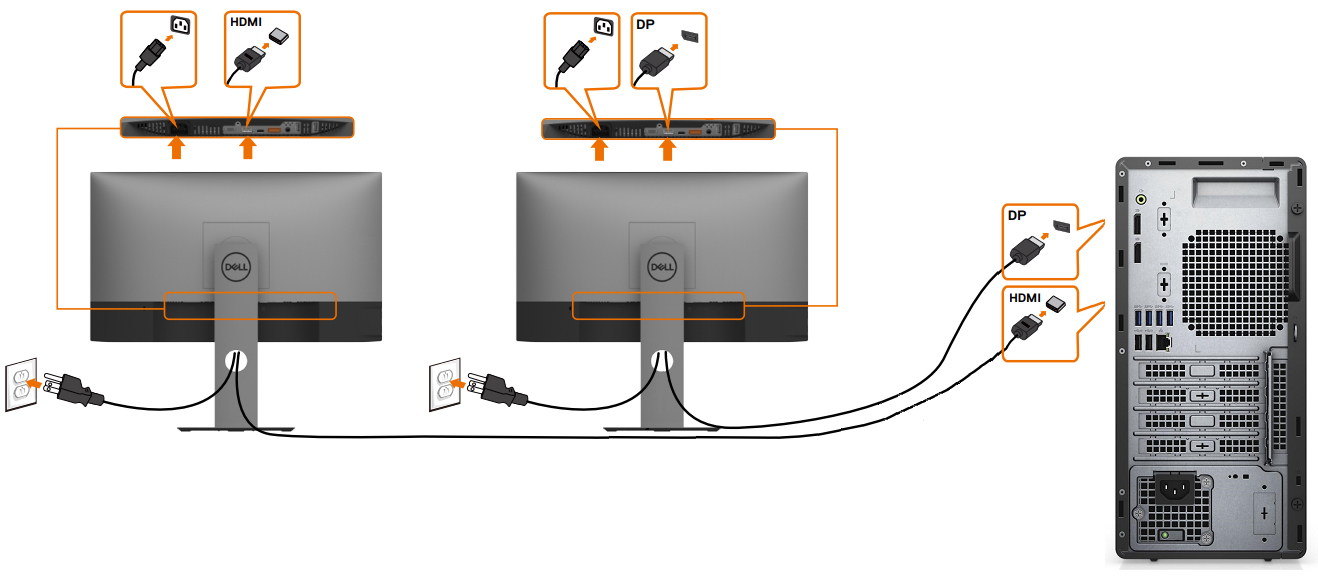
Figure 5: Connecting Multiple Monitors Using Different Kinds of Video Cables to a Desktop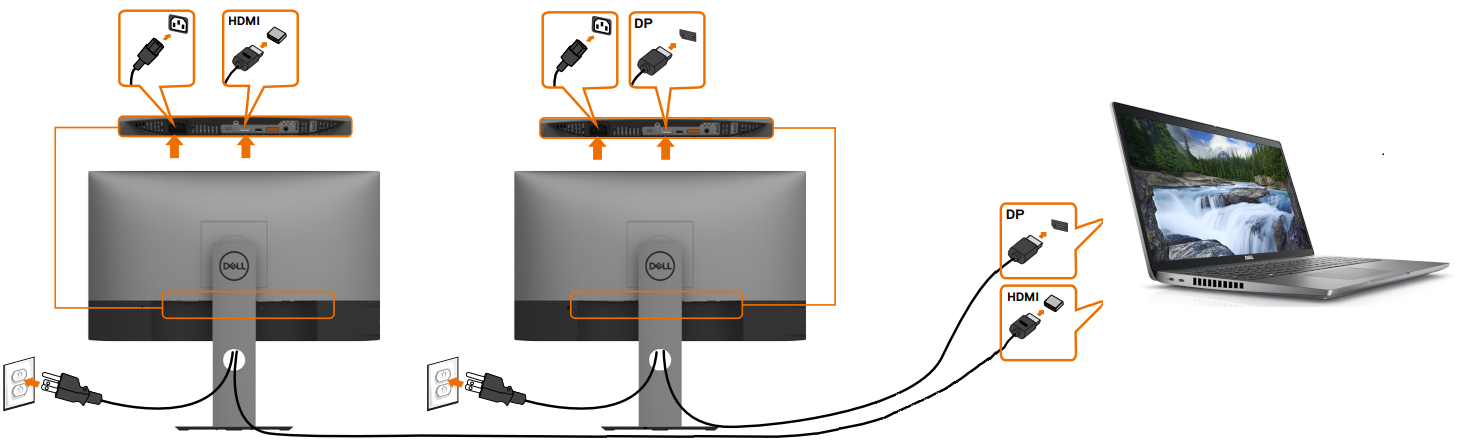
Figure 6: Connecting Multiple Monitors Using Different Kinds of Video Cables to a LaptopNOTE: Figures 5 and 6 are an example of how the video cables should be arranged, ensure to match the type of connections from the computer to the monitors. - Repeat step 2 for additional monitors if your computer supports additional displays.
- When your monitor supports DisplayPort Multi-Stream Transport (MST), perform the following steps.
After connecting the monitors, you can adjust the settings for each monitor.
Arrange your displays
If you have multiple displays, you can rearrange them. This is useful if you want your displays to look the same as they do in your home or office. Select and drag the display to the wanted location in Display settings. When you are satisfied with the layout, click Apply. Move your mouse pointer across the different displays to ensure that your new layout works as expected.
You are shown this option when Windows detects more than one display. Each display is numbered to help you identify them more easily.
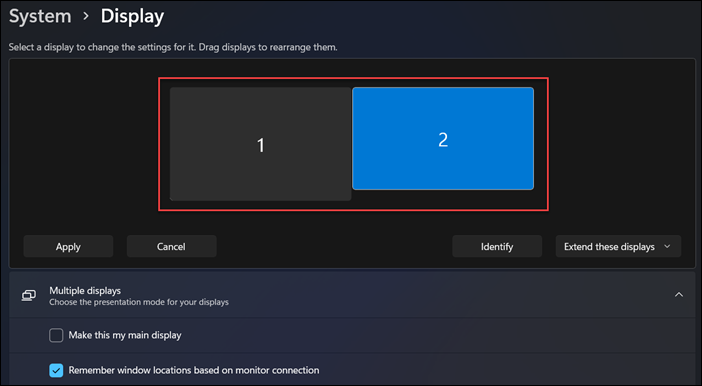
Figure 7: Arrange the monitors in the Display settings window.
Select the primary display
In a multiple display setup, one display or monitor must be set as the primary display. The primary display shows the taskbar and other main desktop components such as time, system tray icons, and more. To set the primary and secondary displays, follow these steps:
- Press the shortcut keys Windows logo + R keys to launch the Run dialog box.
- In the Run dialog box, type
desk.cpland press Enter. - In the Display settings panel, select the display you want to use as the primary display.
- Under the Multiple Displays section, click to select the
Make this my main display
. - Click
Keep changes
when the pop-up dialog box appears.
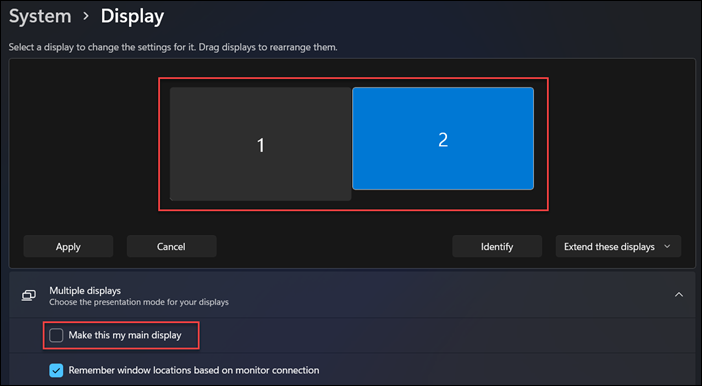
Figure 8: Setting the main display using the Display settings app in Windows 11.
Change display options
After connecting your external monitors, you can change settings such as resolution, screen layout, and more.
To see the available settings in Windows 11 or Windows 10, go to the Settings app, select System, and then choose Display.
Change orientation
Windows recommends an orientation for your screen. To change it in Windows 11 or Windows 10, in the Display settings, under Scale & layout, select your preferred Display orientation.
NOTE: If you change the orientation of a monitor, you must physically rotate the screen. For example, you would rotate your external display to use it in portrait instead of landscape.
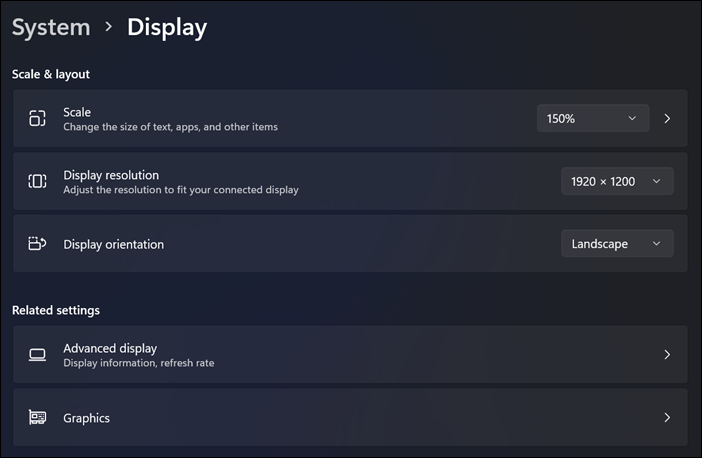
Figure 9: Scale, display resolution, and display orientation settings under the display settings in Windows 11.
Choose a display option or display style
Once the cables are connected securely, your computer should automatically detect and display the desktop screen on the connected monitors. You can now select the display style that best suits your needs. Windows provides multiple display style options on how the desktop screen is displayed across multiple monitors that are connected to your computer.
NOTE: To change what shows on your displays, press Windows logo key + P. Here is what you can choose.
| If you want to | Select |
|---|---|
| See things on one display only. | Personal computer screen only |
| See the same thing on all your displays. | Duplicate |
| See your desktop across multiple screens. When you have the displays extended, you can move items between the two screens. | Extend |
| See everything on the second display only. | Second screen only |
NOTE: When you connect an external monitor to a Dell laptop, the default display style is set to Duplicate. When you connect a second or third monitor to a Dell desktop, the default display style is set to Extend.
Need help with changing the screen resolution, adjust the refresh rate, and change the size of fonts and icons?
A docking station or port replicator provides a simplified way of connecting multiple devices like keyboard, mouse, printer, external hard drives and one or more external monitors to a laptop personal computer which usually have limited connectivity ports.
Most docking stations or port replicators have video ports to connect two or more monitors, and this is similar to connecting your computer to your monitor. You must have the correct video cables. A docking station or port replicator when connected to a laptop allows you to switch off the laptop LCD and use the external monitors instead.
NOTE:
- Before you begin, see the documentation of your Dell docking station and your monitors to determine what video connections they have in common, such as VGA, HDMI, Mini DisplayPort or DisplayPort (DP) (Figure 10), and whether your monitor supports DisplayPort Multi-Stream Transport (MST).
- Knowing if your monitors support MST tells you if the monitor supports daisy chain using DisplayPort cables or if you must use two different kinds of video cables.
- When you know what connections they have in common and whether your monitor supports DisplayPort Multi-Stream Transport (MST), you must acquire the needed cables to be able to connect the dock to the monitors.
- See our Guide to Dell Docking Stations
- Find Manuals and Documentation for your Dell Product

Figure 10: Video Ports
| Numbers reference the image above | |
 |
VGA Connector |
 |
HDMI Connector |
 |
Mini DisplayPort Connector |
 |
DisplayPort Connector |
- For optimum performance, it is recommended that you install the latest drivers on your computer.
NOTE: SupportAssist helps download the latest drivers for your Dell computer. To learn more, go to the SupportAssist page.
- Ensure that your computer has the latest updates for Windows. Go to the Windows Update
- Depending on your monitors and their features, you have two options, as outlined previously.
- When your monitor supports DisplayPort Multi-Stream Transport (MST), perform the following steps.
- Using the correct cable to connect to your dock to the DisplayPort In to the first monitor (Figure 11).
- Using another cable, connect the DisplayPort Out connection on the first monitor to the DisplayPort In connection on the second monitor (Figure 11).
NOTE: To daisy chain more than two monitors, follow a similar sequence: The first monitor connects to the second, the second monitor connects to the third, and so on.
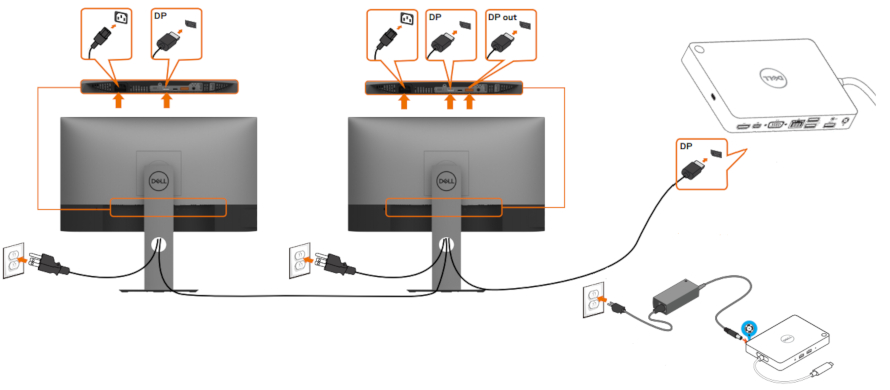
Figure 11: Connecting Monitors Using DisplayPort Video Cables - Using the On-Screen Display (OSD) menu on your monitor, set the MST to On. (Figure 12.)

Figure 12: On-Screen Display (OSD) Example (English Only)NOTE: To learn more, see the documentation of the Dell monitor. - Ensure that the last monitor in the chain has MST set to Off.
- If your monitor does not support DisplayPort Multi-Stream Transport (MST), perform the following steps:
- Connect a video cable from your dock to the first monitor that has corresponding connections (Figure 13).
- Connect a video cable from your dock to the second monitor that has corresponding connections (Figure 13).
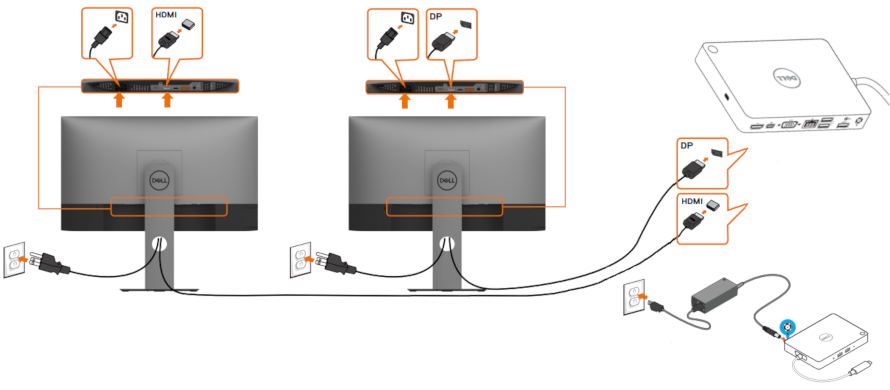
Figure 13: Connecting Monitors Using Different Kinds of Video CablesNOTE: Figure 13 is an example of how the video cables should be arranged ensure to match the type of connections from the dock to the monitors.
- When your monitor supports DisplayPort Multi-Stream Transport (MST), perform the following steps.
Dell wireless monitors enable your Windows laptop, Android smartphone, or tablet with Miracast capability to display the screen image to the monitor using a Wi-Fi Direct interface. When you connect the laptop, smartphone, or tablet to the Dell wireless monitor, you can access the mouse and keyboard that are connected to the Monitor and control the devices.
You can either extend or duplicate your Windows desktop wirelessly to one of these monitors and connect your Android 5.0 (and above) tablet or smartphone over Wi-Fi simultaneously through Dual Cast.
See our Guide to Dell Wireless Monitors.
The latest TVs and computers provide a wide variety of video connectivity options. Ensure that the video port on your computer matches an available video port on your TV, like VGA, DVI or HDMI.
Connecting your Dell computer with a TV
- Connect the TV to the computer using a compatible cable.
- Power on the TV.
- Change the video input source on the TV to match the video source connection from the personal computer (HDMI, VGA (may also be mentioned as personal computer), DVI so forth)
- Power on the computer.
If you encounter a problem when trying to connect your computer with a TV:
- Power on the TV before turning on the computer.
- Ensure that the correct video input source is selected on the TV.
- Coaxial or S-video cable connections do not support higher resolution, ensure to set the resolution to 800 x 600 or less.
- Certain TVs may require you to adjust the screen aspect ratio for the best possible scaling and resolution.
- Certain TVs may require you to set the TV as the primary display. Change the video settings in Windows and restart the computer.
Windows 11 and Windows 10 support dual or multiple monitor setups. If you encounter problems with your multiple monitor setup, such as a blank or black screen, no signal to monitor, resolution issues, learn How to Troubleshoot Multiple Monitor Problems on a Dell Computer.
If your Dell computer has encountered a display or video problem with multiple monitors after upgrading to Windows 11 or Windows 10:
- Uninstall the video driver.
- Update the BIOS of the computer.
- Download and install the latest video or graphics driver.
- Reboot the computer.
NOTE:
- Learn How to Download and Install Dell Drivers.
- To learn more about updating the BIOS on a Dell computer, see our Guide to Dell BIOS.
See these Dell Knowledge Base articles for related information:
- How to Troubleshoot Multiple Monitor Issues
- How to Troubleshoot Display or Video Issues on a Dell Monitor
- How to configure multiple displays on a Dell PC using the Ubuntu operating system
- Video Cables and their Capabilities
- A Guide to the External Ports and Connectors on a Dell Computer
- How to Daisy Chain Multiple Monitors Using DisplayPort Multi-Stream Transport (MST)
Additional Information
How to connect two monitors to a computer
Duration: 01:37
When available, closed caption (subtitles) language settings can be chosen using the Settings or CC icon on this video player.
Affected Products
Alienware, Dell All-in-One, Dell Pro All-in-One, Dell Pro Max Micro, Dell Pro Max Slim, Dell Pro Max Tower, Dell Pro Micro, Dell Pro Slim, Dell Pro Tower, Dell Slim, Dell Tower, Inspiron, Legacy Desktop Models, OptiPlex, Vostro, XPS, G Series
, Alienware and Dell Gaming Monitors, C Series, D Series, E Series, Legacy Monitors, P Series, S Series, SE Series, UltraSharp Premier (UP) Series, UltraSharp (U) Series, Dell Monitors, Dell Plus Monitors, Dell Pro Monitors, Dell Pro Plus Monitors, G Series, Alienware, Dell Laptops, Dell Plus, Dell Pro, Dell Pro Max, Dell Pro Plus, Dell Pro Premium, Inspiron, Latitude, Dell Pro Rugged, Vostro, XPS, Legacy Laptop Models, Fixed Workstations, Mobile Workstations, Dell Pro Max Micro XE FCM2250, Dell Pro Max Slim XE FCS1250, Dell Pro Max Tower T2 XE FCT2250, Dell Pro Max 16 XE MC16250, Dell Pro Micro Plus XE QBM1250, Dell Pro Slim Plus XE5 QBS1250, Dell Pro Tower Plus XE5 QBT1250, Dell 24 Plus Monitor S2425HSM, Dell 27 Plus QHD Monitor S2725DSM
...
Article Properties
Article Number: 000134286
Article Type: How To
Last Modified: 29 Apr 2026
Version: 28
Find answers to your questions from other Dell users
Support Services
Check if your device is covered by Support Services.